Friday, February 27, 2015

Spring Coffee Lovers Blog Hop


Hello!  Today I am joining in on the Spring Coffee Lovers blog hop!  I love a good coffee...well not a BLACK coffee.  My coffee of choice is a White Peppermint Mocha and that is what I drink year round, either hot or cold!  Yum!!  So in honor of my favorite hot drink, I created this card keeping in theme with spring.

Jen Carter Spring Coffee 1

My background was created with the beautiful Quilted Stitched Pattern die from Lil' Inker Designs.  Oh how I LOVE that die!  I thought that the swirls were perfect for the coffee theme. The sentiment is from Lil' Inker too and is from the Coffee Cozy stamp set.  The coffee cups & the puff of heart steam are from PTI's Warm Happiness & Warm Happiness Too sets.  I embossed the heart with Zing Gold Glitter Embossing Powder (very cool stuff) onto PTI's Sheer Basic Vellum
If you'd like to play along or if you'd like to see the other cards that were made for this blog hop, visit the Coffee Lovers Cardmakers blog!

I'm also entering this card in the Anything Goes challenges at Simon Says Stamp Monday & The Pink Elephant.

Thank you so much for stopping by!  Have a great day!

Wednesday, February 25, 2015

Lucky Shamrocks


Remember that really colorful shamrock & rainbow card I shared last week here?  Well for today's card I wanted to use one of the stickers I had left over after weeding out all of the shamrocks form the die cut panel.

Jen Carter Frantic Stamper Ampersand Shamrock

This card was another simple card to put together.  I chose a piece of patterned paper for my background to start (from We R Memory Keepers Love Notes collection).  Then, I cut the largest ampersand from the Punctuation die set from Frantic Stamper with white cardstock.  I love the size of this ampersand!

Jen Carter Frantic Stamper Ampersand Shamrock Closeup

I used a shamrock, left over after die cutting the Shamrock Card Panel, as an accent on my ampersand. I like the pop of color that the green, glittery shamrock adds...with just a touch of luck!

I am entering this card in the Pink Elephant Anything Goes challenge TPE287.

I'm also entering this in the Simon Says Stamp Monday Challenge, Anything Goes.


Thank you for visiting!

Monday, February 23, 2015

Hello!


Hello!  I hope you had a nice weekend!  They go so fast don't they? :)

Jen Carter Whimsy Say What Hello

I really like how today's card turned out and it was super simple to put together!  I used only one die on this card and it is from Clearly Whimsy's Say What? die collection.  There is a little "hello" die that is included with the dies and it made putting together this card really easy.  

Jen Carter Whimsy Say What Hello Closeup

To make sure all of the dies lined up exactly the same, I used a piece of post it note tape (I LOVE this stuff!!) and lined it up with the edge of the card.  After I applied it to the entire left hand side of the card front, I lined the hello die up using the tape as my guide for placement.  I started by cutting the center "hello" and then cut two above it and two below it and then removed the tape.  Then, I just popped the entire card front up with dimensionals on top of patterned paper, added some enamel dots and that was it!


Here's the Say What? die set that includes the hello, to give you an idea what it looks like!

Thanks for stopping by!  Hope you enjoyed the card!  

Patterned Paper: Fancy Pants Burlap & Bouquets
Enamel Dots: My Mind's Eye Lost & Found 3

Saturday, February 21, 2015

ShowCASe Your Style Challenge #9

Hello!  Welcome to ShowCASe Your Style Challenge #9!  Today we have a fun theme that I hope many of you will play along with: Birthday!

Jen Carter Whimsy Birthday Balloon Up Up Away

I have been so inspired by a lot of rainbow cards I've seen recently!  I LOVE color and so for this card I wanted to create a rainbow myself!  I thought that the rainbow coming out of the sentiment looked kind of like a spotlight announcing a big event.  I started by stamping the sweet sentiment from the Birthday Balloon stamp set.  I colored the "awesome" in with gel pens.  

Jen Carter Whimsy Birthday Balloon Up Up Away closeup

I did do a little stamp surgery to put this card together.  I took the rays from the Up, Up & Away stamp set and trimmed one of them carefully away from the other two.  I still have 2 rays that I can stamp together and 1 ray that I can stamp separately!  I love lots of options!  I stamped each ray in a different color and then added coordinating sequins to really brighten things up & make it festive!


I hope you'll play along with us!  We would love to see your creations using stamps from the Clearly Whimsy line, but all products are welcome to be used and no one is disqualified from winning!  The challenge is open for 2 weeks.  You can link up your cards and see the other Design Team samples by clicking here.  There are prizes up for grabs too, so be sure to check that out as well!


Thanks for coming by!  Have a great day!  

*This card has a similar design as Kristie's card here.  Be sure to check out how she used these Whimsy stamps as well!*

Supplies Not Listed Above:
Inks: Avery Elle Raspberry, Mimosa, Aquamarine & Sugar Plum; Fresh Ink Red Currant; Amuse Lime & Grape
Dies: Lil' Inker Designs Stitched Mats: Rectangles & Side Stitched Rectangles

Thursday, February 19, 2015

Be the Rainbow In Someone Else's Cloud

This week my blog posts are all about rainbows!  

Be the Rainbow WM

For today's rainbow card, I started by creating my card base with the beautiful Lil' Inker Designs Quilted Stitched Pattern die.  LOVE this die!!  If you don't have this in your collection, you might want to seriously ask yourself why?!  It adds the perfect touch to a card base and is so fun & unique!

Be the Rainbow Closeup

I used a little pre-printed card from Pink Paislee for the sentiment and then dressed it up with the fantastic clouds from the Cut it Out Clouds & Accessories die set!  I die cut several layers of the clouds and then adhered them all together to give them some dimension.  There's no stamping on this card, can you believe it?


I hope you have a wonderful day today!!  

Tuesday, February 17, 2015

Good Luck

Today I have a bright card to share!  St. Patrick's day is coming up (March 17th) and in honor of that holiday, I've put together a cheery card.

Jen Carter Frantic Stamper Good Luck Shamrock 1.1

I knew when I pulled out this Shamrock Card Panel die that I wanted to incorporate a rainbow into the card along with it. It just seemed appropriate! To create the rainbow background I used a piece of watercolor paper and then painted the watercolors onto my background with my water brush.    

Jen Carter Frantic Stamper Good Luck Shamrock Closeup

I die cut the Shamrock Card Panel from a piece of glittered fun foam with an adhesive back.  I found this at Walmart.  It was the perfect way to use this die because it not only gave me some dimension but it was also easy to apply the delicate cuts to my card front!  I used one of the negative shamrock pieces to adhere to my vellum tag.

Jen Carter Frantic Stamper Good Luck Shamrock Stickers

Tip:  As I was peeling off the negative pieces from the die cut panel, I saved the whole shamrocks.  Since they had adhesive on the back side, I put them on a piece of acetate to save for a later project.  Instant sticker sheet!! I have a feeling that my 6 year old daughter is going to get a hold of this before I have a chance to use them! :)  This is such a BONUS to this die!

I hope you enjoyed this rainbow bright card! :)  Thanks for stopping by!


Sentiment: Lawn Fawn Sophie's Sentiments

Friday, February 13, 2015

(Don't) Let it Snow!

So earlier this week I posted a Spring card and now I'm going to post a winter card!  Much like the roller coaster of Kansas temperatures we've had over the last few weeks, my blog posts are the same way!  LOL!   Well like it or not, we have several weeks or months left of winter.  I guess if I'm really honest, I wouldn't mind a few snow days to have a day off from school! :)  But then it needs to melt right away.  Conditions, conditions, I know! 

Jen Carter Whimsy Sparkle & Shine 1.1

For this card I pulled out the Clearly Whimsy Sparkle & Shine stamps.  I embossed the snowflakes with pink embossing powder.  I then took out the Scandi Christmas set and stamped the little "snowflakes" with VersaMark ink.

Jen Carter Whimsy Sparkle & Shine Closeup

It is really hard to see on the photos, but if you look closely, you'll see a "swoosh" above each of the large snowflakes.  I stamped those with VersaMark ink from the Smarty Pants stamp set.  The sentiment is from the Sparkle & Shine stamp set.  I added a few cream sequins to finish the card off.

Thanks for visiting!  Have a wonderful weekend!

Thursday, February 12, 2015

Sending Hugs!

Hey everyone! I'm stopping in with an entry for PTI's 8th Anniversary Challenge to use a stamp set that hasn't seen ink yet.

Jen Carter PTI Hugs

I love this Big Hugs stamp set from Papertrey Ink!  This card would be perfect to send as an encouragement card or even as a sympathy card.  I started by die cutting the "Hugs" from Pink Paislee's Bella Rouge patterned paper.  I love this patterned paper pack!

Jen Carter PTI Hugs Closeup

I then stamped the sentiment around the die cut.

Super, super simple!  

Thanks for stopping by today!

Wednesday, February 11, 2015

Monthly Meet Up With Lil' Inker Designs

Hello!  Welcome to a new challenge feature from Lil' Inker Designs called Monthly Meet Up!  All of the details on this new challenge are below!  If you participate, just by designing something (ANYTHING) using Lil' Inker Designs, you could have the chance to win up to $75 worth of Lil' Inker Designs store credits!!  Wow!!

For my card today,  I wanted to create something that could be used for Valentine's Day since we are getting so close to that day of love!

Jen Carter LID Be Mine Lips 1.1

I started by cutting the black cardstock with the fabulous Stitched Mats: Side Stitched Rectangles.  I LOVE these for layering images!  Then I stamped my pink lips from the Smooches stamp set in Versamark ink and embossed with a pink sparkly embossing powder.

Jen Carter LID Be Mine Lips Closeup

For the sentiment, also from Smooches, since I wanted this to look like a chalkboard, I first stamped it in Versamark and embossed it in white with a little pink embossing powder also sprinkled on top before I heated it.  Then, I stamped it a second time in white for the shadow effect.  I punched a tiny hole in the black cardstock that I threaded my twine through and then tied it in a bow.


So, how can YOU pay along?
Make a new project or share something you've been working on featuring LID goodies & post this project to your blog or favorite gallery. Link your project to our challenge by using the InLinkz tool on the monthly post on the Lil' Inker Designs blog.
You have through February 24th at 11:30 PM EST to link your project to be eligible to win a prize. Projects should exclusively feature LID goodies to be eligible to win but do not need to exclusively feature LID goodies to join our Meet Up.

What can you win?

Since this is our first challenge we'd like to stir things up by offering a super big prize and the prize will get bigger depending on how many entries we receive. Multiple entries are allowed as long as your projects are featured in separate posts.
Up to 25 entries: $25 store credit to one winner plus 1 stamp set winner
26-50 entries: $50 store credit to one winner plus 2 stamp set winners
51 and more: $75 credit to one winner plus 3 stamp set winners

I hope you'll play along!

Monday, February 9, 2015

Spring anyone?


I have a fun card to share today!  Frantic Stamper has come out with some great new dies that you can use to make pop-up cards with and as soon as I got them I went to work making a card!  It looks a little simple on the outside, but wait until you see what happens when I open it up!  Since I am SO ready for Spring, I went a little pastel & floral with this one!

Jen Carter Thanks Lilac Pop Up Frantic Stamper

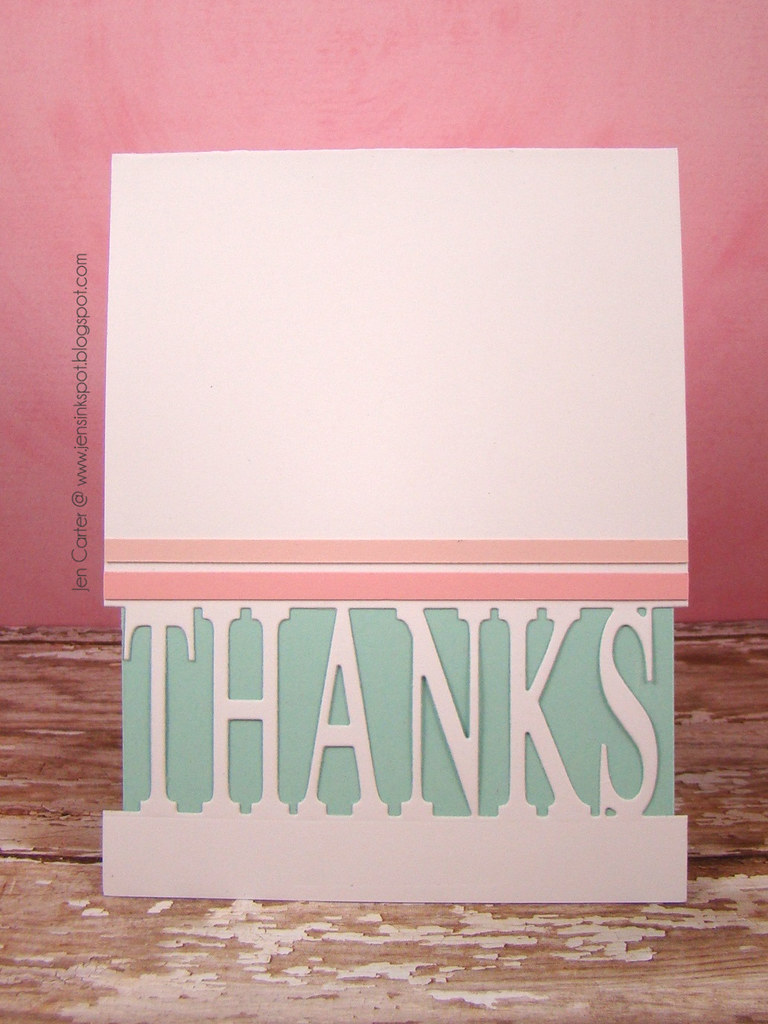
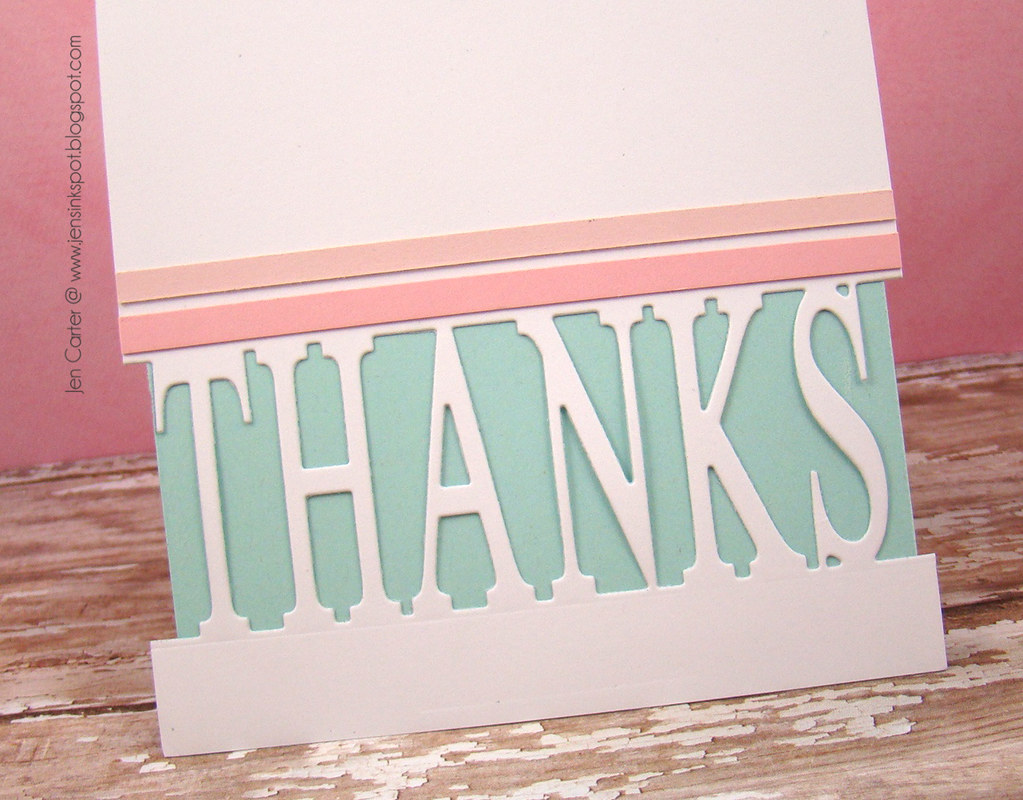
First things first...the outside.  I love this new die also from Frantic Stamper called Thanks Card Band.  When I first saw this die a few months ago I knew I really wanted it in my collection!  It makes such a quick & easy card front and will get a lot of use!

Jen Carter Thanks Lilac Pop Up Frantic Stamper Closeup

The die cuts directly into your card front.  I added some pink cardstock stripes for visual interest. 

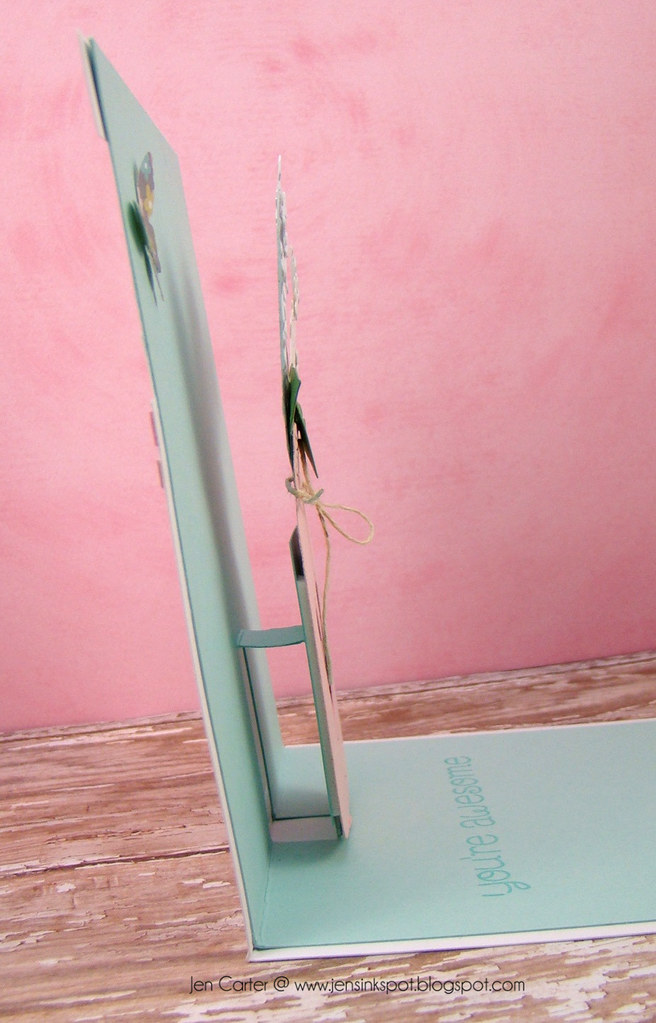
Now, when you open the card up, this is what you find: 

Jen Carter Thanks Lilac Pop Up Frantic Stamper Inside

A cute little mason jar with white lilacs popping out! 

 I'm going to make a video soon to show exactly how these dies work and how I put a similar card together, but I think you'll want to add these dies to your collection!  

Pop Up Bases
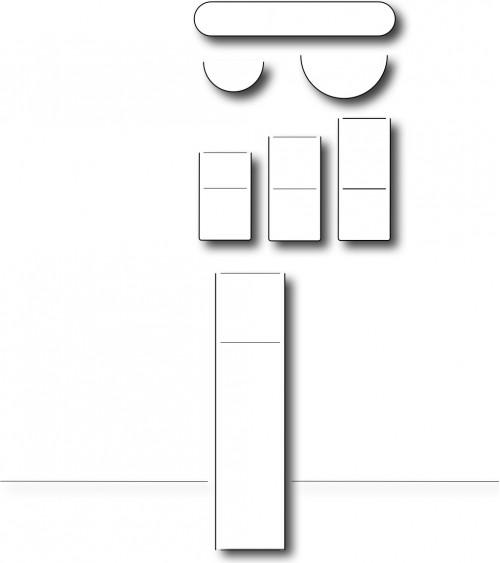
This is what the die set looks like.  You can see that there are a lot of options for using them.  The rectangle ones are what I've used for this pop up card. 

Jen Carter Thanks Lilac Pop Up Frantic Stamper SIDE2

Here's what the card looks like from the side.  I used the largest rectangle die for this card.  The die basically cuts away part of the cardstock so that you can attach whatever you'd like on it to pop out. It also scores lines for your fold and for the folds in the cardstock for your popped out pieces.  For my card I attached the mason jar with lilacs.

Jen Carter Thanks Lilac Pop Up Frantic Stamper Inside Closeup

In the video that I'll be sharing soon, I'll show you how to recreate this mason jar and how to attach the flowers.  In this jar I've placed 2 colors of white lilacs from the new Mix N Match Lilacs die set along with the lilac leaves.  I really love the details that the dies give!  And, I like that there are "extra" flowers to place on the lilacs to give them lots of dimension!  You can also see the Mix N Match Floral Stems through the center heart of the jar.  These stems are so cool in that you purchase them separately and then can mix and match lots of different flowers to them!  I bet they'd even work with some flower dies you already own!

The jar in my card was inspired by a picture I found on Pinterest.
Source

Milk Bottle & Mason Jar

Mix N Match: Lilacs

Mix N Match: Floral Stems

Thanks Card Band

Country Heart Set

Petite Butterflies

Thank you so much for visiting!  I hope you enjoyed this Spring card!

Saturday, February 7, 2015

Hey Hot Stuff!


Hello!  Welcome to another edition of the ShowCASe Your Style Challenge!  Today we are working with a sketch that I just happened to sketch.  Yep, first time doing that!  I hope you'll choose to play along!

Jen Carter Whimsy SCYS9 Get Well Soon Closeup


Our challenge blog is in association with Clearly Whimsy Stamps and is sponsored by Whimsy Stamps, who are generously offering a $10 gift certificate to the randomly-selected winner of each challenge. (If the winning entry uses Clearly Whimsy Stamps products, the gift certificate will be increased to $15).

Jen Carter Whimsy SCYS9 Get Well Soon

For my card today, I used a new stamp set called Get Well Soon & also the coordinating dies, Get Well die set.  I chose four colors of ink for the thermometer and then in the last one added a coordinating enamel dot.  The sentiment is also from the Get Well Soon stamp set. I like that the sentiments in this set make it versatile for more than just get well cards!

To create the border at the bottom of the card, I used one of the dies from the Stitched Border Die trio set.  I punched a hole under the "hot" sentiment and then tied my ribbon through that.  I like that there is a small little extra there that didn't need to continue down the whole card front.

I hope you'll play along with our challenge!! I love seeing your entries every week!  You have 2 weeks to enter the challenge and you can link up your cards here.

Thanks for stopping by!  Have a day full of blessings!
Related Posts Plugin for WordPress, Blogger...