Thursday, May 31, 2018

Dressing Up Alphabet Dies + Video

Recently I shared a video post about using alphabet dies to create stencils or card panels.  I have another video to share today also using alphabet dies but this time it's all about blinging up those alphabet dies.  It was so fun and made for three very sparkly cards!


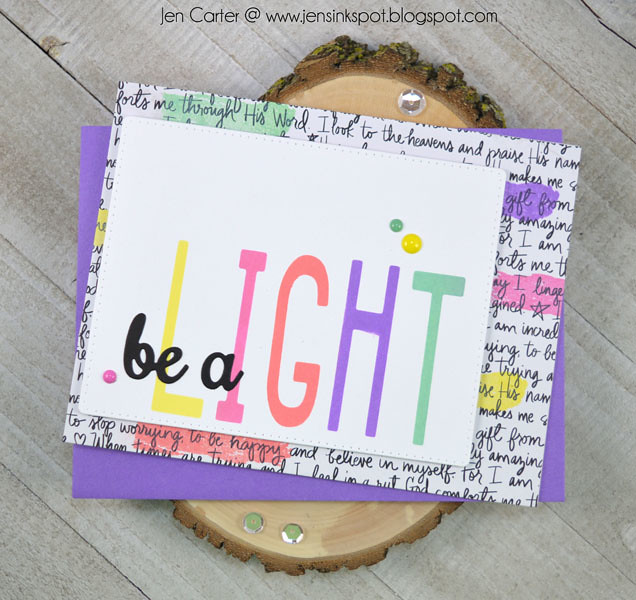
Happy Birthday Bling

Jen Carter FS Blinged Up Happy Birthday 2

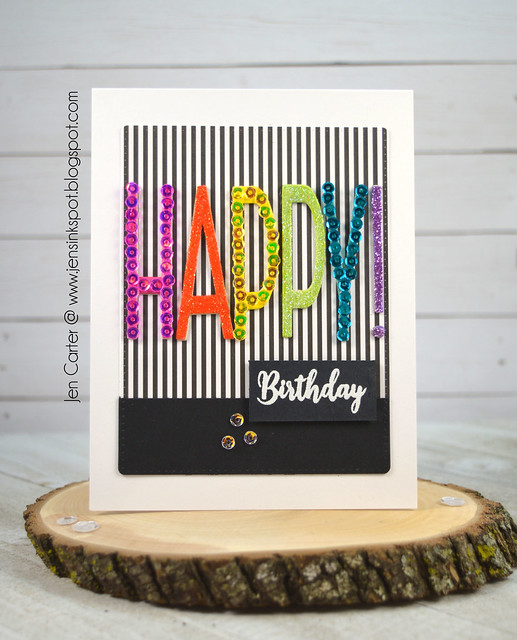
This is the card I showed in the video. The letter & number (symbol) dies are called Brooklyn Alphabet & Brooklyn Numbers. I used sequins, glitter and embossing powder to bling this card up.  I love how fun and festive it looks and the black & white paper helps it to pop even more!  I used a combination of Scor-tape and glue to adhere the various embellishments to each letter.

Jen Carter FS Blinged Up Happy Birthday Closeup 1

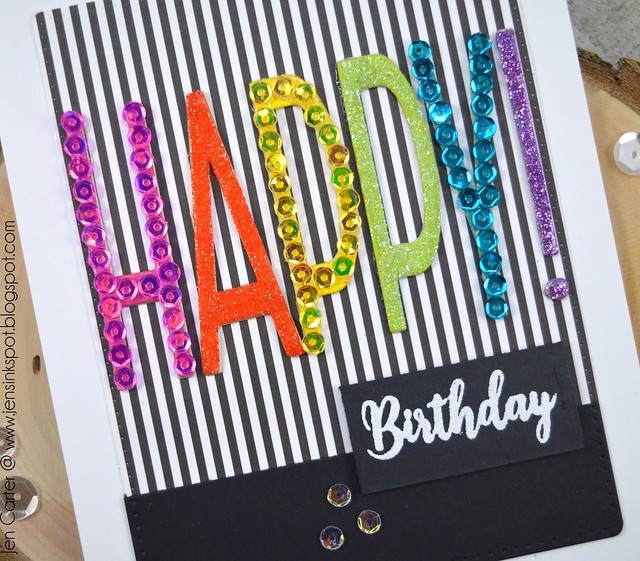
In this closeup you can see the details a little better.  The sentiment is embossed in white and is from a stamp set called Many Happy Birthdays.

Woop! Woop!

Jen Carter FS Woop Woop! 1

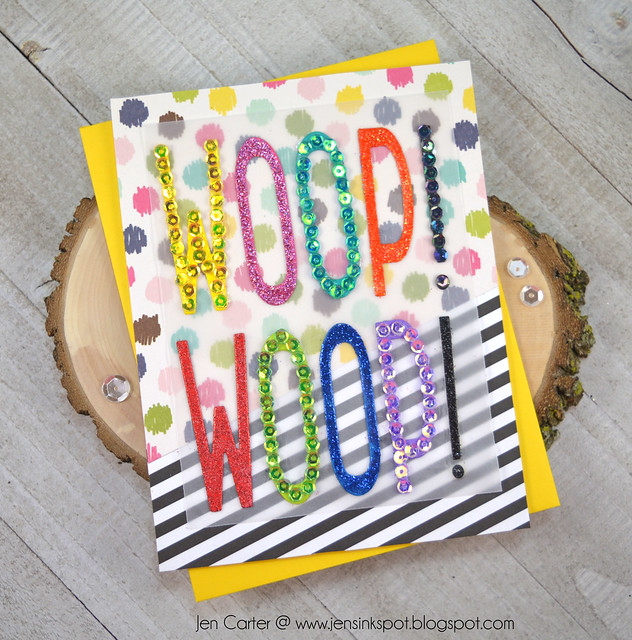
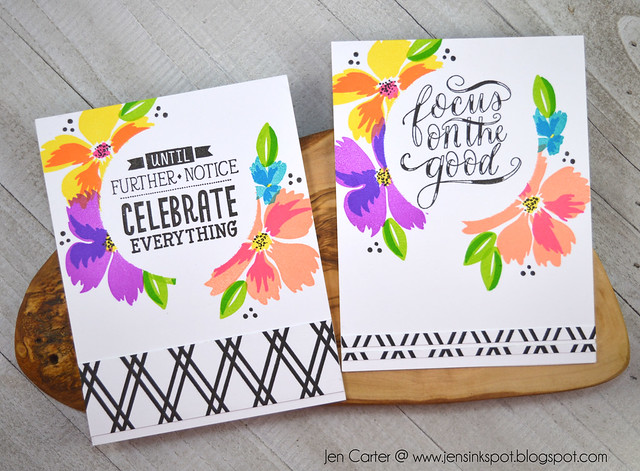
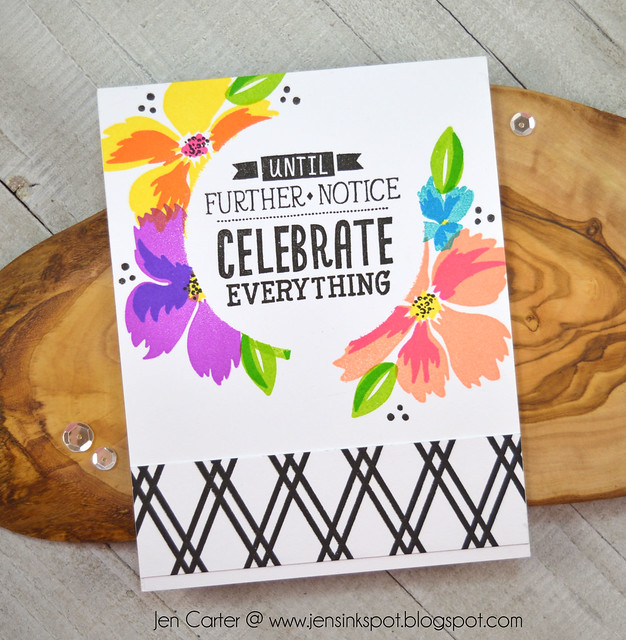
I enjoy being able to create custom sentiments with dies.  For this card I used the same process as I did above using sequins, glitter & embossing paste.  I backed the sentiment with vellum since it is competing with the background paper.  It softened up the various patterns just a bit.
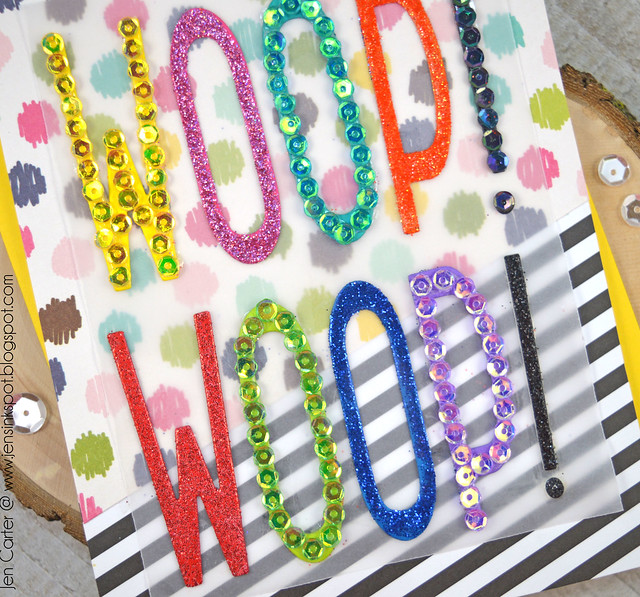
Jen Carter FS Woop Woop! Closeup

Birthday Woop!

Jen Carter FS Woop Negative Die Cuts 1

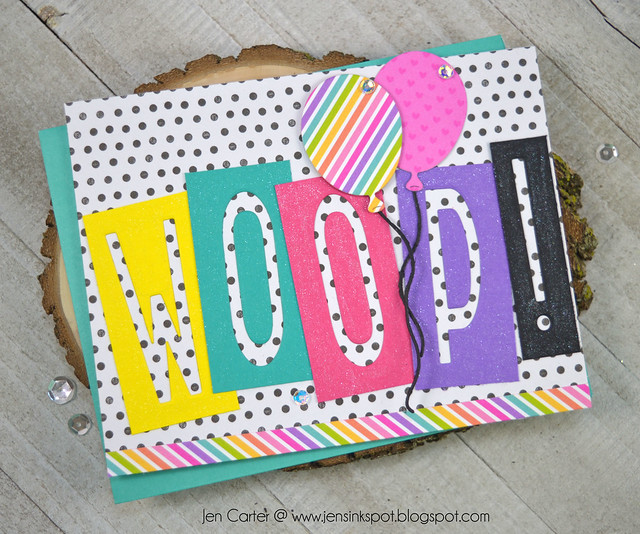
This card is my least favorite from the three and I almost didn't share it.  However, it is nice to be able to use the scraps on cards too and that is just what I did for this one.  I die cut the letters out of pieces of cardstock that I had first cut to the same size and then used these negative pieces to create my sentiment.  Since they are a larger size you can't fit as many on one card but it is still a fun way to customize a sentiment and have zero waste!

Jen Carter FS Woop Negative Die Cuts Closeup

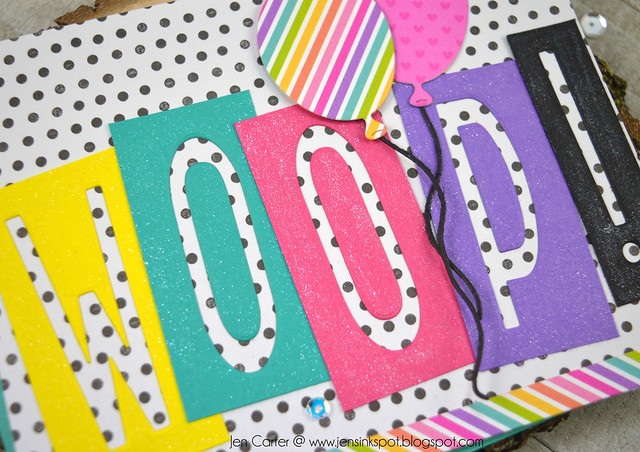
On each of the pieces I used a Nuvo Aqua Shimmer pen to create sparkle.  You can see that a little bit better in this photo.

Thank you so much for joining me today!  Have a great one!

Tuesday, May 29, 2018

Ardyth's 1,000 YouTube Subscriber Blog Hop + Giveaway!


Hello everyone! Today I am joining in on a video hop to celebrate Ardyth reaching 1,000 YouTube subscribers this month! Yay Ardyth!! Congrats!! After you’ve finished watching my video, please leave a comment on the video on my YouTube Channel for your chance to win (someone from my channel will win 2 Catherine Pooler ink pads!), and then click on the link below to visit the next person in the hop.


Prizes
There are more than 20 participants on this video hop and there are prizes to be won! One comment from each video on the hop will be chosen to win 2 Catherine Pooler inks of your choice. One comment from the whole hop will be chosen to win a $25 Gift Certificate to Ellen Hutson, LLC. One comment from the whole hop will be chosen to win a prize pack valued at over $100 from A Jillian Vance Design. And because today is also Ardyth’s birthday, she’s contributing three $25 Gift Certificates (one to Ellen Hutson LLC, one to Catherine Pooler Designs and one to A Jillian Vance Design) to three randomly-chosen comment on her video on YouTube. All prizes will be announced on Monday, June,11 so you have until then to comment.

Be sure to watch my YouTube video on my YouTube Channel and leave a comment THERE for a chance to win the ink pads. Someone who leaves a comment on my video will win 2 Catherine Pooler ink pads. Comments left on this blog post will not count.


Jen Carter CP Wonderful Wildflowers Circle Duo 1
In the video today I will show how I put together these cards using a mask to create the circle frame.  And I also share a trick with one of my husband's tools (I have my own now!) that will make lining up your images & sentiments easy!


I hope you enjoyed the video!  (Don't forget comments for the prize must be left on my YouTube channel, not on my blog!)  Isn't the Digital Caliper tool so cool for centering images, sentiments & other embellishments!  I can't tell you how many times it has come in handy...now if they'd make it in aqua or pink it'd match my other crafty supplies! :)

Stamp Masking with Wonderful Wildflowers

Jen Carter CP Wonderful Wildflowers Circle Duo Focus 1

This is the card I created in the video.  I started by masking my circle with a very thin, lightweight masking paper and then proceeded to stamp the floral images from Wonderful Wildflowers around the perimeter of the circle.  I used the Focus on the Good Floral stamp set to add in the three dots and the sentiment.  For the bottom strips I cut apart part of the BFF Background that I had stamped and adhered it.  

Jen Carter CP Wonderful Wildflowers Circle Duo Celebrate

This card is very similar to the first card except for this one I used a sentiment from the Good Things Stamp set.  I also left a larger piece of the BFF Background on my cardfront (honestly, it's actually covering up a fairly large ink smudge that happened after I had finished stamping the circle!). 

Your next stop on the hop is to Sandy Allnock. If you get lost along the way, visit Ardyth’s blog for the full list of participants. 
Don't forget to leave a comment on my video! Someone from the comments left on my video will win 2 Catherine Pooler ink pads. Good luck!

Shopping List:
Wonderful Wildflowers Stamp Set
Shop at:
CP
Focus on the Good Floral Stamp Set
Shop at:
CP
Good Things Stamps
Good Things Stamps
Shop at:
CP
BFF Background Stamp
Shop at:
CP
Masking Paper
Masking Paper
Shop at:
CP
ALL Ink Collection (43)
Shop at:
CP
Party Ink Collection (24)
Shop at:
CP
Party Collection: Carnivale Bundle
Shop at:
CP
Limoncello Ink
Limoncello Ink
Shop at:
CP
Orange Twist
Orange Twist
Shop at:
CP
Grape Crush Ink
Grape Crush Ink
Shop at:
CP
Flirty Fucshia
Flirty Fucshia
Shop at:
CP
All that Jazz
All that Jazz
Shop at:
CP
Something Borrowed Ink
Shop at:
CP
Bellini
Bellini
Shop at:
CP
Party Dress
Party Dress
Shop at:
CP
Lime Rickey
Lime Rickey
Shop at:
CP
Grass Skirt
Grass Skirt
Shop at:
CP

Sunday, May 27, 2018

Using Alphabet Dies as Stencils Video


Hello!  Today I have a video about using alphabet dies to create stencils.  In the video I share two cards, one of which I've shared on my blog previously.  


Be a Light

Jen Carter FS Be a Light

Jen Carter FS Be a Light Closeup

This is the first card I created in the video.  I used the Brooklyn Alphabet Dies from Frantic Stamper to create a stencil for the card front and used Distress Oxide inks to color each letter.  The "be a" was added with an accessory word die set to finish off the sentiment.  I also used a paintbrush stroke to add highlights on the black & white patterned paper for some extra contrast and to tie it all together.

#AMAZING You

Jen Carter Frantic Stamper Amazing You

For this card I did the opposite of what I did earlier.  I die cut the sentiment out of the card panel and then popped it up with dimensional tape. Instead of using that piece as a stencil like I did in the previous card, it is part of my card and serves as the main sentiment.  The "you" is die cut with Frantic Stamper's Handwritten Love You die that I adhered to the top of the panel.   I created the rainbow background with Distress Oxide inks and flicked it with water to create the water spots. 

Thank you for visiting today!  Have a great day!

Saturday, May 26, 2018

Peek-a-Boo :)


Jen Carter Peek-a-boo Bunny Happy Bunny Mini Bow Hello

It's still Spring even though I'm home for summer break.  We are seeing bunnies in our yard and it is always fun to watch them play!  I love this die from Lil' Inker Designs called Peek-a-boo Bunny Die.  Oh my goodness, it is so adorable!  I love that you can use it all year round and it can be used for general cards (like this one), for baby cards, for kid cards, for welcoming Spring cards, for summer cards...well, you get the idea!  LOL!  I die cut the bunny in both white & gray and then cut off part of the gray so that I could paper piece part of it to be two colors.  I love using patterned paper for the inside of the ears too!  And this particular bunny needed a bow, don't you agree?! I used the Mini Bow die for that.  The sentiment is also a fun font and I thought worked perfectly with this cute bunny.  It is from the Happy Bunny stamp set.  I layered all of those onto patterned paper that I had die cut with the Silly Stitched die set.

Thanks for stopping by today!  Have a wonderful day!


Shopping List


Bow Die Mini
Bow Die Mini
Shop at:
LID
Peek A Boo Bunny Dies
Shop at:
LID
Silly Stitched Die Set
Shop at:
LID
Happy Bunny Stamps
Happy Bunny Stamps
Shop at:
LID

Friday, May 25, 2018

Spring & Summer Coffee Lover's Blog Hop + Sneak Peek


Welcome to the Spring Coffee Lovers Blog Hop!  This is a hop full of Spring & Summer inspired coffee cards.  If you'd like to start at the beginning of the hop and see all the details, including giveaway info, please visit the Coffee Loving Cardmakers blog.  I'm also sharing a sneak peek of a few new Lil' Inker Designs coffee sets that will be released in a few weeks! :)


Good Morning Sunshine!
Summer break started for me Wednesday afternoon and during the summers I like to start the day with a cup of coffee.  It's really kind of strange because during the school year I usually only drink coffee Saturday mornings.  But summer break is a different routine.

Jen Carter LID  To Go Coffee Talk 2 Summer

Everything you see here is so new that it hasn't even been released yet!  It's all from Lil' Inker Designs and while they already carry some really great coffee-themed products, that line is getting ready to expand by quite a few in just a few weeks (June 11th).  This To Go Coffee Cup Gift Card Holder die can be customized to your taste.  I made mine bright and sunny in honor of the spring/summer theme!  I chose bright colors for the cup & the wrap around sleeve.  The stitched detail on this is great!  I also die cut a Stitched Mats Circles die to stamp my sentiment on with Catherine Pooler's All that Jazz ink.  The sentiment is from another new soon-to-be released stamp set called Coffee Talk 2 Stamps.  (See Coffee Talk 1 stamps here.)

Jen Carter LID  To Go Coffee Talk 2 Summer Inside

The coffee cup opens up when you take off the wrap-around sleeve and inside there is a holder for a gift card.  Again, I chose bright paper for the inside.  I also popped the lid up with dimensional tape.

Thank you for joining me today!  Continue hopping by visiting the Coffee Lovers Blog for all of the stops!

P.S. There's a Sale!
There's still a big sale going on at Lil' Inker DesignsMany products are 50% off.  The sale price will be reflected in your cart.  Take a peek! :)

Supplies Released June 11th:

Supplies Used and other Coffee Themed Supplies from Lil' Inker Designs

Stitched Mats: Circles
Shop at:
LID
All that Jazz
All that Jazz
Shop at:
CP
Coffee Talk
Coffee Talk
Shop at:
LID
Coffee Talk Die Set
Coffee Talk Die Set
Shop at:
LID
Latte Love Stamps
Latte Love Stamps
Shop at:
LID
Latte Love Dies
Latte Love Dies
Shop at:
LID
Coffee Cozy Stamps (new)
Shop at:
LID
Coffee Cozy Dies (new)
Shop at:
LID
Perfect Pairs Stamps
Shop at:
LID
Perfect Pairs Dies
Perfect Pairs Dies
Shop at:
LID
Cat Treat Stamps
Cat Treat Stamps
Shop at:
LID
Cat Treats Dies
Cat Treats Dies
Shop at:
LID
Coffee Word Die
Coffee Word Die
Shop at:
LID

Other Supplies Used: Doodlebug Design Hello Paper, Sunny Studio Gingham Paper
Related Posts Plugin for WordPress, Blogger...