Friday, October 31, 2014

Clearly Whimsy October Release Day 2


**This is my second post today!  If you are looking for my Lil' Inker Designs post, please scroll down!  Thanks!**

Happy Halloween!  Welcome to Day 2 of the October Clearly Whimsy Release!  Today the design team is sharing projects made with 3 stamp sets & 2 dies.

Jen Carter 10.31 Sparkle & Shine

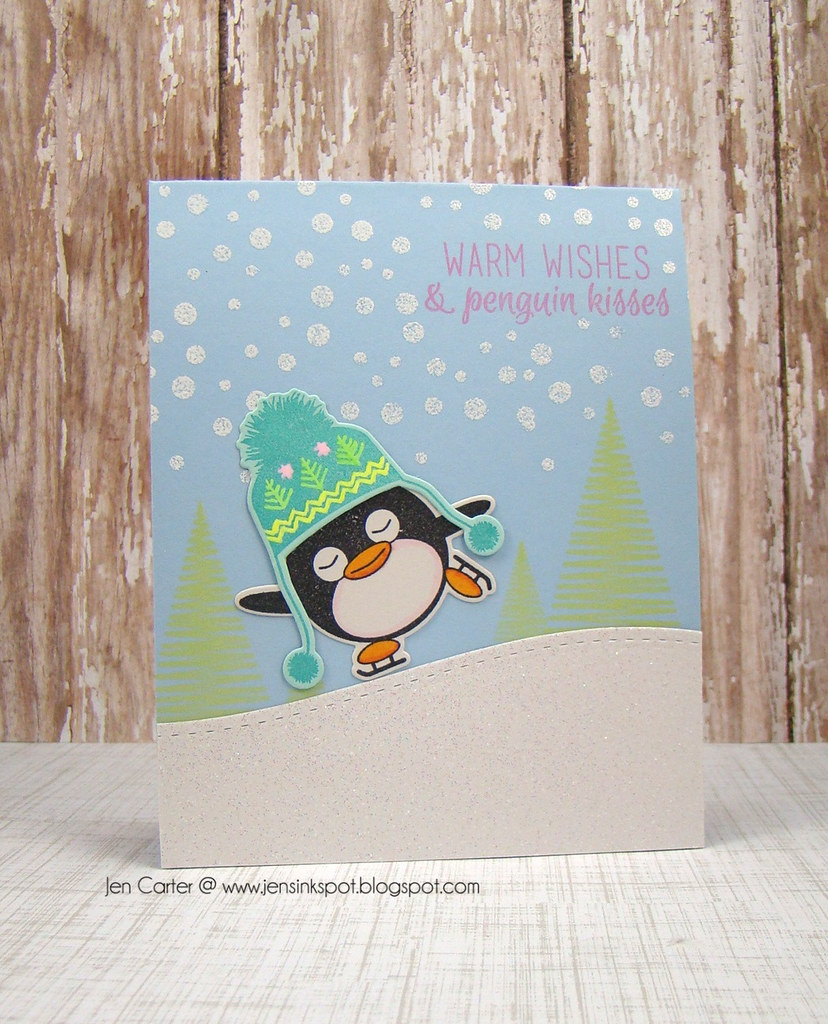
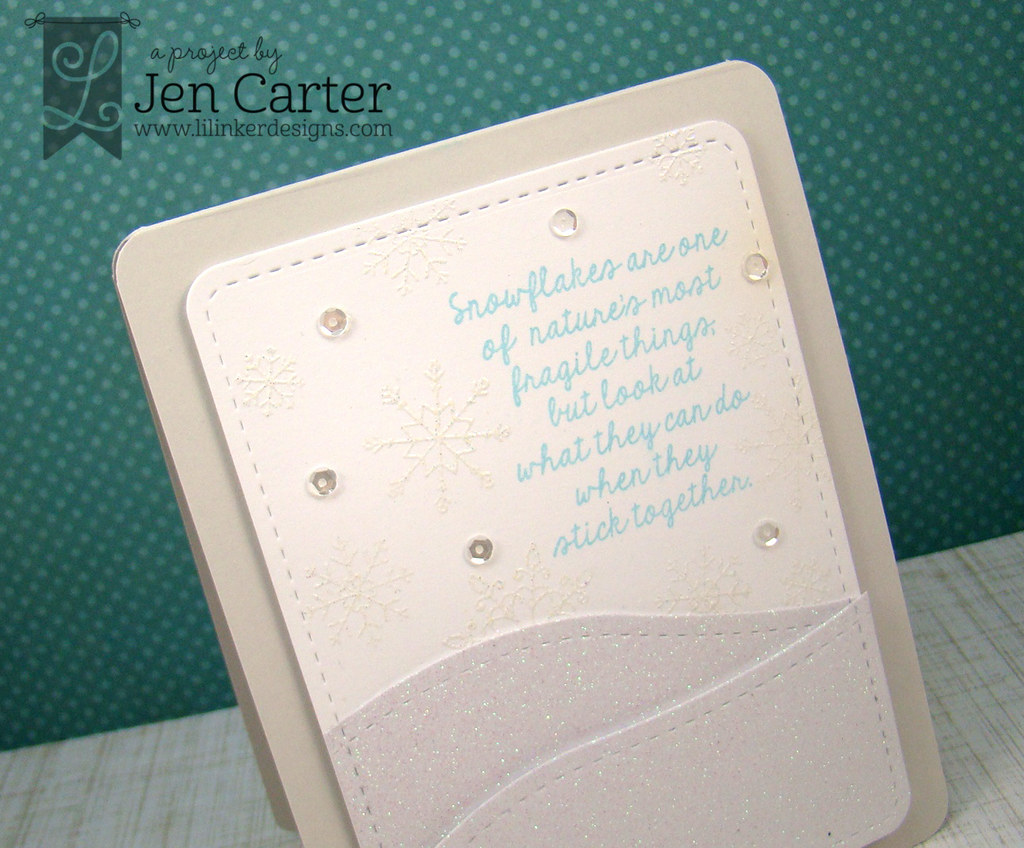
Today's card features the light set in the Sparkle & Shine stamp set.  I love that there are 2 different shapes you can choose to make the lights! After I stamped the lights in several different colors of ink, I used a touch of crystal Stickles to make them shine.  I really like the big "Merry & Bright" sentiment included in this set too!  To finish it off I added some clear sequins.

The products we've featured today are:


Don't forget that there is a sale going on!  Until Sunday you can get 10% off the new products being released at the Whimsy store!


PRIZE ALERT ... We have hidden a fabulous prize of a $15 GIFT CERTIFICATE at one of the stops on today’s hop!  We will draw the lucky winner from the comments left on today’s design team posts (listed below), so be sure to visit everyone and leave a comment to be entered into the drawing:


Jen Carter -- You are here!
Lisa Henke (GDT)

Thanks for joining me today!  We'll be back for a release blog hop tomorrow!

Thursday, October 30, 2014

Happy Days: Lil' Inker Designs Release Day 3

Welcome back to day 3 of the Lil' Inker Designs release!  If you are following along in the blog hop you should have come from Erin Schreiner's blog and if you'd like to start at the beginning, visit Laura's blog There are three $15 gift certificates to the LID store up for grabs, so the more blogs you comment on, the better your chances are of winning!

Happy Winter Days 1.1 wm

For today's card I used the Cover Up Die: Snowflakes to create my background on top of a kraft card base.  I added glue to certain areas on the snowflakes and dumped some chunky glitter on top.  My sentiment, from Big Christmas, was embossed in red on a panel cut with the Stitched Mats: Rounded Rectangle dies.   

Stitched Bauble Side wm

This next card uses a fun new die called the Baubled Christmas tree die. I die cut the tree from white glittered cardstock and then added some fun enamel dots & pearls to the inside.  

Jen Carter Stitched Bauble CLOSEUP1 1.1 wm

The sentiment is also part of a unique new die set called Stitched Script Holiday Word Dies.

Thank you so much for visiting this week!  Don't forget to leave a comment to win!  The more blogs you comment on, the better your chances are of winning!  There's plenty more inspiration to see using these sets today!  Your next stop on the hop is over to Karen's blog!

Clearly Whimsy Release Day 1

This is my second post today!  If you are looking for my Lil' Inker Designs post, please scroll down!  Thanks!

Hi and welcome to the first sneak peek day of the Clearly Whimsy Stamps October 2014 release!

Jen Carter 10.30 Tremendous Triangles Closeup 1

Over the next 3 days we will reveal the new October 2014 Clearly Whimsy Stamps products.  We are releasing 7 new clear stamp sets and 5 dies/die sets this week, and they will be available to buy from the Whimsy Stamps store today and selected Whimsy Stamps retailers on Saturday.


This month we are thrilled to welcome Michelle Short and Lisa Henke as our Guest Designers.  Welcome ladies! We are so happy that you are joining us for this release!

Today we are revealing the Penguin Fun 4x6” stamp set and Tremendous Triangles 4x6” stamp set, together with the coordinating Penguin Fun die set and the Tremendous Triangles die set.  Hop on over to the Whimsy blog for more details.

Jen Carter 10.30 Tremendous Triangles 1.1

The first card I have to share with you today uses the cool new Tremendous Triangles dies & stamp set!  There are so many sizes of triangles to choose from and so many great patterns!  For this card I stamped the triangles in a pattern.  I then die cut a few of the medium triangles from white cardstock and stamped the triangles with the large triangle stamps on top of them so that they would line up.  I popped them up with dimensionals. I then cut the "thanks" with the Thanks Large Word die and cut it in half to layer part of it on the popped up panel and part of it on the card base.  I also stamped a few of the stars from the set in VersaMark on the card base.  I used the stitched line from Stitched Border Die Trio set to cut the stitches into each side of the panel.

Jen Carter 10.30 Penguin Fun, Tremendous Triangles

I love this next set...Penguin Fun!  It IS fun!  I was so excited when this set was shown to us a while back!  I think penguins are so cute!  Simonne has added in some sweet features to this set too!  I started this card by cutting my hill using the Stitched Border Die Trio set.  I added in some trees from the Tremendous Triangles stamp set. I stamped the sentiment and embossed the snowflakes that are also included in the Penguin Fun set.

Jen Carter 10.30 Penguin Fun, Tremendous Triangles Closeup

Now this little penguin...sigh.  I adore her!  I used copics to color her beak and feet and also added a little color around her tummy.  I cut the adorable stocking hat out of aqua cardstock and then stamped on top of it.  I colored in the details from the hat with Souffle gel pens.

The products we've featured today are:


PRIZE ALERT ... We have hidden a fabulous prize of a $15 GIFT CERTIFICATE at one of the stops on today’s hop!  We will draw the lucky winner from the comments left on today’s design team posts (listed below), so be sure to visit everyone and leave a comment to be entered into the drawing:


Lisa Henke (GDT)

Thanks so much for stopping by and we hope to see you again tomorrow for Day 2 of our release sneak peeks!

Wednesday, October 29, 2014

Donuts, Lil' Inker Designs Release Day 2

Hello again and welcome to Day 2 of the Lil' Inker Designs October Release!  All of the spooky products being shown today are currently available in the Lil' Inker Designs store already!  If you are following along in the blog hop you should have come from Erin Schreiner's blog and if you'd like to start at the beginning, visit Laura's blog! There are three $15 gift certificates to the LID store up for grabs, so the more blogs you comment on, the better your chances are of winning! 


Jen Carter Donut Bag 1.1 wm

First up is this cute little donut set & note card holder.  When Laura first showed us these donut products months and months ago I knew I would love them!  They are so cute and fun and I love that she included an option for a teacher!


Donut Bag Closeup 1.1

I cut out the Stitched Gift & Note Card Holder in patterned paper.  I wanted to put a gift card on the inside and I found that this works the best when using a thinner paper, not thick cardstock, so that the card holder stays flat.  This particular sentiment is designed so that you can choose to insert different sentiments where I placed the "teacher" sentiment.  I used the coordinating donut dies to cut out the donut shapes and popped the icing up with pop dots.


Donut Bag Inside

On the inside of the note holder I put a gift card and a little stamped note that I had die cut with the 2nd smallest Stitched Mats: Rounded Rectangles die.

Jen Carter Snowflakes Stick 1.2 wm

For my next card I used the Stitched Mats Rounded Rectangles dies to cut my card mat and then used the Border Builder die set to create snowy hills.


Snowflakes Stick Closeup


I stamped & embossed the snowflakes with the beautiful new snowflake set called Cozy Winter Wishes.  I love the shapes included in this set!  I stamped the wonderful new sentiment off to the side.  It was all adhered to a light gray card base.


Well, that's all for me today!  Come back tomorrow for another round of inspiration and don't forget to leave a comment to win!  The more blogs you comment on, the better your chances are of winning!  There's plenty more inspiration to see using these sets today!  Your next stop on the hop is over to Karen's blog!

Jen Carter -- You are here!

Thanks again for stopping by and for leaving your sweet comments!

Tuesday, October 28, 2014

Wooo Hooo! Lil' Inker Release Day 1!

Hello and welcome to the Lil' Inker Designs October Release!  As you've come to expect from LID there are some fun, fun new products being released this month, you won't be disappointed!  All of the products being shown are currently available in the Lil' Inker Designs store already!  If you are following along in the blog hop you should have come from Heather Campbell's blog and if you'd like to start at the beginning, visit Laura's blog! There are three $15 gift certificates to the LID store up for grabs, so the more blogs you comment on, the better your chances are of winning!

Today we are welcoming two new members to our team!  Please help me welcome Chrissy Larson & Laura Williams!  That also means we are saying goodbye to a team member too.  This will be Heather Campbell's last post with our team.  I sure have enjoyed getting to know her a little better!  She will be missed.

Today I have two cards to share with you!  This first card is my favorite


Jen Carter Wooo Hooo 2.1 wm


I used several new products on this card. I cut out my panel using the cool Stitched Mats: Rounded Rectangle die. I heat embossed my sentiment, from the new I'm All You're All stamp set.  I then added in some banners that I created using the new Border Builder Dies which give you lots of great options for building borders. I'll show you how I created those in a second.  I then cut out the smallest star from the new Seasonal Stars die set to add the star bursts to the card. I popped the stars up with dimensionals.

I love banners!  So when I discovered a super easy way to make a banner using the new Border Builder dies I was very excited!


You'll first use the zig zag die to cut your cardstock.  (I drew the line with a sharpie to mark the center of the die for another project I put together.)


After it cuts, it'll look like this.


I then lined up the double stitched curved die with the top of my zig zag and used a little piece of washi tape to hold it where I wanted it. 


After running it through my die cut machine, this is the final result!

Wooo Hooo Closeup 2.1

My next card uses more of the I'm All You're All stamp set.  


Jen Carter Let Me Help 2.4 wm

I used four of the sentiments from the set and the coordinating Speech Bubble die set.  

Let Me Help Closeup 2.3

Lots of fun combinations of sentiments included in this set! 


I'll have more to share with you tomorrow & Friday so be sure to stop back by!  

Don't forget to comment to win!  The more blogs you comment on, the better your chances are of winning!  Your next stop on the hop is over to Karen's blog!  You can see the entire blog list below!

Thanks for stopping by!

Jen Carter -- You are here!

Supplies Not Listed Above:Wooo Hooo!Dies & Stamps: Lil' Inker DesignsPatterned Paper: AE The Everyday CollectionCardstock: MFT Nightshift BlueTwine: Londonderry Linen WhiteEmbossing Powder: Denim Zing
You're AllDies & Stamps: Lil' Inker DesignsPatterned Paper: MME Just SplendidCardstock: PTI Berry SorbetSequins: Cartwrights & Pretty Pink PoshTwine: Twinery Solid Strawberry

Monday, October 27, 2014

Deco Vases

Hello!  I hope you all had a great weekend! My son had his last football game for the season.  The last game before he joins the Jr. High team next year.  It's kind of hard to believe that he can be that old already.  I'm in a little bit of denial!

On to the card...


Deco Vase Diagonal Stripes Smile

Yes!  I colored!  Can you believe it?  This stamp from Frantic Stamper called Deco Vases is perfect to use with watercolors!  I stamped the image with Tuxedo Black Memento ink and colored away.  To finish, I added the smile die cut from the Diagonal Stripe 3x4 Photo Card and tied a piece of Twinery twine around the mat.  Super easy card!


Thanks for stopping by!

Thursday, October 23, 2014

Diamonds!

Hey everyone!! I hope you enjoyed your weekend!  They always fly by don't they?

Jen Carter Thanks a Million Basic Backgrounds Side 1.2

For today's card I used Whimsy Stamps Clearly Simple Basic Backgrounds & Borders to create the background stripes that I embossed in silver.  I die cut the Thanks Large Word die from gold cardstock.  The diamond was die cut from the newly released Thanks a Million die set that coordinates with the Thanks a Million stamp set that I used to stamp the sentiment.  

Jen Carter Thanks a Million Basic Backgrounds Closeup 1.3

After I die cut the diamond I embossed the image in silver and then sprinkled glitter on top of the entire image to make it shine.

Today's card is based on two challenges.  The first was a fun sketch challenge called Wanna Sketch.


The second challenge was from The Paper Players #218 and the challenge was to make a clean & simple card and to use silver or gold somewhere on your card.  I ended up using both. 


Thanks for stopping by!

Supplies not listed above:
Dies: Lil' Inker Designs Stitched Mats Rounded Rectangles
Cardstock: PTI Aqua Mist, MFT Nightshift Blue
Sequins:  4mm Silver Cartwrights Sequins
Embossing Pwd: Tsukineko Silver
Glitter: Stampendous Crystal Glitter

Wednesday, October 22, 2014

A Hidden Message Bag Clip & Gift

Hey!! I have a project to share today that I made eons ago and have never shared.  It really isn't the time of year for butterflies, but with Christmas coming up, I thought that this would make a fun gift idea for a little girl in your life.  Clear back when Lil' Inker released the Stitched Butterflies dies this was the first project I made with them.  I had always planned on taking a picture of my daughter wearing them, but never got to it, so therefore, no post.  :)  I still don't have a picture with her wearing them, but that's OK!

Jen Carter Butterfly Clip Message

I first decorated my bag by stamping on it with the Spot on Spring Stamps and I also used the flower from the Spring Sentiments stamps.  The images stamped so well on the bag!  My butterfly clip also doubles as a tag/card. 

Jen Carter LID Butterfly Clip

I cut two of the largest butterflies from felt and the butterfly the next size down in fabric & stiffening fabric.  I took one of the felt pieces and used an exacto knife to cut two small slits that a small piece of cardstock could slide in and out of.  I then took the fabric butterfly (that I had fused some stiffening fabric to) and stitched it to the top piece of felt in the middle (be sure to do this before you sew the two largest felt butterflies together or you won't be able to slide your message in and out).  Next, I took the other piece of felt and lined them up and stitched them together using my sewing machine.  This allowed the small piece of paper to easily slide in and out to reveal the hidden message!  I also sewed a small clip to the back of the butterfly so it could clip onto the bag and then could also be used to clip on to something else after the gift was given.  The sentiment was stamped from the Sentiment Flags Additions stamp set. 

Jen Carter Butterfly Barrettes

I did the same process for the butterfly barrettes (minus cutting the slits since I didn't need them for a message).  I also stitched a small button to the middles.  I cut a piece of corrugated cardboard with the Stitched Mats: Rectangles and cut little slots in it to put the barrettes through.  

This really didn't take much time and was pretty easy to put together!

I hope you enjoyed this project!  Thank you for stopping by!
Related Posts Plugin for WordPress, Blogger...