Sunday, October 30, 2011

NEW Rings!!

Hey everyone!! I finally had a chance to add some new rings to my Etsy shop, Jen's Ink Spot, today!! I really am excited about them and hope you are too!  It is getting close to Christmas!  My button rings and/or adjustable rings would make GREAT and UNIQUE Christmas gifts!!

My button rings are made to order to the size you need!  They are not adjustable in size once they are made.


The main button in this ring is made from 50-60% recycled plastic.


The perfect accessory for Christmas or holiday clothing or events!


This is one pretty button!!


Beautiful mint green stones!


Such a fun shape! Love the bling!

You can see all of my button rings here!

I also have a few more adjustable resin rings!  These are not sized to fit, but are adjustable and fit most fingers size 6 and up.


You can see all of my adjustable resin rings here!

To see everything in my Etsy shop, Jen's Ink Spot, visit here!

Thank you for taking a look!! I hope you enjoy the new rings!  Have a great day!


Tuesday, October 25, 2011

Papertrey Ink October Blog Hop


Welcome to the PTI October Blog Hop!

This month our challenge was to create a card using the following photo as our inspiration.


Isn't that a beautiful photo!?  There were so many directions I thought about taking my card but besides the polka dots, the one thing that really stood out to me were the leaves!! Can you see them very well?  The green leaf on the large pumpkin has blue thread stitched around it! I LOVED that detail.  I took inspiration from her leaf and created a very easy accent for my card.


It would look better if I would have used a blanket stitch like she did, but hey! I was in a time crunch and didn't have time to learn how to do it!  Although I did save a bookmark with a tutorial on how to make a blanket stitch.  That'll be for next time!  I also used a sewing machine to stitch the veins onto the leaf.


Here's a closeup of my leaf embellishment.  I tried to use colors that were close to what the colors were in the inspiration photo for my leaf.


Thanks for visiting!! As always, you can see all of the blog hop participants on Nichole's blog.


Supplies (all PTI unless noted)
Stamps: Polka Dot Basics, Autumn Acorns, Photo Finishers
Paper:  Kraft, Rustic Cream
Ink: Palette Orangerie, Landscape & Reflection Blue
Other: Photo Finishers Die, Autumn Acorns Die, Felt from Felt on the Fly on Etsy, DMC floss

Sunday, October 23, 2011

Happy Fall

Hey everyone!! I can't thank you enough for all of you who have voted for me over at the Market Street Stamps Block PartyToday is the last day to vote!  I was wondering if I could bother you to head over to the Block Party and vote for me one more time if you haven't voted today?!  The race is sooooo close and I'd LOVE to have your votes!! Thank you SO MUCH from the bottom of my heart!!

On my way into church this morning I was admiring all the beautiful yellow leaves falling from the trees.  The weather was perfect.  Everything was just so beautiful!  This seems like a perfect time to share a Fall card!


I cut the bottom part of the acorns out of text cardstock and then stamped polka dots on top.  I popped up the top acorn with dimensionals.

Very simple card to put together!

Thank you again for stopping by!! Remember if you haven't voted yet, I'd LOVE for you to stop by Market Street Stamps Block Party and vote for me!! My card is #3 and it says "Jen C" under it.  Thanks again!!!

Have a wonderful Fall day!

Saturday, October 22, 2011

MSS Block Party: Your Help Needed

Hello to all of you who are so loyal in visiting my blog each week!  Thank you to those of you who may be finding yourself here for the first time as well!

Do you remember this card I posted earlier in the week?


It was chosen as one of Market Street Stamps top 10 for their Special Edition Block Party.  The cool part is that the winner of the block party wins $50 a month in free stamps from Market Street Stamps for a full year...$600 worth of stamps!!  WOW!!! 

Here's where I need your help!   I would LOVE if you would stop on over to the Market Street Stamps blog and vote for me!  It would really mean the world to me to have your support!  Even if you have never commented on my blog before but you find yourself visiting or maybe you comment regularly, I would LOVE, LOVE, LOVE your support and vote!  (Yes, I am shamelessly begging!!) :)

Thank you SO MUCH for voting!! I am so blessed by all of you!  If I don't tell you enough how much I appreciate you and how much you encourage me, PLEASE know that you do! I enjoy hearing from you and  appreciate each of you so much!!

Here's the link where you can vote:  MSS Special Edition Block Party

Thanks again!!

Thursday, October 20, 2011

Fringe Flower Birthday

I'm here today to share another project made using a FANTASTIC die from Lil' Inker Designs that is SO fun and something that you really should consider adding to your collection if you haven't already!!  What makes this product even more unique is it was the first of its kind of the market!  Love it!!  So, which die is it?


Seriously folks, this die is SO FUN!!

So now for my project that uses this die.  I tell you, I've cut so many things with this die! I love how different this flower looks just by cutting out a different type of material!


This was a card for a friend's birthday. Can you guess what type of material I used to cut that flower out with?


It is a brown paper lunch bag! 

The cool thing about this one was that I cut the flower from the side of the bag, which when the bag is folded, there are 4 layers that it cut through (the front, the back and then the 2 folded in sides).  So when I rolled this flower, I used several of those pieces together and it created this flower!  It looks a lot different than the flower does when cut with felt doesn't it!?  But still equally as fun and interesting!  You just can't resist touching it!


Here's a shot from the side that might give you a little perspective on the dimension of the flower.  For the center I attached a resin flower. You could add rhinestones, pearls, stickers, buttons, etc to the center to change it up and give it a different look every time!

Have I mentioned how fast Lil' Inker Designs ships?  Super fast!  They have super great customer service too!  I know you won't be disappointed!

Thank you for stopping by today!  As for myself, I am super, super excited to go to a Chris Tomlin & Louie Giglio concert tonight!  I feel so blessed to be able to have the chance to go!  I can't wait!!

Wednesday, October 19, 2011

The Twinery & Sweet 'N Sassy Blog Hop

Welcome to a special blog hop featuring products from best twine company around, The Twinery and a fabulous stamp company, Sweet 'n Sassy Stamps!  If you are following along on the hop you should have come from Dina Kowal's blog!  If you would like to start at the beginning of the hop you can visit The Twinery's blog for a complete list!


There are prizes too!!  By commenting on EACH blog in this hop, you will be eligible to win one of two great prizes!

The Twinery will give away to one winner:

One Ultimate Color Sampler Pack (retail value $25)

and

Sweet & Sassy Stamps will give away to one winner:
One Season of Change Stamp & Die Set (retail value $28)
(Shown below)


I was able to work with the Sweet & Sassy stamp set called "Seasons of Change" (which is the set WITH dies that you can WIN just by commenting on each blog in the hop!) which I have liked since I first saw it released a few months ago.


I really like the pattern on the leaves in this set! I wanted to make a fun Fall project using these leaves and the beautiful Fall colored twine from The Twinery!


So this was what I came up with!  I really like how it turned out!! This was inspired by a project that I had pinned on Pinterest where the creator had decoupaged real leaves onto a pumpkin.  I wondered if I could mimic that look using stamps and tissue paper and it worked very well!


I painted two pumpkins white.  The littlest one I used acrylic paint and brushed it on and for the largest one I spray painted it white.  Then, while that was drying, I stamped the leaf images from the set in various fall colors and then cut them out by hand.  This stamp set has a coordinating die set which I didn't have at the time I made this and that would have sped up this process tremendously!  So hint, hint...when you buy the stamp set, get the matching dies too!! :) 

I applied a layer of Mod Podge in the area where I was going to place a leaf and then stuck the leaf onto the pumpkin.  The white tissue paper blended in with the white paint very well and it is very difficult to even see the tissue paper on most of the leaves. 


Here's a closeup of the leaves on the pumpkin.  After applying the tissue paper leaves, you can seal them down even more by applying a top layer of Mod Podge too. 


After I applied the leaves, I took Mandarin twine from The Twinery and tied a knot at the bottom of the stem.  Then, I wrapped one end of the twine to the top of the stem and then re-wrapped it down to the bottom and then tied both ends together into a bow. 


At the bottom of the large pumpkin, I also tied a bow using Mandarin, Peapod, Lemondrop & Maraschino Twinery twine at the bottom of the stem.


This was such a fun Fall project to create! 


I love being able to use my stamps and twine for home decor!! This would be a great project for a gift too!

So...have you checked out the twine from The Twinery yet?  Here's a photo showing all of their colors!  Sigh!! They are so pretty!


Your next stop on the hop is Harriet Skelly!

Don't forget to leave a comment to be eligible to win the prize packs!  They are wonderful, wonderful prizes!

Have a terrific day!!  Thank you for stopping by!

Tuesday, October 18, 2011

Fringe Flower Gift Idea

I can hardly believe that Christmas is on our heels!  Where did the time go!  I've been thinking about Christmas gifts and what I am going to give this year.   The project I am going to share today was created for the Lil' Inker Fall Release but I haven't shared it yet.  I think that these would make great gifts!


I used the Lil' Inker Designs Fringe Flower die and rolled it with pink felt.  I stitched a little bit of yellow onto the end of the pink felt to make a yellow center when the flower was rolled.  I used the Original Pinwheel die to make the leaves and hot glued two of them onto the backside of the flower.  Then, I attached the flower to a large paperclip.


 If you make these for gifts, you could custom make the colors to the person's personality.  You can mix colors too as I will show you a little later.  If you are giving a gift or a gift certificate to a book store, this would compliment that nicely.  Or, if you wanted, you could use this to decorate the outside of your package too.


How about one more sample?


I LOVE mixing the two colors of felt together to make a flower that is full of color! I have a tutorial on how this works below. 


Here's what the backside of the flower looks like after I attached it to the paperclip:


I cut a circle with felt and then hot glued it onto the back of the paperclip.  This makes it look finished and hides all the pieces.


I hope you enjoyed this project and tutorial!  Thanks for stopping by!

Monday, October 17, 2011

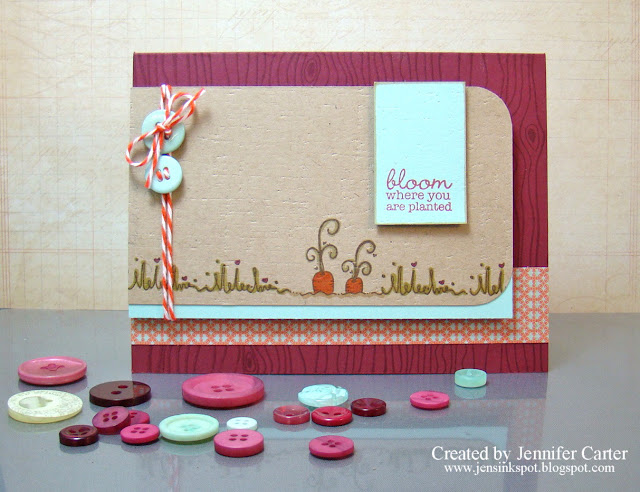
Bloom Where You Are Planted

Hello!! I hope this post finds each of you doing well and having a nice day!  I have a fun card to share with you today that I recently put together using stamps from Market Street Stamps. 


Aren't those carrots so cute!?  I don't have any other images like those in my collection and I really like how sweet they are! I also LOVE Market Street Stamps background stamps!! They fit the entire card front and stamp so well!  I really love their woodgrain background stamp!  I colored the images on this card with copics and added glitter to the carrots with a spica glitter pen.


Of course I couldn't resist adding some Mandarin twine from The Twinery on my card. I was really surprised to find it looks so pretty paired with aqua! I ran the entire stamped and colored kraft panel through my Big Shot with the PTI Linen Impression Plate to give it some earthy texture.


The center panel on the card is popped up with dimensionals and the twine is wrapped around that layer.  The patterned paper is adhered directly to the card base. 

This card is for the Market Street Stamps Block Party.  They are celebrating one year in business!! Angelica and her husband are the owners and she is also a teammate of mine on The Twinery design team!  Congratulations Angelica!!  I wish you many more successful years!


Supplies
Stamps: Homegrown by Market Street Stamps
Paper: PTI Kraft, Aqua Mist, Scarlet Jewel & Patterned Paper Happily Lost by Lily Bee Design
Ink: Dark Chocolate & Pure Poppy PTI
Other: Twinery Twine, Linen Impression Plate PTI, Corner Chomper, Buttons, Pop Dots

Wednesday, October 12, 2011

Sizzix Fresh Vintage Blog Hop


Welcome to the Sizzix Fresh Vintage Blog Hop!!  I am so excited to be working with The Twinery and Sizzix's very own Eileen Hull for this blog hop!

There are 60 designers participating in this hop using 12 different dies! Isn't that fun!  Here is how the blog hop is set up:
  • Each week, for 6 weeks, there will be new projects featured in the hop. You don’t need to worry about finding a long link list or a specific post, because that little button on the top right side bar will automatically take you to the most recent projects.  (This is week 3 of the blog hop)
  • Did you miss a day or miss a week? Don’t worry, just visit the “FAQ” section at the bottom of this post for more info!
 ******
The die that I am using for this project today is the Flower, 3-D Wrapped which is super, super fun!!

Here is the Twinery Twine that I've used on today's project.


Now onto the project!

This die made the most gorgeous flowers and I found that there were so many fun ways to embellish the center of them too! 

I decided to create hair accessories and I even used a few of the gifts to decorate my package!   That black crocheted piece around the box is a headband.  Then I clipped two flowers made from the Wrapped Flower Die on to it!  And then, I wrapped 3 colors of the Twinery's twine around the headband to complete the package decorations.


Here is a closeup of the blue flower.  I cut this one from felt that I bought off the roll at Hobby Lobby.  This flower was made for pennies!  I used the die to cut 2 layers and then rolled the flower together.  With this die your flower can look different just by how tight you roll the flower and how many layers you add!  I LOVE that!!  After I put the layers together, I inserted a group of beads that I also picked up for next to nothing at Hobby Lobby in the wedding aisle.


Here is the red flower and my favorite!  I cut 2 layers of red burlap with the die and also cut 2 layers of a light brown tulle! It cut both fabrics so easily!  I alternated the fabrics so that the tulle was on top.  Then I hot glued an old vintage button I had in my stash to the center.  So easy and fun!


Here is what the headband and flower look like together.  And below is my sweet little girl modeling it for me.


I really love how the flowers turned out and how the twine dresses up the box even more!!


Be sure to click on the Sizzix Fresh Vintage icon (below or on my side bar) to see what the other designers have done with the Wrapped Flower die!  You are in for a treat!

Supplies:
Twine:  The Twinery
Die:  Sizzix Flower 3D Wrapped
Related Posts Plugin for WordPress, Blogger...