Sunday, February 25, 2018

Mr. & Mrs. Bridal Couple

Jen Carter Bridal Couple Champagne 3

I meant to post this card last week for Valentine's Day but time got away from me.  If you are looking for a fun die set for upcoming weddings, wedding showers, proms, etc then this is a die set that you are going to want to add to your collection!  The Bridal Couple Card Builder is so fun to work with!  I added various pieces with different colored cardstock and then made a little boutonniere for the groom too.

Jen Carter Bridal Couple Champagne 2

Jen Carter Bridal Couple Champagne Inside

I stamped a little message on the inside of the card with the Wedding Wishes stamp set.

Have a nice day!

Saturday, February 24, 2018

Winnie & Walter Leading Lady: Take Four


It's hard to believe the month is coming to an end already and this is my last post as Leading Lady for the month of February.  I have enjoyed spending time with Winnie & Walter fans and friends and reading your comments so much!  Thank you for all of your love!  Thank you for your support of not only my work, but of this fabulous company as well!  Thank you so much to Shay for having me!  (Fun fact, I get to craft with her in just a few days!! I can't wait!)

Today my post is focusing on black & white cards with a pop of color.  I loved the floral set that released in November called In Bloom: Victoria's Very Merry Flowers with Lydia Evans and I used that set for both of my cards today.

Jen Carter Winnie Walter Victoria's Very Merry Flowers Happy

For this first card I grouped several of the flowers and leaves from the In Bloom: Victoria's Very Merry Flowers with Lydia Evans on to a larger acrylic block and then inked them up with Black Soot Distress Oxide ink.  I then spritzed them with water and stamped them on to my white cardstock. I repeated this until the cardstock was filled in.  I then lightly flicked a few drops of the black watered down ink onto my cardstock.  For my sentiment strip I stamped the "happy birthday" using the In a Word: Happy stamp set and Flirty Fuchsia ink.  I die cut some of the smaller flowers with the In Bloom: Victoria's Very Merry Flowers with Lydia Evans Cutaways, stamped them with the coordinating stamps using All that Jazz (releasing soon), Black Jack & Tiara inks and adhered them to my panel.  A few clear sequins finishes the card off.

Jen Carter Winnie Walter Victoria's Very Merry Flowers Rugby Stripes

This last card has a more classic feel to it.  I used Black Soot Distress Oxide Ink and the Scenery: Rugby Stripe Creative Screenings stencil to create those nice bold stripes.  I love being able to create my own patterned paper so easily!  The sentiment is stamped using the In Bloom: Victoria's Very Merry Flowers with Lydia Evans stamp set.

Jen Carter Winnie Walter Victoria's Very Merry Flowers Rugby Stripes Closeup
  
For the flowers I went very bold.  I die cut the flowers and then stamped the first layer with Catherine Pooler inks.  I used Party Dress, Aquatini, Lime Rickey, Sauna & Flirty Fuchsia.  The layers that you see on top of the solid flower/leaf images were made by embossing.  Did you know that you can emboss on top of embossing powder?  If you're careful not to overheat the powder so it loses color, you can layer embossing powder which is what I did here for the centers of my flowers! Simply emboss the first layer, stamp the second layer with watermark ink, add your second layer of embossing powder and heat it again.  The brands of embossing powder I used are Ranger & Zing.  


Thanks for stopping by again today! I  Before you go, leave a comment on my blog Jen's Ink Spot on any (or all four) of my Winnie & Walter Leading Lady posts for a chance to win a $30 gift card to the Winnie & Walter store.  You have until Friday, March 3rd to comment and I will pick a winner randomly from all of the comments left and will announce the winner March 7th!    Thanks again and have a wonderful day!

Friday, February 23, 2018

Sweet & Lovely...and a Special!

Jen Carter You Sweet Lovely Gray Pink Polka Dot 1

I made a super simple card to share today.  This sentiment from Lil' Inker Designs called Lovely & Sweet can be used to make super quick cards!  All I did for this card was arrange the sentiment on my block how I wanted it, stamped it in Versamark ink and then embossed!  I popped the gray panel up with dimensional tape and added a piece of patterned paper to the side.


Lil' Inker Designs Special
In case you haven't heard, there is another special going on at Lil' Inker Designs this month.  You can get the fun Hello Awesome stamp set & Awesome Word die FREE with a $75 purchase!  Use code "AWESOME" at checkout!

Thursday, February 22, 2018

Spotted Thanks with New Catherine Pooler


Jen Carter Thanks Love Grows Spotted Thanks

Last week Catherine Pooler had a new release. One of the stamp sets released is called Love Grows which has some fun flower, leaf & sentiment stamps in it.  I decided to use the flower centers to make fun colorful background paper. I masked off the paper with post-it note tape at a diagonal.  I used many colors of the beautiful Catherine Poolers inks, both new and previously released. I started stamping the different circles on my Premium White Cardstock, also from Catherine Pooler.  This cardstock is very smooth and is designed to work beautifully with the CP inks.  

When I was done stamping I die cut the white paper & the green/blue paper with the Postage Stamp dies which were available in the Love is in the Air Stamp of Approval Box (which will be available in the CP store at a later date).  

Jen Carter Thanks Love Grows Spotted Thanks Closeup

I die cut the hand lettered thanks with the gorgeous Thanks die.  Last, I added some iridescent sequins in random places and tied some pink twine around my frames.

The Inks


If you haven't checked out the beautiful ink line from Catherine take a minute to do it. 😁 It is my most favorite ink!  I love how bright and vibrant it is and how beautifully the colors work together.  I also love that it dries quickly!  Seriously, it is the BEST! :)

Products Used


Thanks for stopping by today!

Saturday, February 17, 2018

Winnie & Walter Leading Lady: Take Three


Hello again!  I'm excited to be back for my third Winnie & Walter Leading Lady post on the Winnie & Walter blog!  I've really been enjoying spending time with you this month!  Thank you for all of the nice comments you've left on my posts!  

Today's topic focuses on using the Cover Model: Do You See What I See Cutaway to make two totally different looking cards.

Jen Carter Winnie Walter See What I See You Amazing Holiday Cheer

First up is this bright and colorful card.  I die cut the Cover Model: Do You See What I See Cutaway with white cardstock first and then attached that to my cardbase.  I then used a rainbow of colorful cardstock and pieced each row together.  It looks time consuming but it really went quickly.  I just dabbed a dot of glue in each empty space and then inserted the individual pieces one row at a time. 

For the sentiment I die cut the Tagged: Holiday Cheer Cutaways from vellum.  I embossed the yellow "you" that I had stamped using the The Big, The Bold and You stamp set.  The "amazing" was embossed with white and stamped using the same sentiment set.  The little stars were die cut with a die in the Tagged: Holiday Cheer Cutaways.

Jen Carter Winnie Walter See What I See You Amazing Holiday Cheer Closeup 2

I like adding a little dimension to my cards so in this photo you can see how I also popped up some of the diamonds in each row.

Jen Carter Winnie Walter See What I See Faith Believe Miracles

For my second card I went with a more sophisticated look.  I first die cut the Cover Model die from black cardstock and adhered it to a white card base.  I then chose five colors of cardstock and placed those pieces in the corresponding places using a small dab of glue.  I die cut the "believe" from aqua cardstock using the In a Word: Believe Cutaway die and then layered it on top of two more die cuts to give it dimension.  I stamped the sentiment, from the In Bloom: Debra's Poinsettia with Lydia Evans on black cardstock and then embossed it in white. 


Thanks for visiting today!  Before you go, leave a comment on any (or all) of my Winnie & Walter Leading Lady posts for a chance to win a $30 gift card to the Winnie & Walter store.  

Friday, February 16, 2018

A Spring Bike Ride 🚲


I'm so ready for Spring are you?  I work at an elementary school and there has been so much sickness.  I'm so ready to get past this!  Bring on Spring! 😎

Lil' Inker Designs Sale
Before we get to today's card, I wanted to let you know about another special that is going on at Lil' Inker Designs this month.  You can get the fun Hello Awesome stamp set & Awesome Word die FREE with a $75 purchase!  Use code "AWESOME" at checkout!


A Spring Bike Ride

Jen Carter Spring Bike

I made this bike scene using several older (but still good!) products from Lil' Inker Designs.  I started by putting together the background.  The yellow panel was first die cut with the super cute Quilted Stitched So Sunny die.  Then I put the three pieces of paper together and die cut them with the fun Color Blocking die.  The sun is the Sunshine Large die and the clouds are in the Rainbows & Clouds die set. I die cut the bike with the Rustic Spring dies & then stamped it with the coordinating Rustic Spring stamp set.  The bike was colored with copics.  The fun spring word was die cut using the Brush Script Spring Word dies.

Thank you for taking a look!  Have a wonderful day!

Thursday, February 15, 2018

Catherine Pooler Inks & Stamps Release Day 3


Welcome to Day 3 of the new release for Catherine Pooler Designs!  Today the design team is showcasing the Eat, Sleep & Create stamp set (my personal favorite set from the release), the Create die & the Doodle Garden Background stamp.  


The release is already available in the Catherine Pooler store so if you haven't already checked it out, you can do that by clicking here.  There are 8 new ink colors available that coordinate beautifully with the previously released Spa Collection: Paradise Found ink bundle as well as new stamp sets, dies & a new stencil.  You can check out the Spa Collection: Zen Garden Bundle here.

Create Your Own Sunshine Painted Heart
I loved playing with the new Eat, Sleep & Create stamp set.  I couldn't put it down!  For my first card I was inspired by this quilt.  I thought that the paint strip from that stamp set would be perfect to replicate the heart with.

Jen Carter Create Your Own Sunshine Painted

I started by stamping the middle stripe of the heart which is stamped in the new ink color Spruce (most of the inks used on this card are the new colors).  I then worked my way from the middle to each side.  So starting from the pink color on the left hand side I used Rose Petals, Polished, Shea Butter, SeafoamSpruce, Skylight, Stone Blue, Daydream & Sugared Lavender.  When I got to the stripe on the very end of each heart I used a post-it note to mask off the top of the stripe so that it would be shorter than the other stripes.

Jen Carter Create Your Own Sunshine Painted Closeup

I actually made two cards that are very similar (I'll share the other at a later date) and from it I used the new Create die to cut out the create sentiment.  I stacked it up with two more sentiments and then added a dusting of glitter on top using a Nuvo glitter pen.  The sentiment & little plus signs are also from the Eat, Sleep & Create stamp set.  I love all of these colors stamped together!

Create Happiness Doodled Background
If you were following Creativation you probably saw the gorgeous black & white background from Catherine Pooler's booth.  That background is also a stamp!  Yay!  

Jen Carter Doodle Garden Eat Sleep Create Happiness Rainbow

For this card I started by using the same paint strip stamp from the Eat, Sleep & Create stamp set that I used on the first card I shared today.  To make the background I lined up all of the Spa inks and then stamped 3 - 4 colors on each row slightly overlapping each stamp.  I love the colors that were made when the colors overlapped.  Once that was dry I stamped the  Doodle Garden Background stamp with VersaMark ink over the top of it and then embossed it with white embossing powder.  I cut a white strip for the sentiment, from Eat, Sleep & Create, and stamped it in DaydreamPolished (coral), Shea Butter inks.


This is what the background looked like prior to stamping & embossing with the Doodle Garden Background stamp.  I just love the colors!  

Keep Hopping
You won't want to miss what the design team has in store today!  Continue hopping for more inspiration!

Catherine Pooler
Jen Carter You're Here!
Tracie Pond  
Melissa Miller  
Susan Powell
Karen Baker
Ardyth Percy-Robb  
Laurel Beard  
Allison Cope
Taheerah Atchia

Comment to Win
Leave a comment on my blog for your chance to win one of two Zen Ink Collections given away each day of the hop or a $45 gift certificate if you already purchased the collection.


Thank you so much for joining me today!

Tuesday, February 13, 2018

NEW Catherine Pooler Inks & Stamps Release


Welcome to Day 1 of the NEW Catherine Pooler Release!  This is an exciting day because not only are there a bunch of great stamp & dies sets and a stencil available to order now, but there are also new inks!! :)  EIGHT new inks to be exact and they coordinate beautifully with the last ink release of the Spa Ink: Paradise Found Colors

Today we are showcasing Zen Feathers Stamps & Dies, Chevron Cheer Stamps and Ovals & Flowers Dies along with the new ink colors.

Introducing 8 New Fabulous Ink Colors


Here's a picture of the new colors Spa Ink: Zen.  Ignore the smudges, I have used them a ton the last few weeks! Did I mention that they are available to order NOW! Shop here!  :)


I wanted to share a picture of a background that I stamped using the entire collection of the Spa Inks together.  I'll share how I used this on a card on Thursday, so be sure to come back to see it then.  Aren't they all beautiful stamped together?  And I love how they make beautiful new colors when overlapped too.  I used a stamp from my favorite new stamp set from this release called Eat, Sleep, Create (which I'll also share more about on Thursday as well).

Happy Birthday Watercolored
There are so many fun products to play with in this new release!  For my first card I used the new Zen Feather, Chevron Cheer & the gorgeous Stained Glass Cover Plate

Jen Carter Zen Feathers Stained Glass Chevron Birthday

For this card I die cut the beautiful (get it before it's sold out, I think it'll go fast!) Stained Glass Cover Plate with white cardstock.  If you look closely at the cover plate design you'll notice that it has a large circle in the center.  I snipped off the pieces from the inside of the circle so that the center would be completely open. I adhered the panel to my white card base and stamped the sentiment (I'm loving that font!) from Chevron Cheer with Black Jack ink.

Jen Carter Zen Feathers Stained Glass Chevron Birthday Closeup

I die cut six of the flowers from the Zen Feather die set, stamped them with Versamark from the Zen Feather stamp set & then embossed them in white.  I touched the ink pads to the lid of the inks and then used an aqua brush to pick up the ink and then colored the flowers.  The colors I used are Skylight, PolishedShea Butter, Mint to Be & Juniper Mist. I adhered the flowers to the card base with dimensional tape (except for the two in the middle).

Chevron Thanks
This next card I stuck with a flower theme but added another fun background.

Jen Carter Chevron Cheers Thanks Love Grows

I first stamped the chevron oval from Chevron Cheer and then used the new, must have Thanks die (such a gorgeous hand lettered font!) to cut the word out of the center.  I popped up that entire panel and used a turquoise paper to add some contrast for the background.

Jen Carter Chevron Cheers Thanks Love Grows Closeup

I stamped the flowers from the Love Grows stamp set in AquatiniPolished, Shea Butter & Royal Treatment and the leaves in Spruce & Seafoam.  I hand cut the flowers & leaves but there is a coordinating Love Grows die set that I'd recommend.

Products Available Now


Don't forget that all of the new products are available in the store and you can start shopping right now!

Keep Hopping
You won't want to miss what the rest of the team has created with these fabulous products!

Catherine Pooler
Kristie Goutlet
Ardyth Percy-Robb  
Ilina Crouse  
Jen Carter (that's me)

Comment to Win
One last thing before you go. Leave a comment for a chance to win one of two sets of Zen Garden Inks being given away each blog hop day or a $45 gift card if you already purchased them!


Thanks for stopping by today!

Saturday, February 10, 2018

Winnie & Walter Leading Lady: Take Two


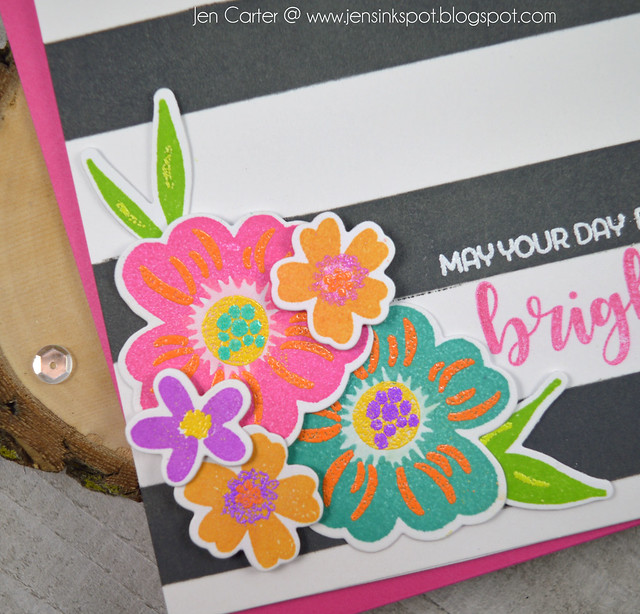
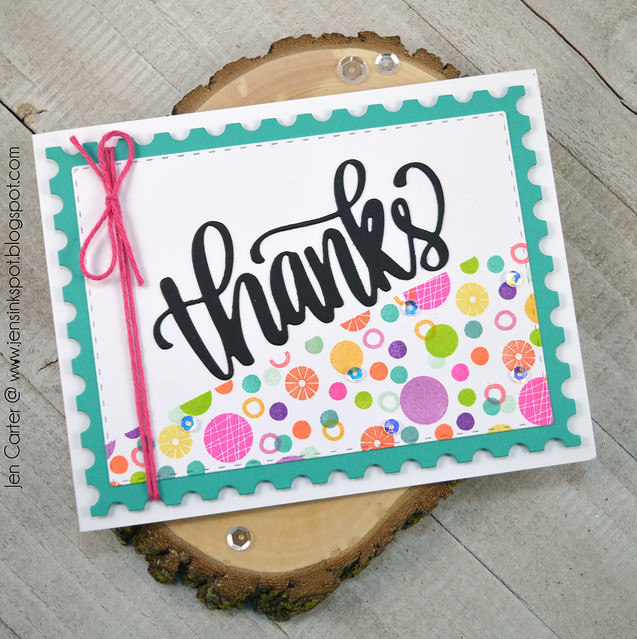
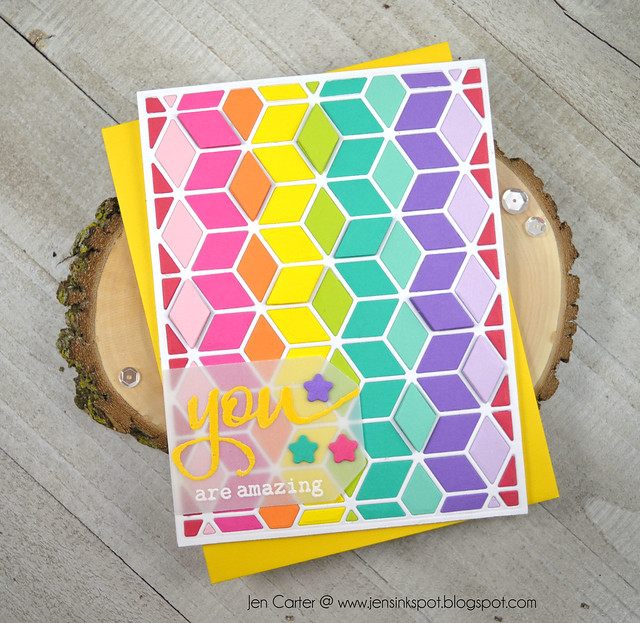
Hello Winnie & Walter friends!  I'm happy to be back today for my second Leading Lady post this month on the Winnie & Walter blog.  Following my post from last week where I put out the challenge to make the most of the tiny stamps in our stamp sets, today's theme is to stretch your dies.  For the next two cards I mainly used two recently released die sets, Essentials: Josephine Cutaways (hexagons) & In a Word: Holidays Tiles Cutaways.
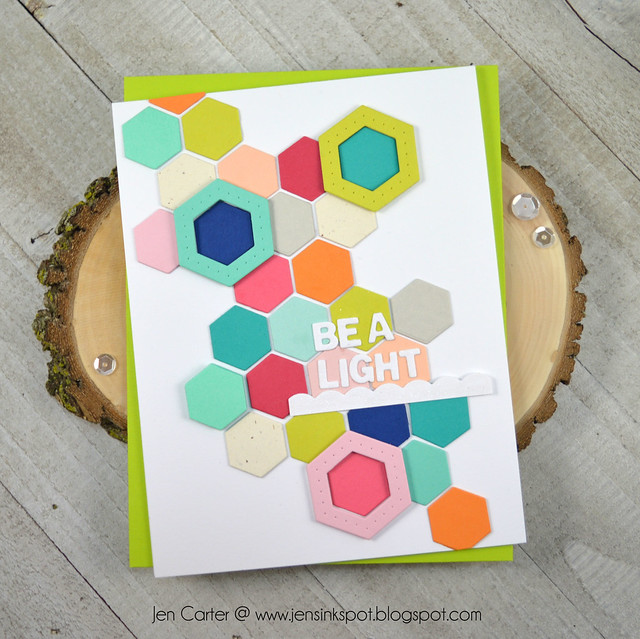
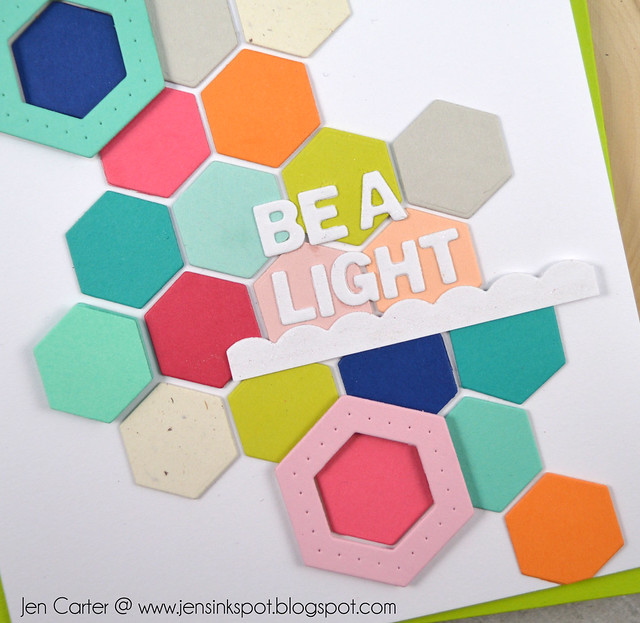
Be a Light

Jen Carter Winnie Walter Josephine Hexagons Holiday Tiles Be Light

For this first card I started by choosing a color scheme and then die cutting three of the smallest hexagons from the  Essentials: Josephine Cutaways die set in each cardstock color.  When die cutting with this die you not only cut the small hexagon but you also get the hexagon frame in one pass.  I set aside most of the frames for a second card.  I started by laying out the hexagons in the order I'd like, trying to keep them as straight as possible and then adhered them down to my card front.  


Jen Carter Winnie Walter Josephine Hexagons Holiday Tiles Be Light Closeup

I had a lot of fun playing with the sentiment.  I took the In a Word: Holidays Tiles Cutaways (shown below so you can have a visual) and started playing with the letters to see what words I could come up with using the various letters this set cut.  I found a website that was a big help to me called Word Grabber.  You enter the letters that you are working with and it generates words using those letters.  There were pages and pages of words to choose from using only the letters included in the Holiday Tiles set.  It was definitely a great way to stretch a holiday themed die set!  Once I came up with the sentiment I adhered it to my card. I die cut the top portion of the scalloped frame included in the die set and used it for a border under the sentiment. 

To finish the card, I added in three of the hexagon frames and popped them up with dimensional tape and then chose one of the hexagons and also popped it up to add some visual interest.
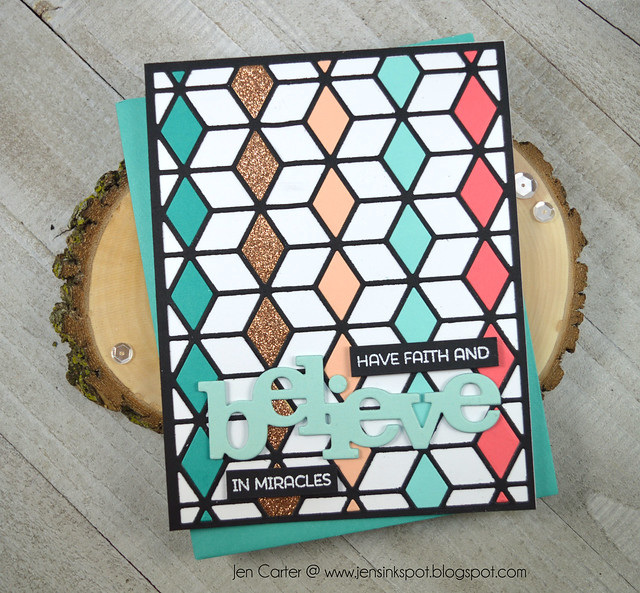
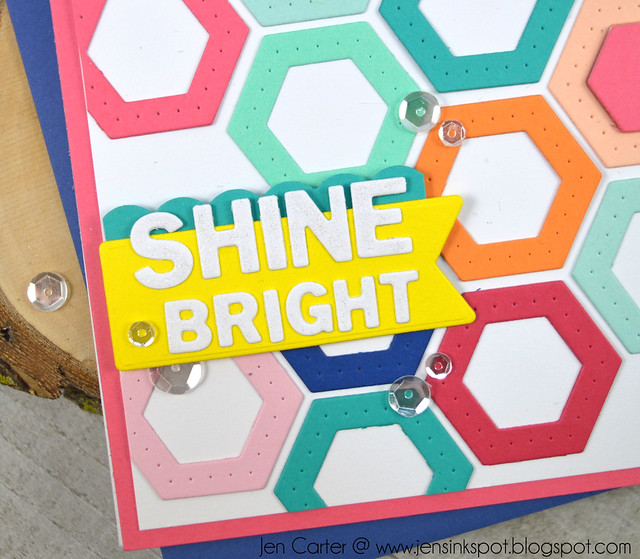
Shine Bright

Jen Carter Winnie Walter Josephine Hexagons Holiday Tiles Shine Bright

My second card is basically a repeat of the first card only this time I used the frames that were die cut when I cut the hexagons for the first card.  Again I randomly added the solid hexagons to the centers of a couple of the frames and popped them up with dimensional tape.

Jen Carter Winnie Walter Josephine Hexagons Holiday Tiles Shine Bright Closeup


I created the sentiment the same way I did on the first card, using the  Word Grabber website to find the words to use. I used a Nuvo Aqua Shimmer pen to add some sparkle to the white letters.  I adhered the letters to a banner that I had die cut with the Tagged: Holiday Cheer Cutaways die set.  I again die cut part of the scalloped frame in the In a Word: Holidays Tiles Cutaways set and adhered it to the back of my banner tag. I finished the card off by adding some clear sequins.

I hope this post will help you to be able to find ways to stretch your dies in new ways.  


Leave a comment on any (or all) of my Winnie & Walter Leading Lady posts for a chance to win a $30 gift card to the Winnie & Walter store!  Thanks for visiting today!

Thursday, February 8, 2018

Stitched Love


Stitched Love
Are you ready for Valentine's Day?   It's getting so close!  Today's card is one for not only Valentines but for anyone you want to show love to or even for weddings or wedding showers.

DSC_4959

For this card I started by cutting the Forever Heart Die Layer 2 into dark gray cardstock.  I really like how this die stitches the heart and border around the card base!  It also has a coordinating die called Forever Heart Die Layer 1.  I die cut the "Love" from the Love is Love die into the bottom of the card base.  The little hearts in the center of the Love and coming up from the top of the "O" are from the extras in that die set.

DSC_4963

For the background of the Love I stamped and embossed in white the wreath from the Love & Honey stamp set and then colored it with Zig Real Brush pens.  I popped the entire gray cardstock up with dimensional tape.  

Thanks for taking a peek!
Related Posts Plugin for WordPress, Blogger...