Monday, September 24, 2007

Mini Scrapbook Coaster Magnets

Here is a super easy project that I made to demonstrate at a couple of Funshops. This is a mini scrapbook page attached onto a chipboard coaster and the back has a magnet glued on to it so that you can hang it on your fridge or file cabinet or desk, etc... These are so easy to make with The Angel Company's beautiful paper packs. You already have the coordinating papers and tags and all you have to do is cut the paper to size and add a few embellishments and you're done!

(The first coaster uses the paper & tag from the Kamalaht paper pack.)


The stamp sets that I used on all of the coasters are TAC's "More Abundance" which is absolutely perfect for this project and great for other scrapbooking projects as well. I also used "Running Stitches" on the bottom of the tags to give the tags a little extra embellishing. I inked the stamp once and stamped it onto the tag and then without reinking, I stamped the same stamp twice more. This is what gives it the fading look.

The second coaster uses the paper & tag from the Hemingway paper pack.)


On the corners of each coaster I stamped one of the images from "Artsy Elements" (LOVE this stamp set--it is SO versatile!!) in Noir Palette ink and then used another one of my absolute favorite products--Souffle pens--to add the colored dots. The dots just give the scrapbook page the little extra color that is needed to finish it off. The tags on each coaster are attached on pop dots which give the page dimension. I also went around the edges of each coaster with Noir Palette ink to give the edges a little color as well.

(The last coaster uses the tag & papers from Mia's Cottage (tag & striped paper) and from Sands of Time (background paper.)

See! I told you it was easy!! It makes a great gift for a family member or friend also!!

Tuesday, September 18, 2007

Altered Photo Frames


I am having so much fun playing with these photo frames! I bought the frames from various places like Michaels or Dollar Tree and then painted them white and altered them. How much fun is that? These are for a craft fair that I have coming up in just a few weeks and I'm frantically trying to finish projects to have for sale!

I also want to say that some of the frames that I bought at the Dollar Tree were absolutely HIDEOUS!! They were so ugly, but only $1 and once I sanded them down and painted them, and then covered them with paper, you would have never known what they looked like when I originally bought them! So, even if you can't find a plain wood frame to alter, look at Goodwill or the Dollar stores or even garage sales for a frame that you can make into a beauty!!

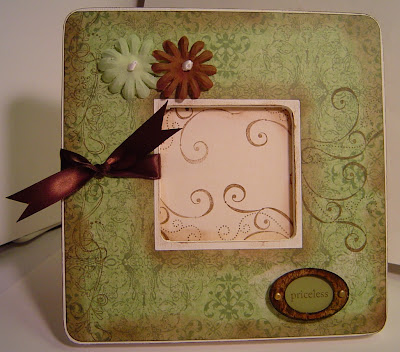
The latest frame that I altered is shown above. I used paper from the Catelynne collection--one of my favorite paper sets in the TAC catalog! I used flourishes from the "Curls & Swirls" stamp set inked in Burnt Umber Palette to create the swirls and then sponged ink on the sides of the paper. The bookplate is chipboard that TAC sells and is from the set called "Essential Elements". There are so many things that you can do with this chipboard set! I used Burnt Umber & Landscape Palette ink to color the bookplate and then embossed it twice with Ultra Thick Embossing Enamel. The flowers are another one of my favorites and they are the Assorted Bitty Blossoms that are also in the TAC catalog and I just tied a ribbon through the center of each flower.

The chipboard in the middle is to be replaced by a photo and when it comes time to sell this one, I will probably put the price on that piece.

I should also add that I saw a frame similar to this one on another blog and fell in love with it and this is my version of that frame. So, I cannot take credit for the original design of this frame--I just altered the design to fit with The Angel Company products! Thanks to Christina Fischer for her awesome design work! If you would like to see her frame, you can click here.

I will try to upload some other frames that I've made later on. I hope that this inspires you!!

Wednesday, September 12, 2007

The Evolution of a Card & Chalk Pencils


Sometimes when you are trying to make something it just doesn't turn out like you had hoped. That's what happened when I made this card. I took the layout from a card Gwen had made but when I put the scarecrow image on it, it just wasn't right. And, looking at it in retrospect, I think that the main reason that I didn't like it was because of the scarecrow's black nose--which could have easily been changed!


Anyway, since I was trying to work on a card to make at a FUNshop, I tried again. Earlier in the month I had made the "Swirly Seasons" card pictured above for a swap (the dots on the pumpkin have been paper pierced) and I really liked the layout so I decided to see what it would look like with a scarecrow as the main image instead.


I was starting to like the card more but I felt like the first circle that I had stamped with the TAC "Circle Sampler" set and then punched was a little too big for the card so I added a center circle popped up with a pop dot. I still didn't have it quite right. The circles just overwhelmed the card a little too much for the purpose I had in mind. So, I tried again and this is what I ended up with:

As you can see, all of the cards are very similar but by changing just one or two elements, I was able to get it just right. Then, I decided to use the same layout again and use a totally different theme and color scheme and see what the card would look like. This was for an example of how you can take a layout from a card that you previously made and use the layout again to achieve a totally different look. This is a great tip when you are in a hurry and don't have time to design a card from "scratch". Here is how that card turned out:


Just by changing a few elements, like the paper and stamp sets I was able to create a card that had a totally different look and feel to it and it took a lot less time to put together than the other cards that I was trying to design as I went.
The scarecrow and baby cards were all stamped with the "Everyday Events" set from The Angel Company which I just love. The images were colored in using Chalk Pencils. These pencils are a lot of fun to use and give you a very vibrant colored image. They are acid free and archivable and very easy to blend. If you would like to know more about how to use chalk pencils and the different techniques that you can do with them, click here and you will find an article that I wrote telling all about them.
I hope that you enjoyed these cards. Sorry that this entry was so long!! Thanks for sticking with me until the end!

Thursday, September 6, 2007

Happy Birthday Masculine Spinner Card

*******
 
April 1, 2013 Update:
 
 
Suzanne is hosting a blog hop with the Ugliest Card we've ever made.  Well, as I was looking through my blog, especially from wayyyy back I found some pretty awful cards.  But, none as ugly as this one that I gave to my husband for his birthday one year...prepare yourself, it is UGLY!
 
*******


Today is my husband's 35th birthday. He made the comment that I didn't give him a card last year (shame, shame--but I did give him a gift) and so I made it a point to make him a cool card this year.

He is totally into race cars (used to race a dirt track car) and so I pulled out the new TAC "Cars" stamp set. I couldn't bring myself to use the actual race car in this set because we are not Ryan Newman fans and the car on the stamp is number 12. We're Jeff Gordan fans--#24!! So, I used the sports car instead and made this cool spinner card.

This is the first time in a long time that I didn't use exclusive TAC papers but I had bought these papers several years ago and since it was for my husband I decided that it didn't matter too much. The black and white paper that the car is "driving" on is a left-over piece that I made using the wax resist technique.

The fun thing about a spinner card is that the image actually spins across the card! It's so awesome! I always tease Dwight about crashing so I thought that it would be fun to put the car on a spinner. As you can see on this next photo, as the image makes its way across the card it spins around and upside down. It's so much fun!! And, it's easy to make!!


Of course I couldn't make just one spinner card. I had to make a pretty, girly one too! This one I LOVE!! It is made with one of my favorite new TAC paper packs called "Mia's Cottage". Isn't the paper gorgeous??!! This card uses 3 of the 5 papers in the pack. The flower spinner is punched out of one of the sheets of paper in this pack--my personal favorite! The striped paper underneath is another page from the pack and the bright pink background paper is also included in the paper pack.

I stamped a flourish from "Artsy Elements" in Claret Palette on the sides and the sentiment is stamped in Noir Palette ink and is from the "Little Things" set which is another one that I love.
As you can see the flower spins across this card too. These are just way too much fun!!

Wednesday, September 5, 2007

What can you do with a clay pot?


I saw the cutest project in a magazine that I recently bought called "Homegrown Hospitality" by Papercrafts. It is a magazine that gives you ideas for gift giving. The project that they made was "Terra Cotta Cookie Pot" and they took a small, plain clay pot, wrapped some cookies in cellophane and put them inside the pot and then they tied a ribbon around the pot to give as a gift. Very cute.

So, this made me wonder what I could do with a terra cotta pot and some stamps. How do you stamp something that isn't flat? So, what I did was inked my stamp with Palette ink and then laid it on the table. Then, I rolled the pot over the top of the stamp making sure that I rolled over the entire imagine so that I didn't cut any of the image off. It worked perfectly! The palette inks worked beautifully on the pot too!
Since this was just my first try I know that I can do it better next time and make the design even more interesting but I am happy with the result!
I am working on crafts for an upcoming craft fair and when I was at Target today I visited my favorite place in the store--the dollar spot! They had a cute little manicure set and a pack of 3 tiny finger nail polishes--just the right size for my tiny pot. I think that they look pretty cute in the pot! Now, when I'm ready to sell these I'll wrap them in cellophane, tie a pretty bow around it and stamp a tag to attach to the bow.
Simple project but a lot of fun! Just think of all the possibilities that you could do with these! You could give them as gifts, give them to hostesses as a thank you, have them as table favors or even use them at a class.
What can you put inside the pots? Candy, jewelry, nail polishes, lotions, foot scrub, cookies, etc, etc, etc... The list can go on and on and on!
Just one more way to incorporate stamped items into your home decor!

Tuesday, September 4, 2007

TAC September Specials GALORE!!

Wow! There are so many new specials that TAC is offering during the month of September! There is something for everyone!

For customers...

Remember September Promotion

The Angel Company will help you “Remember September” as the perfect papercrafting month by offering two product coordinates collections that are cute, classy, and just the right amount of sassy! Each kit features either TAC™’s exclusive Lilly Anna™ or Mimi™ paper collection, a limited edition stamp set, a coordinating cardstock pack, coordinating hardware, and ribbon collection for a very special price. Whether you pick fresh, funky Lilly Anna™ or fashion-forward Mimi™, you will have made the perfect choice to create projects that are truly unforgettable!


For Hostesses:

Oh how we love our Hostesses! Promotion

This promotion is awesome and I just found out about it this weekend.

Do you like this stamp set? I DO!!


It is called "Oh How" and will be a new stamp set featured in the January 2008 catalog. But, it can be yours during the month of September for FREE if you have a FUNshop that reaches $250! This is in addition to the Level A & Level B hostess sets of your choice with a $250 Funshop!! This has a retail value of $10.95 and will not be made available to the rest of the public until January--so get your sneak preview while you can.

And, last but not least, for everyone:

September's Stamp of the Month


This is called "Love & Kisses" and can be yours with a $30 purchase during the month of September. This set is only $4.25 and consists of the 4 stamps shown above. For ideas on how to use this set, visit The Angel Company's website here.

Sunday, September 2, 2007

Kallioppe!!

This is one of my favorite cards that I designed for the TAC catalogue. It didn't make the catalogue but it was on display at seminar which is why I am showing it to you now. When I first saw this set I wasn't sure what I was going to do with it but I had a lot of fun using it! The ladies in this set are a hoot and it made designing this card so much fun! The set is called Kallioppe and retails for $10.95 which includes 3 different ladies and 3 different sayings.

The paper that I used is from the TAC Hemingway collection which is just gorgeous! I love the colors! The cardstock and ribbon are also available through TAC and is coordinated to match the Hemingway paper collection.

I colored the ladies with aquacolor crayons and a dove blender. The dresses and the buckle on the shoe were colored with glaze pens which makes them shine--LOVE those pens too!! You can see the shine a little better from this angle.

So, try a stamp set that you may not think is "your" style and you may be surprised with what you come up with!
Related Posts Plugin for WordPress, Blogger...