
Well, I told you in my earlier post that I hoped to have some cards featuring the new Scor-pal bug tool and I have those ready!! I took time to relax and play a little today!
This first card above is my favorite of them all! Have I ever told you how much I LOVE POLKA DOTS!! They are so cool and so "in"! I created the polka dot background on the green bazzill cardstock using tools that you may already have at home! For the solid polka dots I used a pencil eraser dipped in VersaMark ink and for the circle outlines, I used a lid from my water brush pen, tapped it on the VersaMark pad and then stamped it onto my paper. It took a little patience but was worth the end result!
Here is how the embossed/de-embossed lines were made using the Scor-bug.

First, I lined up the orange bazzill cardstock so that I would be able to do 2 rows of dots 1/4" apart using the scor-pal.

Next, I took the scor-bug and first ran the bug down the paper on the BACK side of the paper so that the dots would be raised when I turned the paper over. Then, I turned the paper over and scored with the bug on the front side so that the dots would be de-embossed as you can see in the photo above. You move the tool over the scor-pal just like you would if you were using the scorer tool.
 This is how the dots look closeup.
Stamps: Graphic Blooms, Petal Pack, Blooming Builders, Laughter Hostess Set
Inks: Water Lily Green, Orangerie (stamped off twice before stamping on the paper) & Burnt Umber Palette
Here is another card using the same stamp set as above, Graphic Blooms, but with a whole different look. See how you can take the same set, use a different color scheme and the set takes on a whole new identity?
 For this one I embossed with the scor-bug on the back side of the cardstock. Then, I turned it over and took a sanding block and lightly sanded the embossed circles to create the white bumps. What an easy way to create a background! I also added stickles to the centers of each of the flowers. You can see a closeup of what this looks like below.
 The next cared has a shape all it's own!
 See what I mean? The top part of the red TAC Scarlet paper goes above the top of the card base by about 3/4" or so. Yes, it would require a slightly larger envelope (or you could scale the card down so that it would fit in a standard A2 sized envelope). I printed the TAC free black & white paper download onto this scarlet paper and that is what the background is made of. I also had a piece left over from the card that I am going to show you next and that is what I made the strip with. You can see that I used the scorbug to de-emboss a row of dots down the side of the card. A closeup is shown below.
 And, last but not least, here is my last example of using the scorbug on a card (well, for today anyway).
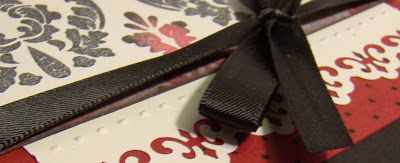
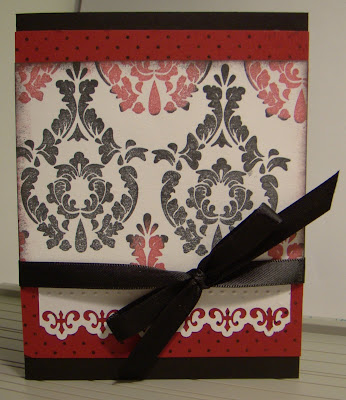 This uses a set you've seen a lot of recently, "Victorian Elements". I used the Scorbug right below the black ribbon. A closeup of this is shown below. This is another piece from the paper that I used above (the B&W TAC free download paper printed on to TAC Scarlet).
 I hope that you enjoyed these samples as much as I enjoyed making them! Be sure to check out these other Angel blogs to see their scorpal projects!
Melisa - http://paperliciousdesigns.blogspot.com/2009/05/score-pal-projects-blog-hop.html
LaurieW - http://www.soapboxcreations.blogspot.com/
Brenda - http://bcraftytoday.blogspot.com/
Carol - http://stampincarol.blogspot.com/
Rita Kegg- http://ritasangels.blogspot.com/2009/05/blog-hop-scor-bug.html
Jany - http://stampwithjany.com/
Vicki - http://angelstamper2.blogspot.com/
Bridgett - http://hoosierstamper.blogspot.com/
Allison - http://stampedbyanangel.blogspot.com/2009/04/trio-tutorial-money-holder-business.html
Chris - http://allamericanstampers.blogspot.com/
Kim - http://angelatmydoor.blogspot.com/
Betty - http://stampinteacher.blogspot.com/2009/04/scor-pal-blog-hop.html
Jamie - http://inkspots101.blogspot.com/2009/05/stamped-teachers-gifts.html

 Here is the Mother's Day card I made today for my mom. It was inspired by one Jen Tapler made using patterned paper. I loved how it looked and challenged myself to recreate it using stamps and white paper. I think it turned out pretty well!
 Here's another view from the front. The sentiment is from "Trendy Greetings" and I use it A LOT! The brown piece that it is stamped on is popped up with pop dots.


 The scalloped paper is 8x8 and made with DCWV Scalloped paper Robins Nest 3.
 I stamped one of the flower images from “Victorian Elements” with Water Lilly Green palette ink onto the Robin’s Egg 3 scalloped paper. I stamped it first on scrap paper and then stamped it the second time onto the cardstock to make more of a watermark effect. I stamped it 3 times to create a partial border. The tag is from the Reece paper pack and is popped up on pop dots. “Our Girl” is from the “This Girl” set and is stamped in Water Lilly Green ink. I used flowers & buttons from the buttons & blossoms jars in the catalogue and also stamped the flower image onto the blue flower (which doesn’t show up well in the photo but has a nice effect). I tied scrapper’s floss through the button holes and attached them to the flowers with glue dots.
 I LOVE how the “bow” is tied through this button hole! I didn’t pull one side of the ribbon completely through forming a loop. I pulled the knot tight and had a cute little accent for my button (which came out of the Audrey Embellishment Jar). Easy but it adds a nice touch!
