
Today and tomorrow the design team will be sharing the new Fringe Flower die! This die is so much fun!! I have made so many flowers with this die and have cut so many different types of products with this die that I had a hard time narrowing down what to share with you today! Want to see what it looks like?

There are prizes up for grabs too!! You can win one of THREE $10 Shopping Sprees to the Lil' Inker Designs store just by leaving comments on the blog posts each day! You have until Sunday, September 25th to comment and the winners will be announced on the Lil' Inker Designs Shop Blog on Monday, September 26th.
Now for the projects!
This first project speaks to my Kansas heart. :) You can't drive down the roads without seeing wild sunflowers everywhere! I LOVE seeing them! They are just so beautiful!
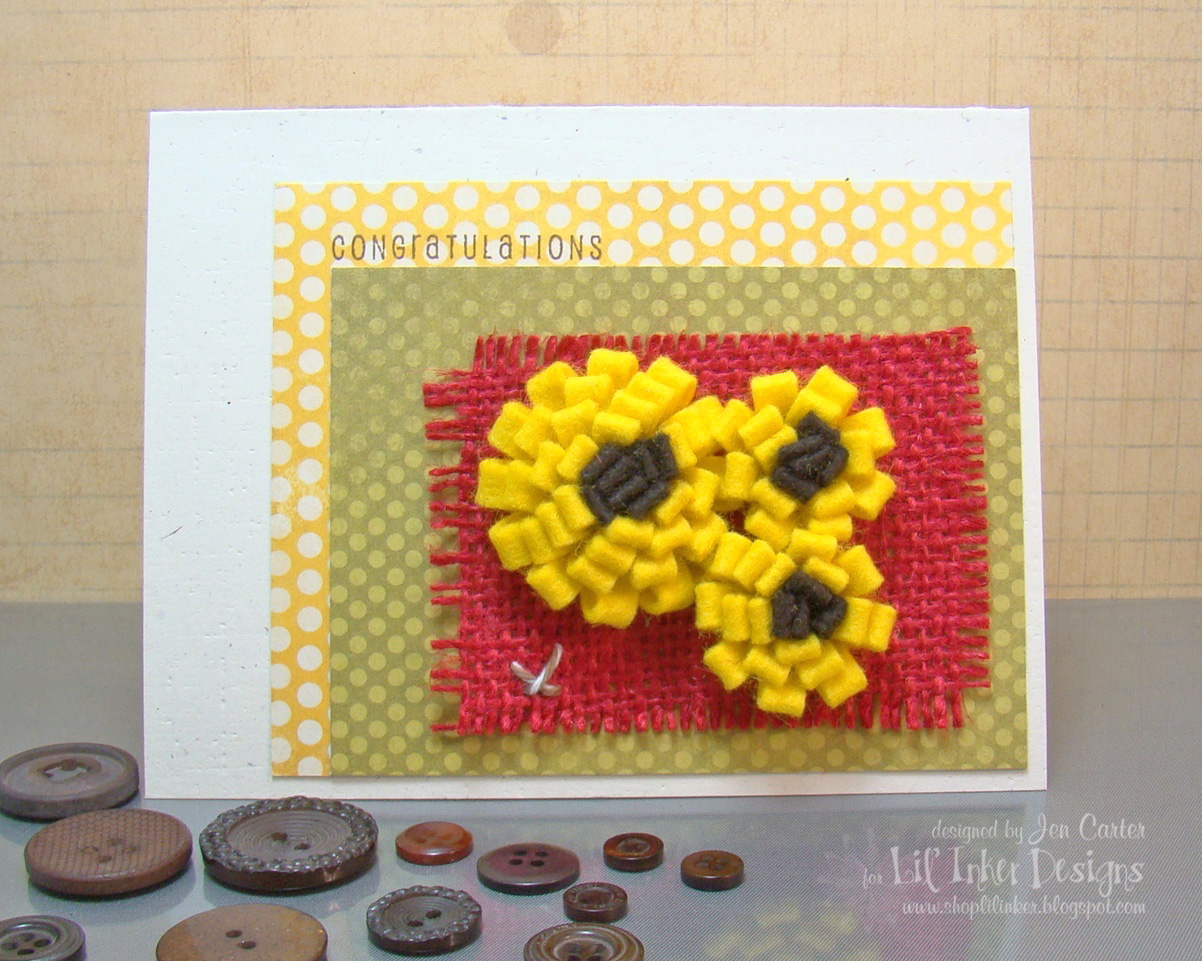
I went with a very earthy, natural feel for this card and made three sunflowers. It is so easy to make these flowers with more than one color and I've prepared a short tutorial below to show you how to do it! It is also easy to make the flowers smaller or larger depending on what size you'd like them to be. Just add more or less felt and you're ready to go!

First cut two pieces of felt from the colors you want your flower to be and fold each piece in half as shown. Since I wanted the inside to be brown, I cut off 4 "fringes" from the brown die cut. I attached the brown felt to the yellow felt by placing a 1/8" piece of scor-tape on both sides of the felt to hold it together.

Second, I took the paper backing off the scor-tape from the first step and then applied a second piece of scor-tape over the entire piece of felt. This helped to stabalize the two pieces together too.

Third, remove the paper from the scor-tape and start rolling your flower, beginning with your center color first.

The last step is to secure the flower ends down. I found that using a little bit of hot glue worked the best to hold the ends in place.

Here's a closeup of the finished flowers. I "poofed" the flowers out a little by carefully spreading the petals out.
For my next project I wanted to share another card that I made using several different types of flowers made from this same die.

There are so many ways to make different looking flowers from this one die!! I love the versatility of it!

The pink flower is my favorite of this grouping and it is really easy to make! It measures approximately 2 inches in diameter. I put together another quick tutorial on how to make it that you will find below. The yellow flower is just a smaller version of the regular fringed flower. I cut off a small piece from the die cut felt and rolled it. The turquoise flower is cut from several layers of white tissue paper (probably 6 or 7 layers that I cut all at the same time). I kept the layers together and rolled them and then used scor-tape to keep the ends together. After it was rolled I sprayed it with turquoise glimmer mist several times to get a good coat. When that was dry I also sprayed it with a clear sparkly glimmer mist. I think it has s fun, full look to it!
Here is the tutorial on how to make the felt flower shown in the card:


Put hot glue around the edge of your circle and begin adhering the fringes to the glue.

Here is what it looks like when you have finished going around once.

Cut off the excess fringe and apply another layer of hot glue to the inside of the circle.

Attach a second layer of the fringe. At this point you only have a piece left with about 4 or so fringes on it. You can attach a button to the center like I did for my card above or you can cut another piece of felt and add one to two more layers to your flower.

Here is a flower with 3 layers added.

Here is a flower with 4 layers.

Here are 2 finished flowers. The pink flower has four layers of fringes and the purple flower I chose to add three layers and then glue a button to the center.
Here is a look at my finished card again.

Thank you so much for visiting today!! I hope I didn't tutorial you out!! :) I think you will LOVE this new die!! It makes creating these flowers a cinch! I can't wait to share more with you at a later date!! I will have another post on Thursday & Friday of this week with more Sneak Peeks of Lil' Inker Designs New products!! If you would like to purchase the Flower Fringe die, it is available NOW in the Lil' Inker Designs store, so be sure to head on over and grab yours!
Make sure to visit ALL the participating designers today and be sure to leave a comment on each blog for a chance to win!!
Your next stop on the hop is the Lil' Inker Designs Shop!!
In case you didn't start at the beginning of the hop, here is a complete list of all participating designers (there will be another group of designers posting more projects using this die tomorrow, so be sure to visit the Lil' Inker Designs blog tomorrow as well!
Jen You are Here!!
Supplies
Sunflower Card
Lil' Inker Designs: Fringed Flower Die, Sentiment Flags Stamp Set
Other: Twinery Twine, My Mind's Eye Patterned Paper, Linen Impression Plate PTI, felt (Felt on the Fly Etsy Store & Hobby Lobby brown), Red Burlap, PTI Dark Chocolate Ink
Thank You Card
Lil' Inker Designs: Fringed Flower Die, Pinwheels Stamp Set
Other: Raspberry & Harvest Gold Felt PTI, Tissue Paper, Country Foliage Sizzix Embossing Folder, PTI Linen Impression Plate, Raspberry Fizz, White, Black & Simply Chartreuse PTI Cardstock, Buttons, Scrapper's Floss, Corner Chomper, Glimmer Mist

48 comments:
Oh my goodness Jen, you have really shown what this die can do! I love your card using the die 3 ways......look at your creative self! You are truly an amazing creative designer and I'm so glad to have you as a friend!
What a gorgeous cards and flowers. Thank you for making this tutorial!
Thanks for the tutorial on doing the flowers. I just love the different looks of them.
Versatility!!! Your flowers are just lovely!!! thank you!!
These are just too cute! Thanks for the tips!
Robin
Both cards are amazing! I love how you made your sunflowers :)
Jen, I am totally blown away right now!! Your idea to combine the 2 different colors of felt is BRILLIANT! Your card with the three flowers is amazing and I love that you have 2 TUTORIALS here for both ways you've so cleverly used our new die! I can't thank you enough for all this wonderful and amazing work! WOW!!
Totally totally cute Jen! Love the flat flower you showcased! Great use of the die!
These are so pretty Jen. Love how you added the brown to the yellow flowers. :o)
Wow! These flowers are absolutely amazing. Thanks for showing some fabulous alternatives for using this die!
Your sunflowers are really cute, but your second card totally wowed me. I love the debossed background, bright colors and that you made three different flowers! Thank you for the pictured tutorial, too. Very helpful. Awesome job!!!!!
another really great tutorial on how to use this die to max advantage. loved the larger flowers and the cards are lovely.
Oh gosh...those are super cute! LOVE the way you used two colors on the flower. Just beautiful, Jen!
I'm just amazed. Your projects are great! I have to have this die!
Wow, Jen! Your projects are always so amazing! I absolutely LOVE the two tone flowers! So creative!
Oh, Jen, I love these cards! You are so clever to create a different colour centre and I appreciate the tutorial 'cause I never would've figured that out. LOL
Fabulous flowers and cards--thanks for the tutorials!
I <3 your card. :D
Cute cute flowers and cards!
love those flowers and cards. Thanks for the tutorial.
Amazing creations, and beautifully demonstrated! Appreciate that! Love your work!!
Ooh! I'm loving your tips, Jen. First the two-color flower, then that flat version. Outstanding!
Fabulous inspiration. I especially like the fall colored sample.
These are fabulous! Thanks for the tutorial! Looks less intimidating than ALL hot glue gun!
As always Jen...you make these dies look amazing!! What terrific projects and you did a fab job at sharing the instructions!
Thanks for showcasing the different textures that you get with the flower based on the material you used. Great cards!
Very cool flowers and a great tutorial. . .now I need the die!!!!
AWESOME projects Jen! Love your flowers, great work!
Love those cheery sunflowers!
What a versatile die -- at least in your hands! Beautiful results.
Great projects. I am loving this die.
Your flowers are amazing, Jen!! Lovely cards, each and every one!
Gorgeous flowers and I love that sunflower idea! ;)
I love your choice of colors. You have a great eye for combing your colors.
Wow Jen! You were busy! This die looks like so much fun! I LOVE your sunflower card with the red burlap and so natural looking! The other card is just gorgeous and who knew you could do so many things with this die! Thanks for the tutorials and all the tips!
FABulous, Jen! I love the sunflowers on your first card and the three completely different-lookin' flowers on your second card!
Jen this is gorgeous! I love all of the fabulous flowers you created. That die is amazing. I love your card with all of its wonderful texture! :)
Stunning examples! Thanks for the tips and tutorials :D
That sunflower is super fabby...
love the way you did it!
Great cards!
Oh my heavens.. I just love your creations.. and your tutorials are wonderful.. :) hugs
super cute cards!! Love the sunflowers!!
Such pretty projects!! And fantastic tutorial too!! Thanks for the inspiration!
Beautiful cards, loving them. Thanks for the inspiration and giveaway.
Great tutorial! You make gorgeous flowers :o)
WOW!!! I really need this die, love it!! Your creations are amazing!
that is a crazy-fun new die!!! love how you've showcased it! :)
Oh, this is fabulous! Want!
I found hot glue worked best as well. Love your card with 3 different and beautiful fringe flowers! Some thinking outside the box for those! Love the burlap addition.....it's fun to use!
Post a Comment