Monday, July 30, 2012

Hooked on Hexagons

Hi & welcome!!  I hope you are doing well! We just returned from a conference in Omaha.  We had a great time and it was so good to be back in the city I went to college in!  I had a lot of fun reminiscing and touring the college I attended and seeing all the changes!  While in Omaha, we got to hear Alex Kendrick of "Facing the Giants" and "Courageous" speak (and got his autograph and picture too).  It was such a great event and I loved seeing my 9 year old son on the edge of his seat enjoying what Alex had to say!

Ok, on to the crafty side of things...

I love hexagons! I don't know what it is about them, but they are fun to design with and they catch my eye!


I put together this gray/coral card and it was a lot of fun figuring out where to put the pattern paper and how to piece everything together.  I love this patterned paper by Authentique in their Carefree collection!  Such pretty colors and pattern choices!


I popped up the sentiment that was stamped on a hexagon and in doing so, it allowed me to be able to tie my new Twinery Strawberry twine through the hexagon hole.  Such a fun and easy way to add a little extra to the card.  

This card is being entered in the Hooked on Hexagons challenge in the Moxie Fab World.  You only have a few hours left if you want to play along!  Thanks for stopping by!

Sunday, July 22, 2012

Best Wishes

Hey everyone!!

I made a few cards to share with you today to celebrate the new colors of twine available today from The Twinery!! One of the cards is also for PTI's Stamp-a-faire event that was this weekend!


First up is a very busy card with the beautiful new Ocean twine!  What a gorgeous, gorgeous color this is! I love it!  This card is for the PTI Stamp-a-faire event where we were challenged to make our own embellishments.  I made my own embellishments by taking the center of the sun and sewing several half circles on it to give it detail and also used the twine to embellish the butterfly.


Here is a closeup of the twine so you can see this fabulous color a little more closely.


This next card showcases the new Midnight Blue twine that I've paired with PTI's Enchanted Evening ink (used to stamp the "friend" sentiment).  


This sweet little postcard is from one of my favorite paper packs, "Summer Fresh by Simple Stories".  I cut it out and tied the twine around it.  It worked perfectly!

There are four new colors being released today!! Yippee!!  


I shared a card last week that used the Strawberry color (it is a coral color) and you can see it here.  I have another one using that same color to share with you at a later date.

Be sure to stop by The Twinery today to see these new colors for yourself!

Thank you for stopping by today!! I hope you love these new colors as much as I do!

Supplies:
Best Wishes Card
Twine: Ocean
Paper:  PTI Smokey Shadow Patterned Paper, My Mind's Eye Indie Chic Nutmeg, Aqua Mist Cardstock
Ink:  Dark Chocolate, VersaMagic Ocean Depth
Dies:  PTI Fabulous Frames & Hello Sunshine Dies, Sunrise Impression Plate, WPlus9 Butterfly Die
Stamps:  Paper Smooches, PTI Fabulous Frames

Friend Card
Twine:  Midnight Blue
Paper:  Simple Stories Summer Fresh, My Mind's Eye On the Bright Side One, PTI Harvest Gold
Stamps:  Friends 'Til the End PTI, Market Street Stamps Candy Stripe

Limited Supply Challenge

Hey!! Did you participate with the PTI Stamp-a-faire this weekend?  I went over to Laurie's house and while we didn't get a ton done, we did have a good time and accomplished making a few cards!  Here is one of them for the Limited Supply Challenge.


Our challenge was to use:

STAMPS: Natural Beauties only (or another floral set as a substitute if needed)
  • PAPER: Stamper's Select White, Hawaiian Shores, Aqua Mist, Simply Chartreuse
  • RIBBON: Hawaiian Shores Bitty Dot
  • BUTTONS: Simply Chartreuse  
  • You can use as many or as few as you like and any inks you prefer.  You may also add in dies, twine or glitter if you desire. Please do not use any other products besides those listed .


  • I kept it pretty simple and only used a few extra items that were fair game like impression plates/dies and twine and a few extra colors of ink.  

    What a fun challenge!


    Supplies (all PTI unless noted)
    Stamps: Daydreamer, Pretty Peonies
    Paper:  Hawaiian Shores, Aqua Mist, Aqua Mist Patterned Paper, White
     Ink: Simple Chartreuse, Aqua Mist, Hawaiian Shores, Raspberry Fizz, Harvest Gold
    Other: Linen Impression Plate, Simple Stripes Impression Plate, Twinery Twine, Pop Dots, Fabulous Frames Dies

    Friday, July 20, 2012

    Sunshine & Rainbows!

    Hello!  Today I have a card for the CAS-ual Friday's challenge.

    The theme is to use a black card base.


    I went bold!  The sponsor this week is Lil' Inker Designs so I incorporated a lot of those products onto my black card base.  I used Lil' Inker Designs new large sun die, the cloud dies, the large banner die from Flags & Tags, and a sentiment from the Rainbows & Clouds Stamp set


    To create the multi-colored rainbow banner, I die cut the banner three times in different colors and then cut each piece down to size and adhered them together.  It makes a very bold banner with a fun look, the perfect backdrop for my rainbow sun.  The bling in the middle of the sunshine die is a clear rhinestone that I colored with my copics.

    If you get a chance to play along this week, the prize up for grabs is a $20 gift certificate to Lil' Inker Designs!  There are so many fun products to choose from!

    Thanks for stopping by! I hope you have a great weekend! I'm off for some stamping fun tomorrow with my friend Laurie Willison!  It's been too long since I've had the chance to stamp with a friend, so I'm looking forward to it!

    Thursday, July 19, 2012

    Hello!

    Hey everyone!! I spent a little time this afternoon creating and I wanted to share one of those cards with you!


    If you haven't heard, The Twinery is releasing FOUR new beautiful colors of twine next week!  Whoo hooo!  I got those new twine colors in my hands yesterday and was so excited to take them for a test drive.  Well, they are a hit!! LOVE them!  Here is one of the cards I created with the new colors.  This color is called "Strawberry" and is a pink coral color.  

    **If you are a PTI fan, this is a PERFECT match for Berry Sorbet!  Yea!!**


    There are several other things that I love on this card.  Hexagons.  What is it about hexagons?  I just adore them and they are so trendy right now!  And that sweet little Hello tag.  You know, for some reason office & school supplies always call my name.  I'm always looking to see what I can do with the new designs for the year and how I can incorporate them into fun projects and gifts.  When I saw this stamp set, it was a match meant to be! LOL!!

    Thanks for visiting!! Have a great day!

    Supplies
    Stamps: Avery Elle Hello
    Paper: PTI Smokey Shadow, Rustic Cream
     Ink: PTI Berry Sorbet & Palette Charcoal
    Other: Strawberry Twinery Twine, PTI Hexagon Cover Plate, Corner Rounder, Pop Dots

    Thursday, July 12, 2012

    It's a Party!

    Welcome back to another fun-filled release wrap up post with Lil' Inker Designs!  Today the entire design team will be sharing projects using products from this month's release from Lil' Inker, and on my blog it is going to be a party!

    If you are following along with the blog hop, you should have come from the fabulous Amy's blog!  If you would like to start at the beginning, visit Laura's blog!  Don't forget to comment along the way to be eligible to win one of two $10 gift certificates to the Lil' Inker Designs store (LID) where all of the products from this release are stocked in the store and ready for ordering!

    Let's party! (There are A LOT of pictures in this post by the way!)


    For this party I used both the new Flip Flop set and the Sunshine dies along with other fabulous LID products!  The gumballs and licorice are proudly displayed on a cake stand that I made myself! 


    Here is a closeup of the licorice jar with the lid on.  I used the Lil' Inker Designs large banner die for the clear tag.  I found some FUN duct tape (the polka dots) and attached it to the top of the tag and then attached the sun die cuts as well.


    Aren't the suns so fun in different, non-traditional colors?  I LOVE how they layer on top of each other so well too!  They just pop against all of the rainbow colors!  I punched a couple holes in the plastic tag and tied my Twinery Charcoal twine around the jar to hold the tag in place.


    And the candy jar...


    For the tag on this jar, I used the frame die from the Flags & Tags set.  It is kind of hard to see on this picture.  I again layered the suns and stamped a cute sentiment from the Sunshine set on a flag die cut from the Sentiment Flag Additions set.  I again punched a hole in the top of the frame and tied it to the jar with Charcoal twine from The Twinery.


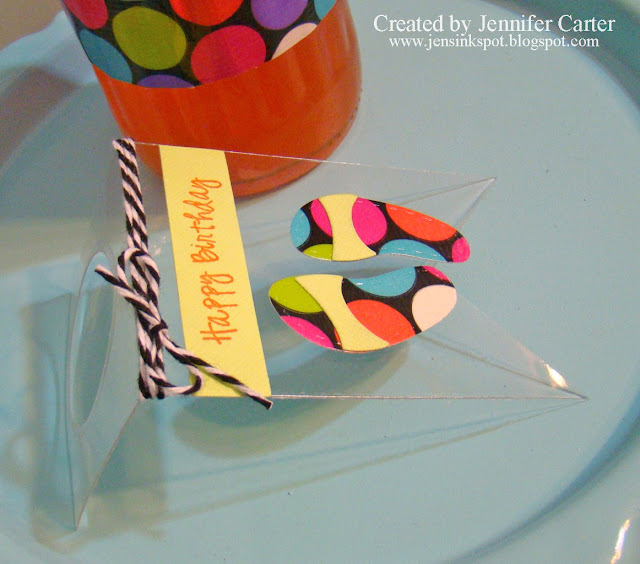
    The bottles of pop are my favorite part of this set!  I took the labels off the bottles and then wrapped them with the polka dotted duct tape. 


    I then created a bottle tag from a piece of clear plastic with the large banner die and cut a circle in the top of it with a circle Nestie.  I scored it at about 2 inches and then folded it over.  I stamped a few of the sentiments from the new sets on cardstock and attached it to the tag.  To create the duct tape flip flops, I stuck the duct tape to a piece of scrap cardstock and then die cut them and attached them to the tag.  I finished it off with another piece of Charcoal twine.

    I have to point out the "man" sandals here!! I love that there is such a versatile option to this set!


    Here is a closeup of the tags on the bottles.  

    I want to share a quick tip with you today too.  I didn't like that there were some numbers stamped on the top of the bottles.  It was distracting to me.  So, I discovered an easy way to get rid of those ugly letters & numbers.


    Take a sanding block (or a piece of sand paper) and lightly rub it across the numbers.


    It comes right off and cleans up the bottle easily making it much prettier when all decorated up!


    Don't forget that these items are available now in the Lil' Inker store!

    Ready for more inspiration?  Your next stop on the hop is over to Sarah's blog!  Don't forget to leave a comment for your chance to win one of two gift certificates to the Lil' Inker Designs store!!

    Thank you for visiting! I hope you enjoyed the party!

    Tuesday, July 10, 2012

    Flip Flops!

    Are you ready for some more Lil' Inker Designs fun?  The design team has another great set to share with you today!  It is so cute!  If you are following along in the blog hop you should have come from Amy's blog. If you would like to start at the beginning please visit Laura's blog.

    I have been so excited about this release for months!  When Laura first told us that we would be getting these for a release several months ago, I wondered how I was going to wait that long!  Well, the time has come to finally share Lil' Inker Designs Flip Flop Dies & Stamp Set!  And if you think you've seen a set like this before, you are wrong! :) This is so unique in so many different ways!


    For my first project, I wanted to showcase how this set is SO UNIQUE...and it is part of the reason that I love it so much!  Included in this set are dies to cut male flip flops (or beach flip flops) AND soles for the shoes!  How cool is that!! OHHH, and the sentiments in this set are so cool!! So creative!! So versatile!!


    Aren't the "man" flip flops cool?  And the soles?  LOVE them!!  The LID signature stitched detail is also wonderful!


    Up next is another card featuring the female & male flip flops.  And the sentiment..."Just Married".  I haven't seen that sentiment around much and I think it is so cool that it is paired with these dies!


    Here's a closeup of the detail.  There's also a surprise, an interactive element to this card....


    I cut the flip flops so they would open up to reveal the sentiment!  It says, "Enjoy Your Honeymoon"!  Another great sentiment that you don't find very often!  I punched little tiny Velcro fasteners with my Big Bite Crop-a-dile and attached them to the flip flops so that they would stay shut and open easily. The littlest heart on the inside is from the flip flop dies that can be used to embellish the flip flops and the biggest heart is from the "Of the Heart" dies that was released previously.

    Here's what the flip flop set looks like:


    Did you SEE those sentiments??  
    his & hers
    Missing My Mate
    A Perfect Match
    Enjoy Your Honeymoon
    Just Married
    Quite a Pair
    Everything is better in flip flops
    etc, etc, etc

    I mean, how FUN and UNIQUE and VERSATILE are those sentiments?  LOVE!!

    As always, you know that there are prizes up for grabs! Just comment on the blogs in the hop and you will be eligible to win one of two $10 credits to the store!  

    To continue on and see more inspiration using these sets, visit Sarah's blog!

    Thanks for stopping by!!

    Supplies:
    Have Fun Card
    Patterned Paper: Splash from Little Yellow Bicycle
    Cardstock:  Spring Rain PTI
    Twine:  Shore by The Twinery

    Just Married Card
    Patterned Paper:  Fabulous from Simple Stories
    Cardstock: Rustic White & Kraft PTI
    Impression Plate: Simple Stripes PTI
    Other: Ribbon, Felt

    Two Hearts Become One

    Hey everyone!! I wanted to share a card I made for a new challenge blog for WPlus9 called Cloud9.


    I needed a card for a wedding and I thought that this set was the perfect thing to use! The card is super simple but still elegant.  I think that this Mehndi Medallions set was the first set I ever purchased from WPlus9 and it is still my favorite!   There are just so many options on what can be done with it!


    This is the inspiration photo that we were basing our cards on.  I used the colors from the photo as my inspiration and also the different sized flowers.


    If you'd like to join in and play along, you still have time!   

    Thanks for stopping by!

    Sunday, July 8, 2012

    Sunshine!

    Yep, it is definitely sunny here in good old (hot) Kansas!!  But, that is not what this post is all about!! Welcome to a fun new release from Lil' Inker Designs!  I am so excited to share today's products with you! If you are following along in the blog hop, you should have come from my fabulous friend Amy's blog!  If you didn't start there and would like to start at the beginning, visit Laura's blog!

    Let's get on with it, shall we?


    Today the design team is sharing a new set of sun dies (they can be purchased as a set OR individually but you really will want both, heehee!!) AND a coordinating Sun Sentiment Stamp Set.  These are a GREAT compliment to the Lil' Inker Rainbows & Cloud set!  For this first card I used one of the rainbow dies, the largest cloud die and both of the sun dies for a fun little collage. 


    I LOVE how well they all work together! AND, the dashes...oh the dashes are so wonderful!  They add such a nice, finished look and a feeling of texture.  So fun!


    Also on this card I used the Texture Plate Collection Frame 1.  It makes such a great frame for the card!

    I have one more project to share with you today using these new sun dies.  Are you ready?


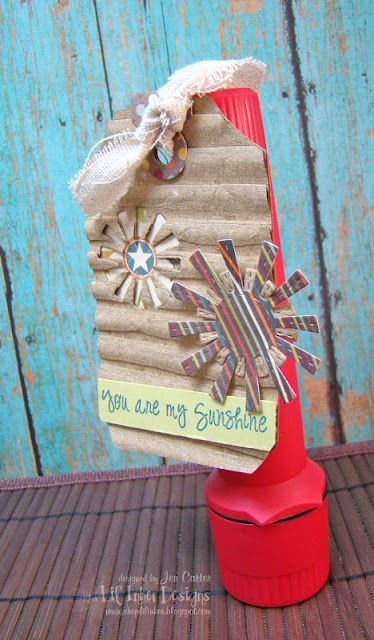
    I have two kids, one boy and one girl and they love to play games in the dark.  They really love flashlights.  I thought a fun gift idea would be to pair the sun die AND the super fun sentiments (that you NEED for your collection as well) with a flashlight & lantern.  What kid wouldn't LOVE that?  Makes a great birthday gift or stocking stuffer too!


    Here is a closeup of Sadie's lantern.  Of course it HAD to be hot pink, her favorite color!  I used the sun die and die cut a piece out of the tag.  Then, I die cut the sun with cute, girly patterned paper and adhered it to the tag.  I added the sentiment, "You are My Sunshine" to the little border (isn't that the perfect sentiment for your children?).  I also punched a little circle from a coordinating piece of cardstock and popped it up in the middle of the sun.


    Here it is turned on.  She's going to love it!


    And, here is the boy version.  I had a piece of corrugated wrapping that I had saved and it made the perfect outdoorsy/boy tag.  I die cut the smallest sun out of the tag and then backed the "hole" in the tag with patterned paper.  I then cut the largest sun out of patterned paper and used the small sun from the tag layered behind it.


    Here you can see how I layered the two suns on the tag a little more closely.  It gives it such a fun and unique look! 


    And, here it is with the flashlight turned on.

    Want to see what the dies look like?  Here you go!


    The great thing is that you can order them now!  And of course I know you are so curious to see all the sentiments in the stamp set too!


    Aren't there some fun ones!  Just reading them all gets my mind spinning with more and more ideas!  

    Well I'm sure you'd love to see more wouldn't you?  I'll be back on Wednesday with another new release product that I know you'll love!  To continue on with more inspiration today, visit new mommy Sarah's blog!

    Thank you for joining me today!  If you are interested in winning some great prizes from Lil' Inker Designs, be sure to comment on the blogs in the hop!  There are two $10 store credit to Lil' Inker Designs up for grabs!

    Friday, July 6, 2012

    Patriotic Spools

    I shared a post over on The Twinery's blog a few days ago and I wanted to share the complete project here as well!   Since my post went up on July 4th, I thought it was appropriate to share a patriotic project in honor of the USA!


    This is such a simple project to put together!  I started with 3 vintage thread spools that I picked up at a second hand store and wrapped twine from The Twinery in Denim, Lemondrop & Maraschino.  I cut a little slit in the top of the spool with a craft knife for the end of the twine strand.  I used various papers in red, white, blue & yellow and then cut them with die cuts to make the patriotic themed decorations.  I love the pinwheel!! It was made with the mini pinwheel die from Lil' Inker Designs!


    To make the mounts, I took wire and twisted the bottom of it and then put it in the hole in the spools.  I also created a spiral with the top of the wire so that I could attach the decorations to it easily.  You can get an idea of what that looks like from the photo above.


    I love how it adds just a little patriotic decoration to my living room wall!


    You could use this same idea with so many themes, so think outside this patriotic color scheme.  You could also use this idea to display your favorite photos. This makes it easy to change the photos out every so often to keep them fresh and current!

    Thank you for stopping by today!!

    Wednesday, July 4, 2012

    Happy Fourth of July!

    Happy Fourth of July!!   I have a post over on The Twinery's blog today that I hope you will take a look at and I'm going to share a small sneak peek here!   Since this is a special holiday in the United States, I thought it was appropriate to share a patriotic project today in honor of our country!


    Be sure to check out all the details on The Twinery blog! Thank you for stopping by and happy Fourth!
    Related Posts Plugin for WordPress, Blogger...