Tuesday, June 26, 2007

Leaving for The Angel Company Seminar & Final Farewell Stamps!!!

It has finally arrived!! I leave early Thursday morning for The Angel Company seminar!! I am so excited, I can hardly stand it!! When I get back, I'll have the new catalog and new samples and lots of news to share with you!

I thought that I would leave you with one more post since I won't have time to update my blog until after Sunday. We get name tags before seminar that we can decorate if we want to and this is how I decorated mine (sort of my theme lately):


And, here's another card that made a month or so ago. It uses the Catelynne paper and I used Ultra Thick Embossing Enamel to make a thick coat on the "U", added some prisma glitter and melted it all together. It is very sparkly in real life.

FINAL FAREWELL STAMP SETS
If you have anything that you want to purchase that is on the retiring list, I must have your order by tomorrow (Wednesday). This is your last chance to get these stamps and to get them at 25% off!! It's such a great deal!! But, hurry this offer ends VERY SOON!! And, once they are gone, they are gone!!

Well, I'm going to leave you now but when I come back I should have all kinds of news & samples to share with you. I can't wait!!

Saturday, June 23, 2007

Scrapbooking With Stamps


Before I was a stamper, I was a scrapbooker...and still am! My love for papercrafting developed and started with scrapbooking, which led me to rubber stamping. I fell in love with making cards and haven't spent as much time scrapbooking as I should (my unscrapped pictures are really stacking up now) but I still love it. On my last post, I showed you a paper bag book that I had made. Well, the layout that I used for that came from the scrapbook page shown above. I took many of the elements that I used on that card, directly from this scrapbook page.

This is the "All About Me" scrapbook page that I sent to The Angel Company to be displayed at Seminar next week. You can see that I used quite a few stamps on this layout...which the end result is that I saved money!!


I used the Spring Fling "Punctuation" set (that I hope is in the new catalog) for the journaling lines and for the parenthesis. The parenthesis are stamped with Landscape Palette Ink but to lighten the color I first stamped it on scrap paper and then stamped it onto my journaling piece. I was thrilled with how well the ink matched the green paper color (which is also one of my favorite colors)!!

I used the same technique that I used on the parenthesis to stamp the "Artsy Elements" flourishes & "Petal Pack" flower stamps (from Jubilee) down the side of the page to create a border (saved money by using plain cardstock and not patterned paper there).

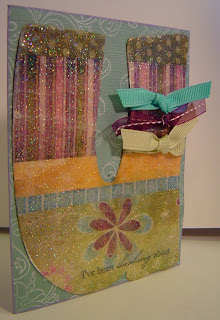
The pink flower (from "Petal Pack") was stamped on TAC's Catelynne paper and then punched out with a cirlce punch. I also stamped a smaller flower from "Petal Pack" and punched it out with a 1/2" circle punch and attached the two flowers with a brad. I put icicle stickles on the pink flower to add some sparkle. The flower circle is attached to the layout on pop dots to add dimension.

The blue mat that my picture is attached to (you can see a small part of it in the flower & border picture above) has been distressed using one of my favorite products, the edge distresser. Love it!! This gives it a little more visual interest and it also gives it depth and dimension. The patterned paper I used on this layout is all from the TAC Catelynne paper pack. I think the paper in this pack is gorgeous!!

The other stamps I used in this layout are: "My Favorites" Level A Hostess Set (This is Me) & "Abundance Is" (living joyously).

How I saved money:
  • I can reuse these stamps on my layouts as many times as I would like and make them look different each and every time by changing the colors and mixing up the various elements.


  • I can make my own patterned paper using stamps.


  • I can make my own embellishments and make them match my theme each and every time. I don't have to run to the store for the right color of embellishment.


  • And, although I didn't use alphabet stamps in this layout for my title, that is one way that you can save a TON of money! I don't know how many packs of letter stickers I have that I spent several dollars on (at least) and still have half of the letters left--they are either letters that I rarely use or they are the wrong size or the wrong color. By using alphabet stamps to design your title, the only investment that you have is the purchase of the set. Once you have that you are unlimited on the number of times that you can use those letters and you can make them whatever color that you want so that it will match your layout each and every time!!
Happy scrappin'!!!

Thursday, June 21, 2007

Moving Away Keepsake Gift


I made a fun project yesterday that I have been excited to share with you! I am SO addicted to making these paper bag cards & books!! This project started because I was suppose to make a "going away" card for a friend who is moving away this weekend. All of the girls in our Bible study group were going to sign it and then we wanted to send it to her at her new home. Our group leader suggested that we each write a verse of encouragement to her and as I was thinking about that I thought that we were going to need space for all of us to write a verse so what better way to do that than for each lady to have an insert so that we could each write as much as we wanted!

So, what started as a small card turned into a keepsake gift! How fun!!

The layout is one that I had used for a scrapbook page for TAC's upcoming seminar. I'll share that with you at a later date. Often times you can take ideas and layouts from your scrapbooks and vice versa when papercrafting.


You can see the slideshow of the book at the top of this post and if you click on it, it will take you to my gallery where you can see the details of each photo and learn a little bit more about how I made this.

Basically it is made out of two white paper sacks. I cut off the bottom part of the sacks and then folded them in half. This formed 4 pockets. Then, I decorated each sack and bound them together with ribbon and cardstock. I made 8 inserts for the inside of the pockets so each person could write a note of encouragement. The tabs on the inserts were made with circle punches and then attached with glue. All stamps, of course, are from The Angel Company (except for the "Handmade by" stamp on the back cover).

One of the features that I really like, for some reason, is how I bound it. I know, that's a funny thing to be excited about! Here is a picture of the binding.

The reason that I like this is because of how the ribbon is hanging down the side so that both ends are at the bottom. I just did this by re-knotting the ribbon and looping the end so that it points down. You could add embellishments or beads to the ribbon to give it a really cool look as well!

This book could be made for so many occassions and in so many themes. Again your imagination is your limit. You can also use much smaller bags or larger bags to change it up a little. And, if you don't have paper sacks at home, you can do this same thing with envelopes! Just seal your envelope and then cut off the right side of the envelope to form your pocket as seen in this photo.


Happy playing!! Oh, and if this post inspires you to make a paper bag card/book or an envelope book, please let me know! You never know, I may just feature it on my blog!!

Tuesday, June 19, 2007

Clipboards & A Note to Other TAC Angels!

To those of you who read this blog who are not demonstrators for The Angel Company, I'm sorry that most of this post will not apply to you! I'm sorry to bore you with the details that follow this project!!

First, let me show you a quick project (mini magnetic clipboards) that I made for a workshop a few weeks ago:


The paper is from TAC's Rustic Chic paper collection and the stamps are Distressed Designs (diamonds) & Dance With Your Spirit (words).

These clipboards are fun, easy and quick!!


A Note to TAC Demos:
If you read this blog and are a demonstrator for the Angel Company I wanted to let you know about a new website for Angels Only! First, let me say THANK YOU to the owners of A Shade of Blue, Anne & John, who have worked tirelessly to provide a resource for Angels in the last years. Their work is so appreciated and the resources that they provided through the Angels Only forum were awesome.

However, recently the Angels Only forum was retired. You can still continue to visit A Shade of Blue for great papercrafting ideas, a gallery of samples, cool people and fun resources. Basically, the only thing that has changed is that there will no longer be a place for Angels to discuss and find resources that pertain specifically to The Angel Company. So, a new forum has been created and was just launched yesterday!! Yes, it is VERY new!!

I found out about this new forum from a friend on ASB. The new forum is called "Paper Wings" and will be everything TAC! To visit this forum, click here. You must register to have access to all of the forums which include seminar talk, TAC resources, general discussions, information for new angels, business questions, ecommerce and AngelNet talk, etc. If you visit the site without registering you will still have access to general TAC talk, just not the "business" portion of the site. Registration is free.

So, if you are a TAC demonstrator, please stop by, register and join the fun! We are just now beginning to get the word out to other Angels!

At seminar time, which is only 9 days away, Angie will be posting updates about what is in the new catalog and what we learn and see! If you can't make it to seminar, you won't want to miss this!!

Thank you for your time! I hope that you have an enjoyable day!

Monday, June 18, 2007

Masculine Cards & Contact Me

I am so sorry that I haven't posted for a while now! I have been so busy getting ready for The Angel Company's Seminar next week that I just haven't taken the time to update my blog. But, I have been working! I've made over 100 cards to trade with other Angels at seminar and I've almost completed another 25 special trades. I still have a few other things to wrap up before then too but I still have a little time left!!

Masculine cards...

Well, there is nothing easy for me about creating a masculine themed card. But, I had a swap to complete that was for a masculine birthday card so I had to come up with something!! Here's what I made:


What I LOVE about this card is how it folds. The blue flap doesn't go to quite the center of the card and then the red image piece is attached to that. I used scalloped scissors to cut the edge of the card to add a little visual interest. You can't really see this in the picture, but there is a little bit of gold stickles on the bike's bell.
Stamp sets used all by TAC: Beach Fun (bike), Keep on Cluckin' (chick, saying), Paisley Rockz (yellow stamps inside card), Soft Spoken (red sentiments)
**EDITED TO ADD: I've had an inquiry as to how I achieved the look of making the bike have both red & black color on it. Simple! I first inked it with red ink and then took my Noir (black) Palette Spot and inked the edges of the bike with that. Since I made more than one of this card, on the others, I also added a little black ink to the center of the bike as well. After the ink was applied to the stamp how I wanted it, I stamped the image on my paper and that is all I did to achieve this look!**
Contact Me...
If you have tried to use the "Contact Me" button on the top of my blog on the left-hand side, your email probably bounced. SORRY!!! I had it set up wrong! But, it is fixed now so if you tried to email me before and couldn't, please try again!!

Saturday, June 9, 2007

Made for Each Other...

I was playing around with my new Angel Company Sneak Peek catalog sets and discovered something really cool! One of the flourishes from the Curls & Swirls set and the largest bird from the Deco Designs set are made for each other!

If you are a fan of the Deco Designs set (which I think is so cool & trendy!!) you NEED the Curls & Swirls set!! (wink, wink!!)

Look at this:


The tail of the bird matches the design of the swirls so well, even down to the dots!! You could do so many fun things using these two sets together. Here is an example:

The great thing about this project is that it took me about 5 minutes to put the whole thing together. It was super simple but has a great effect! This one is on a paper coaster (like what you put your drinks on when you go to Chilis or other restaurants) and you can put a magnet on the back and hang it on your fridge or a file cabinet. You could also attach ribbon at the top and hang it from a shelf or peg. You could easily turn this into a card or use it for decoration on a scrapbook page!

The colored dots on the paper & the flowers on the bird are made using Souffle Pens (also pictured). I know that I've said this before but I LOVE these things!! They are a MUST have for me! They work so well on dark paper and can add so much visual interest to a project!
The sentiment is stamped with the TAC Sneak Peak set "More Abundance" which is another great one for cards or scrapbook pages.
I hope that you enjoyed this project and that you all have a nice weekend!

Friday, June 8, 2007

Magic Card!!

I saw a card when I first started to really get into stamping that I knew I wanted to try to make called a "Magic Card". So, I gave it a try and it was a total failure. I decided yesterday that I wanted to try it again. It isn't the prettiest card but it is so cool! It is really a magic card!!

Here's what the outside looks like:


It's really not that eye catching, but look what happens when you pull on the ribbon & tab:


And, here is what it looks like when the tab is pulled completely out:


The black image in the window magically becomes colored! Very cool!!

Now, in case you were wondering, I won't be teaching a class on how to do this one yet because it isn't the simplest card to make. I redid this and redid this and redid this and after it was finally put together decided that there has to be an easier way to make this...but I haven't figured that out yet!

What I would really like is if I could snap my fingers and just like magic a finished "magic card" would appear! That would be pretty impressive!!

Recipe: The Angel Company Retail Therapy Stamp Set, DCWV & Bazzill paper, Stickles, Ribbon, eyelet, Oval Coluzzle, Prismacolor Pencils, Circle Punch

Tuesday, June 5, 2007

Sneak Peek from The Angel Company

I have really been enjoying my new sneak peek sets from The Angel Company! I cut the "More Abundance" set up today so of course I had to use it on a card right away. First though, I went to the Color Combos site and found a color combination that I liked but hadn't used yet and I came up this combination:


This one brought back memories because I remember loving the pink & gray color combination back in grade school! I even had a sweatsuit that was in the pink & gray color scheme!
So, using those colors, and 3 of the new sneak peek sets, this is the card that I came up with.

On this card I used the TAC Sneak Peek sets "Treasure It", "More Abundance" & "Curls & Swirls". The inks I used are Palette inks. The background on the pink & green papers were stamped with one of the swirls in the "Curls & Swirls" set and the words came from "More Abundance" (love that word set and the font for this particular saying!!). The flowers are from the "Treasure It" set (the stems & leaves on the smaller flowers are from "Fanciful Flowers").
These sets will be in The Angel Company's newest catalog that will be released to customers on July 1st but they are available for purchase now!

Saturday, June 2, 2007

More Treasure It!

I've been having fun playing with the new "Treasure It" sneak peak set. I decided to find a color combination from the Color Combos website and make a card using those colors. Here is the color combo that I chose to use:


I love the colors and probably wouldn't have put them together on my own! Here is the card that I made using this color scheme (and the base of this card is brown although it almst looks black on this photo):
Also, if you are interested in printing a copy of the TAC "Final Farewell" updated list, TAC now has a link on their homepage that you can print the list in a pdf format. Here is a direct link.

I was tagged by my friend Jennifer on her Doodle Blog and I am suppose to answer these questions using only one word (which I may not be able to do on every question). So, here it goes (I typed the answers to these questions Saturday night):

Yourself: crafter
Your Partner: Supportive
Your Hair: Frustrating (!!)
Your Mother: awesome
Your Father: worker
Your Favorite Item: My Scrapbooks
Your Dream Last Night: none
Your Fear: Bugs
Your Favorite Drink: Cherry Pepsi
Your Dream Car: (I'm boring. I just really don't care!!)
Dream Home: One that cleans itself (I know, I cheated!!)
The Room You Are In: Computer/Crafting
Where You Want to be in Ten Years: Ireland (just for a visit!)
Who You Hung Out With Last Night: Tammie
You’re Not: Skinny :)
One of Your Wish List Items: TV (for craft room)
The Last Thing You Did: VBS Meeting
You Are Wearing: shorts
Your Favorite Weather: Springy
Last Thing You Ate: chocolate
Your Life: good
Your Mood: Happy
Your Best Friend: Dwight
What Are You Thinking About Right Now: sleep
Your Car: MiniVan
What Are You Doing At The Moment: Typing
Relationship Status: Married
What Is On Your TV: Frosty the Snowman (seriously!! My 4 year old's idea!!)
What Is The Weather Like: Perfect
When Is The Last Time You Laughed: 30 minutes ago
Related Posts Plugin for WordPress, Blogger...