Friday, June 5, 2015

Summer Coffee Lover's Blog Hop


**I have lots of new listings for stamp sets for sale on my "Stamps for Sale - Updated" tab above!  Or you can click here.  Take a look if you have time!  Thanks!**

Jen Carter Iced Coffee Sprinkles Closeup 3

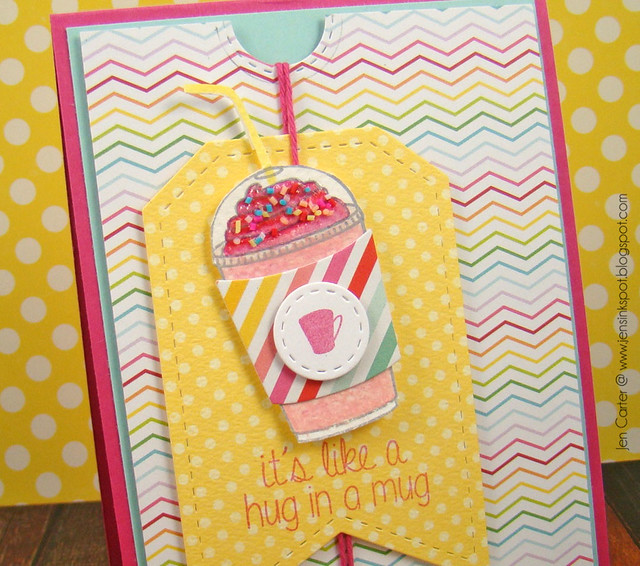
Welcome to the Summer Coffee Lover's Blog Hop!  Today's blog hop is all about summer coffee!  
Jen Carter Iced Coffee Sprinkles 1

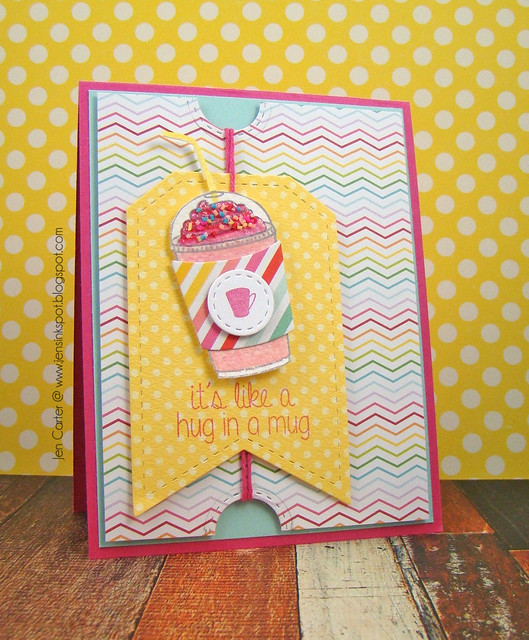
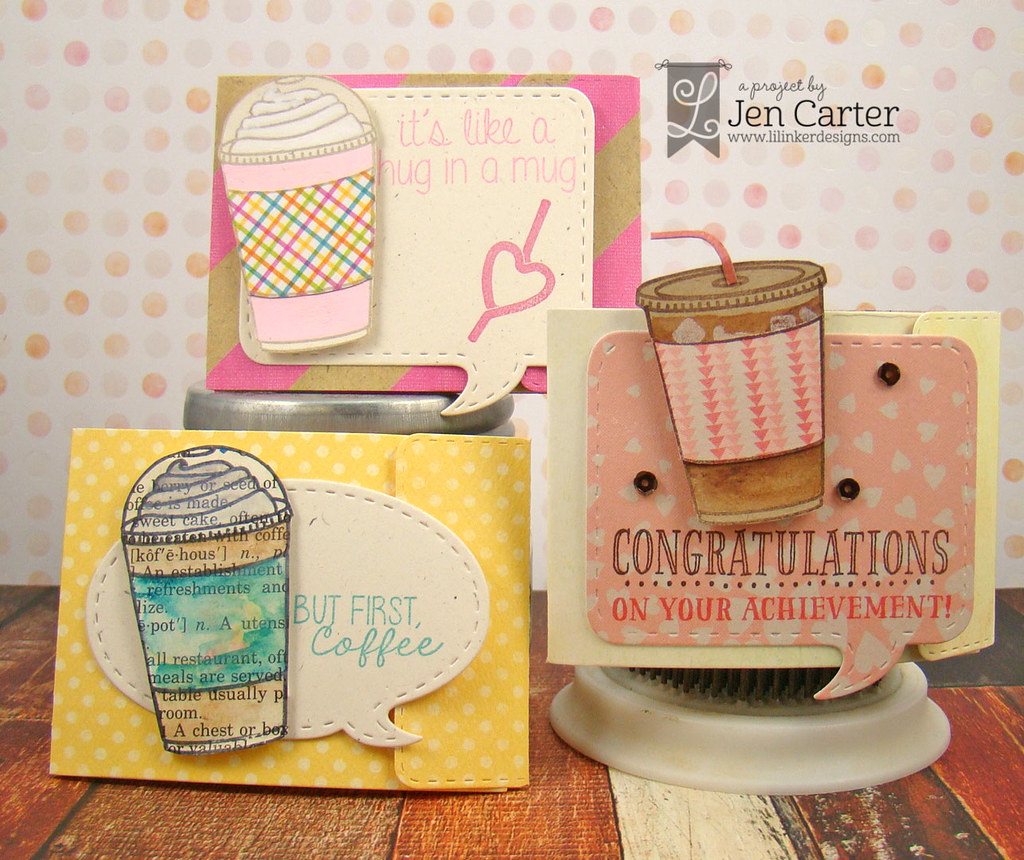
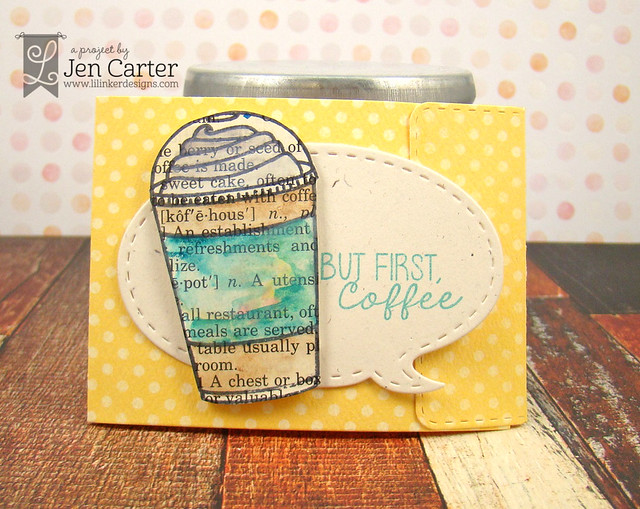
Since today's hop focuses on summer coffee drinks, I decided that I would make my coffee into a frappe!  I went with a pink frappe and you can let your taste buds decide if it is a bubblegum, cotton candy or birthday cake frappe! :)  They all sound good to me!  

I used some new stamps, called Coffee Talk, from Lil' Inker Designs that just released this week (perfect timing for this hop!!) to put this card together.  I first die cut the twine holes (and the circle in the center of the mug) with Dual Stitched Mats: Circle dies.  The tag was die cut with Anytime Tags 2.  I stamped the coffee cup from Coffee Talk on watercolor paper and then colored it in with aquacolor crayons and a water pen.  I die cut the coffee cozy with the Coffee Cozy Dies from LID and then cut out and glued on the straw.  After coloring my cream on top, I used glossy accents and then sprinkled sprinkles on top.  The little tiny coffee cup in the center of the cup is from a stamp set called Send Pretty Greetings.  

I wanted to use bright colored papers for this card which is nontraditional when you think of coffee.  But I do like how it pops.  

Thank you for joining me today for the Summer Coffee Lover's Blog Hop!  If you'd like to see all of the participants, visit this link.

Have a wonderful day!

Supplies:
Stamps: Coffee Talk & Send Pretty Greetings by Lil' Inker Designs
Paper: Avery Elle Everyday Collection, Pebbles Fun in the Sun
Sprinkles: Delish Beads
Twine: Twinery

Thursday, June 4, 2015

It Takes a Village...


Hey everyone!  I have been excited to share this card with you.  I love house/building dies and stamps.  So you can imagine how excited I was when Frantic Stamper released a whole series of dies (and a stamp set to coordinate) that are houses, buildings, businesses, landscape items, dies for the sky, etc!  

Jen Carter City Welcome Home

This is the first card that I put together using these products.  One of the things that I really like about these dies is that you can go with just a silhouette type look where you choose not to add any details or you can paper piece to your heart's desire (like I did with the church and minimally with the other buildings). 

Jen Carter City Welcome Home Closeup hills

 I wasn't sure when I started how many buildings I'd use in the scene, so I first cut my hills using the Stitched Scene Builder Edgers die set and placed it on my cardfront where I wanted them to be.  

*Tip:  I only put adhesive on the bottom part of each hill so that I could tuck in the buildings where I wanted. This allowed me to move them around without "committing" myself to a placement until the very end.

The buildings I used for this card are the Village Candy Shoppe, Church, Firehouse & Book Shoppe

Jen Carter City Welcome Home Closeup

Here you can see how I have a little dimension on the buildings.  Don't you just love that teeny tiny bike (from the Village Wheels set), airplane (from the Village Sky set) and that little lamp post (from the Village Park & Traffic set)!?  To create the clouds, I inked up the back of the cloud stamp with white pigment ink from the coordinating On the Village Road stamp set,  stamped it on my card front, then used a white eraser to even out the ink and make it look more fluffy.  Then, I cleaned the stamp, turned the stamp over to the "intended" side, and stamped the details on top.  It really softened the clouds & added some dimension to them.

Another thing to notice is that on the yellow building, the Candy Shoppe, you can lift up that little rectangle piece at the top and make it 3D.  I chose not to do that on this card but I will use that fun detail on other cards and projects!

There are SO many fun dies in this set, many of which I was not able to fit on this card!  I hope you'll check out the Village dies & stamp set from Frantic Stamper!


 Village Candy Shoppe, FirehouseChurch

 
Village Park & Traffic and Village Sky


Stitched Scene Builder Edgers die and  Village dies & stamp set

Thanks for stopping by today!

Tuesday, June 2, 2015

Lil' Inker Designs June Release Wrap Up

Welcome back to day 3 of the Lil' Inker Designs release!  If you are following along in the blog hop you should have come from Laura William's blog There are three $15 gift certificates to the LID store up for grabs, so the more blogs you comment on, the better your chances are of winning!  

Jen Carter Baby Shaker Stork 7 wm

I pulled out the Stork Stuff dies & stamp set for this shaker card. For the sentiment I die cut the new Baby Word Die and then stamped the "welcome" from the Stork Stuff Stamp Set.  

Jen Carter Baby Shaker Stork Closeup 2


I popped the entire yellow panel up and framed it with the cool die set called Embossed Dots Rectangles.  I really like how it framed the card.

Jen Carter Stork Gender Reveal Scratch Off 2 wm

Next up is a fun gender reveal card!  Such a cool idea to coordinate with the Stork Stuff dies & stamp set!  It has lots of uses beyond gender reveal too (it would be fun to send to a new mom/dad or to a couple who has just found out what they are having!), but such a fun idea to use it in this way!  First the main card panel is cut using the new Dual Dotted Rectangles dies!  These are really cool and I love all of the FUN options that they give!  To coordinate, I also cut out the image panel using one of the dies from the Dual Dotted Squares set!

TIP: If you're worried about all of those little holes, watch my video HERE for a quick & easy way to get them out of die/cardstock (and I'd love if you would subscribe to my new channel while you are there)!

Jen Carter Stork Gender Reveal Scratch Off Closeup 4


As I said earlier in the week I had so much fun mixing & matching papers for the storks from Stork Stuff.   After piecing her I cut out the stork's bag, stamped the baby's gender underneath and then adhered the 1" Silver Rub Off Circle (also available in gold).  The circles already have adhesive on them so they are super simple to add to your project!

Jen Carter Stork Gender Reveal Scratch Off Open wm

Here's what it looks like after the circle has been rubbed off. The sentiment is from the Stork Stuff stamp set.

That's all I have today.  Thank you so much for visiting this week!  Don't forget to leave a comment to win.  The more blogs you comment on, the better your chances are of winning!  All of the Lil' Inker products that I've used are linked below.  Your next stop on the hop is over to the Lil' Inker Designs store to check out all of the new products!


Thanks for visiting today!

Monday, June 1, 2015

Lil' Inker Designs June Release Day 2


Hello again and welcome to Day 2 of the Lil' Inker Designs Release!  All of the products being shown today are currently available in the Lil' Inker Designs store!  If you are following along in the blog hop you should have come from Laura's blog! There are three $15 gift certificates to the LID store up for grabs, so the more blogs you comment on, the better your chances are of winning! 

Jen Carter I Heart You Alphabet 3 wm

First up today is a simple "I Heart You" card! I used the fabulous new Cover Up Die: Alphabet.  I see so many uses in my head for this die! I can't wait to pair it up with some school cards later down the road.  It's also perfect to use with the baby themed products LID is releasing this month!  But, I took a simpler approach.  I die cut it with white & pink cardstock and then selectively cut out the parts I wanted to highlight.  I then die cut one of the Dual Stitched Hearts and popped it up over the "o".  

Jen Carter Iced Coffee Gift Card Holders Group 1 wm

Next, I put together a trio of coffee themed gift card holders using the new Coffee Talk stamp set & the previously released Limited Edition Stitched Gift & Note Card Holder Die & Dual Stitched Speech Bubbles 2.  This was actually my husband's idea! When I showed him the set he said I should use them to make gift card holders!  He's so smart. :)

Jen Carter Iced Coffee Gift Card Holder Iced Coffee Watercolor 1 wm

For this first one I was inspired by some coffee art I found on Pinterest.  I stamped the coffee image from Coffee Talk (the cup & lid are separate stamps) on a piece of coffee dictionary paper that I ripped out of an old dictionary.  I then took out my aquacolor crayons, scribbled on an old CD case the colors I wanted to use and picked them up with my aqua pen.  I really liked how it turned out.

Jen Carter Iced Coffee Gift Card Holder Iced Coffee Watercolor Inside

Coffee Talk also has sentiments that are perfect to put on the inside of the gift card also!

Jen Carter Iced Coffee Gift Card Holder Hug Mug Frappe 1 wm

This one I colored the Coffee Talk image with Souffle gel pens.  My son loves the Cotton Candy Frappe at Starbucks so I made this one pink!

Jen Carter Iced Coffee Gift Card Holder Hug Mug Frappe Inside


Jen Carter Iced Coffee Gift Card Holder Congratulations 1 wm

And last, I used my aquacolor crayons to color on kraft cardstock some iced coffee.  I stamped the solid ice cubes from Coffee Talk with vintage cream pigment ink.  This sentiment is from a wonderful new stamp set called Go Confidently that has lots of great sentiments and options to go along with the larger sentiments, such as "On Your Achievement!" like I used here

And don't forget about these new Ombre Paper Pads! :)


There's plenty more inspiration to see using these sets today!  Your next stop on the hop is over to Lisa Henke's blog!  To see ALL of the new release items, click here!


Previously Released Products:


Thanks for stopping by today! 
Related Posts Plugin for WordPress, Blogger...