Friday, October 10, 2014

Flipping Your Die Cuts


Hello!  I wanted to share a card with you today that uses a fun technique. Hopefully it will get you thinking about some of your dies in a different way!

You know how much I love versatility in my crafting products, as I'm sure you do too!  We can only spend so much money on our hobby so making our dies & stamps stretch further is important.  If we start looking outside of how a die or stamp is intended to be used we can often open ourselves up to a whole new world of possibilities!  This is what I found when playing with the Frantic Stamper Baby Animals dies!

Baby Animals Lions Anniversary Rev

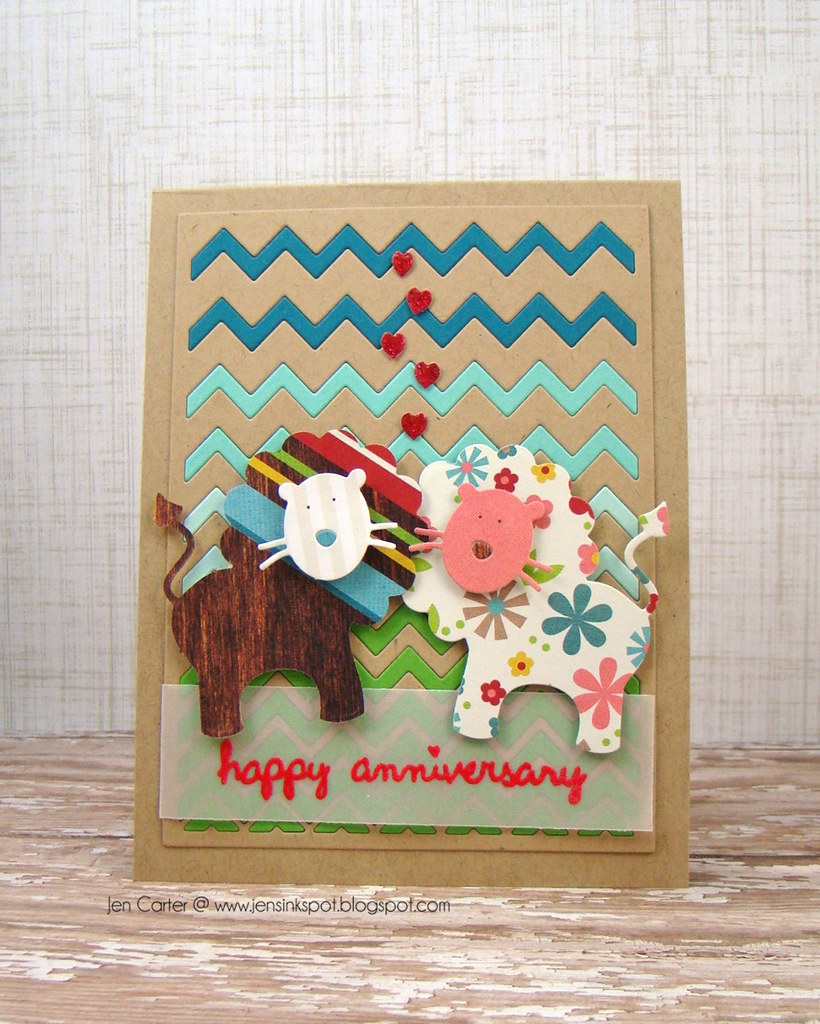
I started first with the background.  I used a truly genius die called the Ombre Chevron Card Panel die.  I used blues to represent the sky and greens at the bottom for grass.  I LOVE the options that this die gives for mixing up colors and patterns!  Next, I chose patterns for the lions.  They are a little busy, but I wanted one to represent a female and one to represent a male so I chose patterns according to that (more about them below).  The hearts that cascade to the top are die cut in red glitter paper from the Singing in the Rain die set.  I used glossy accents on top of them to make them shine.

Baby Animals Lions Anniversary Closeup Rev

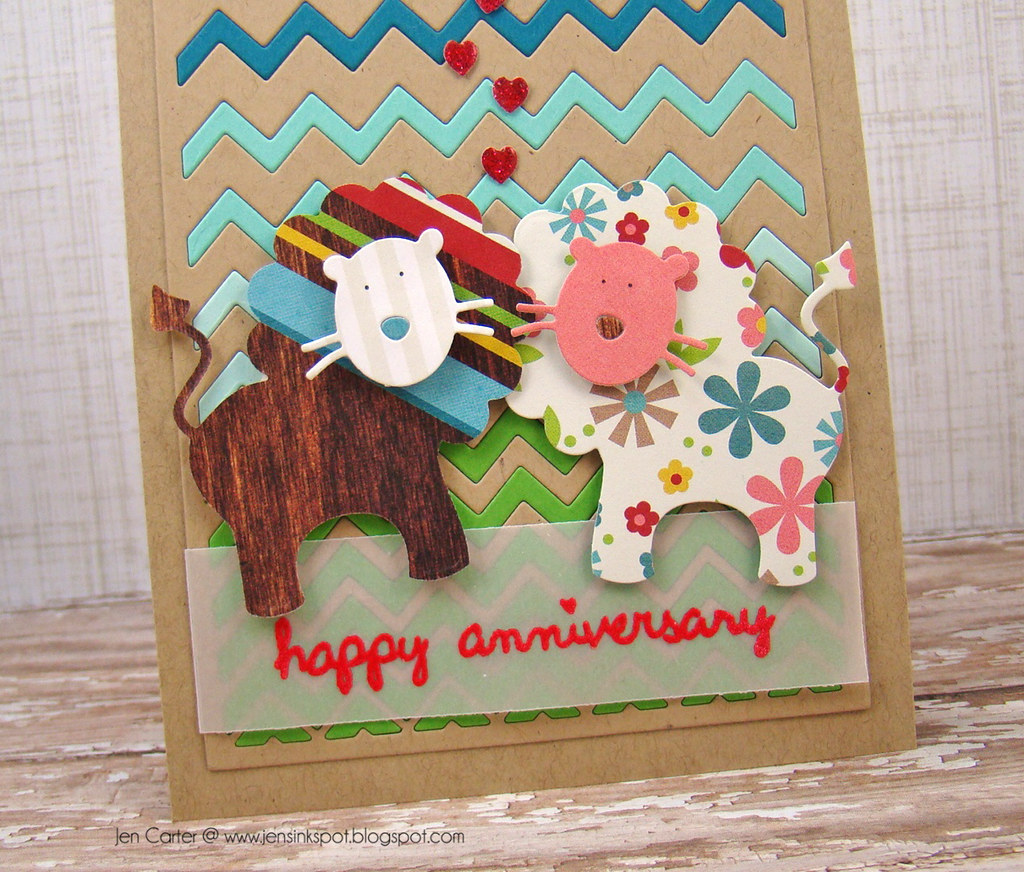
I wanted the lion couple to face each other so I chose my patterned papers and flipped one of the patterns over to the "wrong" side when I cut it with the die (being careful to position the pattern paper where I wanted it to cut since I couldn't see it once I flipped the paper over).  After it was cut, I flipped the die cut over and got the reverse of the original lion.  Now I have two lions that are facing each other and I've doubled the ways that I can use this die set!

Here are the Baby Animals dies.  You can see the direction the lion is facing.

If you are having a hard time visualizing how to place your die for it to cut out facing the other direction, maybe this will help.


Place your die with the patterned paper facing down and the cutting edge of your die also facing down.


When you run it through your machine this is how it will look when you turn the die cut over.  The pattern will be on the "wrong" side of the die cut.


I thought it would also be fun to show you a few more examples of how you can use this same technique with the other animal dies in this collection.  Lots of cute options! 


Thanks for stopping by!

Supplies:
Dies: Frantic Stamper (listed above)
Stamps: Lawn Fawn 
Papers: Simple Stories Hello Baby
Embossing Powder: Zing Rouge

Wednesday, October 8, 2014

Spooky!


How can it be that it is October already?  Where has the time gone?  It's crazy how fast these last months have flown by and now here we are in Fall.  Keeping with that theme, I'm playing along with the Paper Players #216 Challenge to make a Halloween themed card.  
  
Jen Spooky Clouds WM

I previously created a card where I used the bat die from Bats & Broomsticks to make eyebrows of sorts for the new Lil' Inker Designs Spooky Word die.  I thought it was kind of a cool look, so I wanted to make another card with the focus on that idea.  I attached my card panel onto a base that had been die cut using the cool Quilted Stitched Pattern die.

Jen Spooky Clouds Closeup Bottom

I cut the "Spooky" word die out of some lime green glitter paper (DCWV) I had and then added some googly eyes in the holes of the o's.  I attached the bat die above the eyes.

Jen Spooky Clouds Closeup Clouds

I used some matching black & white polka dotted paper to make 3D looking clouds.  I cut two of each size of the clouds with the Cut it Out Clouds & Accessories die set and stacked them up for dimension.  When I adhered them to my card it's like your eyes are playing a trick on you.  Just something sort of fun for a Halloween card.


Thanks for stopping by!

Monday, October 6, 2014

You're so Sweet!


Hey everyone!  I hope you found some time to create on World Card Making Day!  I was busy most of the day Saturday and didn't get a lot made, so I grabbed some time at my desk Sunday afternoon and created as much as I could.  This was one of the cards I made.  It is based off of a sketch over at the Retro Sketches challenge.  We were challenged to pick any sketch from the archive and make a card based on that sketch.

Jen Sweet as Candy & Happy Everything

For my card I used some fun products from the Clearly Whimsy stamp line.  I started by embossing the star burst images from the Happy Everything stamp set in four different colors of embossing powder.  I just really love these images! 

Jen Sweet as Candy & Happy Everything Closeup

That Sweet word die...it is so SWEET!! I really like word dies and this one is so unique!  I embossed the rest of the sentiment from Sweet as Candy - Sweet Sentiments in black.  I had to add in a little sparkle too of course, so I added some 4mm clear sequins from Pretty Pink Posh.  

This is the sketch I chose from the Retro Sketches archive.

Thanks for visiting!  Hope you have a wonderful week, full of unexpected (and sweet!) blessings!

Supplies
Stamps & Dies: Whimsy Stamps
Embossing Powder: Zing Rose, Leaf, Powder & Butter; Ranger Fine Detail Black
Cardstock: Lemon Tart PTI
Patterned Paper: Simple Stories Hello Baby
Sequins: Pretty Pink Posh Clear 4mm Sparkling Clear


Saturday, October 4, 2014

Warm Wishes

Happy World Card Making Day!  I hope you are able to find time to sit down and craft today!


I know it seems really early for Christmas, but lots of crafters are starting to prepare for the holidays.  I have a quick & simple card to share today that would be pretty simple to mass produce!

Birch Trees & Cardinal 1.2

To create the scene I started with Frantic Stampers cool Small Birch Trees die.  I LOVE the size of this die! It's perfect for creating a focal point on a card.  I cut the trees from a dark gray cardstock.  I then die cut the two smallest birds in the Cardinals die set.  They fit perfectly on the trees.

Birch Trees & Cardinal 1.4

To create the snow drifts I used the Stars & Stripes Photo Card and only cut the bottom portion that cut the little swishes.  Those were cut with white glitter paper.  I trimmed the edges slightly to get the shape I wanted and popped them up with dimensionals at the base of the trees.

Super simple card that only took minutes to complete!


Thanks for visiting!  Have a great World Card Making Day!

Supplies:
Related Posts Plugin for WordPress, Blogger...