
 I tried a new technique last week that was so cool and so much fun and I thought that all of you might enjoy trying it too! Here is a slideshow tutorial that includes pictures of each step. If you would like to slow the tutorial down or view each slide individually, click on it and it will take you to my gallery where you can control the slideshow easier. (The first time you click on it, it should give you the controls to speed up or slow down the tutorial, the second click will take you to the gallery.) I have included the written instructions for each step below.
What you need:
Wax Paper (from your kitchen)
Glossy Cardstock
Brayer
Palette Inks or Kaleidacolor Ink
Hot Iron (with steam turned off)
2. Take a piece of wax paper that is cut to the same size as your glossy cardstock and wrinkle it into a ball. Then, flatten it out again.
3. Heat your iron to a medium-high setting with the steam turned off. Sandwich your wax paper between the 2 pieces of glossy cardstock so that the glossy side of each piece of cardstock FACES the wax paper.
4. Take your iron and gently press it onto the sandwiched layers of cardstock and wax paper for a few seconds. Be sure that you iron over the entire piece of cardstock so that the wax transfers to the entire piece.
5. Take your brayer (also available through TAC for $12.95) and load it with ink. For this first card I used TAC Bordeaux Palette Ink. Make sure that the entire brayer is full of ink and you do this just by continuing to roll the brayer on your ink pad until you've covered the entire thing.
6. Now roll your brayer over the glossy side of your cardstock. You will see the wax resisting the color.

It's really simple isn't it!! Here are some more cards that I came up with using this technique.
These next two use one piece of the cardstock that I had cut into a card mat size and I just cut that piece into two seperate pieces to make accent strips for these cards. The stripes on these cards were made by using the Kaleidecolor Ink pads which are a rainbow of colors. Doesn't that make a cool effect?

(Other Supplies Used: TAC Happy Celebration Level B Hostess Set, Souffle & Gelly Pens, Shimmer Chalks (used to highlight the words), Paper Piercer)
 (Other Supplies: TAC Kid Praises Stamp, Watercolor Pencils, Dove Blender, Gray Tombow Marker, Winchester Eyelets, Crop-a-dile)
This next card uses a design by Risa that I really loved. The red background paper is the wax resist piece on this card and it is then stamped with the Salsa Flowers in Noir Palette Ink.

(Other Supplies: TAC Seeds of Blessing (Sentiment), TAC Salsa Flowers, Blue, Green & Yellow DCWV Cardstock, Sanding Block, VersaMark Ink, 2" Circle Punch, 2 1/2" Circle Punch, Matte Heritage Brads)
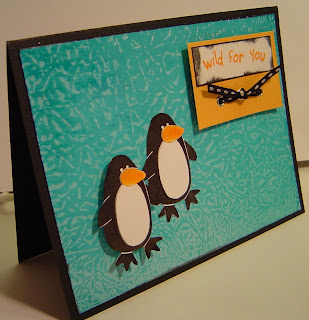
This is the last card that I made today using this technique. I thought that this one looked like water or ice so I put the cute little penguins from the TAC Wild for You stamp set on it. It's really a plain card but it's still cute. The penguins are also stamped on glossy cardstock and cut out. The beaks were stamped in orange and then cut out and glued onto the original black beaks. There are several eyelets on the sentiment piece that the ribbon is tied through also.
Happy stamping!!


 And, just in case you were wondering what the stamp set that I used looked like, here's a picture of that too! It's only $19.95 for 12 stamps!
 Laurie is a very talented artist who is fairly new to stamping--although you can't tell that by her work! I met Laurie several years ago when I was selling children's books and she hosted a catalog party. When she heard that I was now with The Angel Company she contacted me and told me that she was interested in having a party because she loved to scrapbook. Well, her love for scrapbooking has also become a love for rubber stamping. She has been quite successful selling her cards to her friends and coworkers and her enthusiasm for stamping is very contagious!
  (Inside of card)
 Here is a little that Laurie shared about herself:


