Tuesday, January 31, 2012

Love Ya with Lil' Inker Designs

Hi!! Today the Lil' Inker Design Team are sharing projects using the bonus goodies products from the last release.  I have a card to share with you today and will be back again on Friday to share another one!  If you are just beginning the hop at my blog, you can start at the Lil' Inker blog for the complete list of designers.  If you are following along in the hop, you should have arrived here from Emily's super creative blog!

Today's card focus' on the Hearts die & stamp set.


This card is very clean and simple!  I attached white on white die cuts from the Hearts die set.  I love the detail on the perforated hearts!


I also stamped the pattern from the Tags & Flags stamp set onto some Poly Shrink "paper", die cut the various hearts and then heated them in the oven so that they shrunk.  I attached them with baker's twine as an accent on the bow.  This is such a fun and easy and versatile way to use your Lil' Inker Dies!  And...can you see how adorable that perforation is on those tiny accents!!  LOVE how it turned out!


I have really enjoyed working with these hearts and I know that I will pull them out often! 

Your next stop on the hop is to Teresa's beautiful blog!

Supplies
Dies & Stamps:  Lil' Inker Designs
Twine:  The Twinery
Other:  PolyShrink, Ribbon, PTI White Cardstock, PTI Hawaiian Shores Ink, Amuse Buttercup Ink

Monday, January 23, 2012

They are here!! Four New Twinery Colors!

I am so excited to share that The Twinery's four new colors (and they are FAB!!) are available for purchase today!!  Yippee!!  I made two cards to share that features all four new colors!


With Valentine's right around the corner, I can't get enough of hearts!  As I mentioned above, this card features all four new colors of twine and they coordinate very well together!  Have you heard that orange is the "in" color for 2012?  Well, The Twinery is right on trend with their new Cantaloupe color!


I paired this twine up with paper from Crate Paper and new dies from Lil' Inker Designs.  The button is tied with the new Flax twine. While I am mentioning Flax...Oh my!! THAT one is a staple for sure! Everyone needs this one in their stamping arsenal!  It is a perfect match for kraft cardstock!  You might as well buy a whole spool of that one! It is a must have and will get TONS of use!

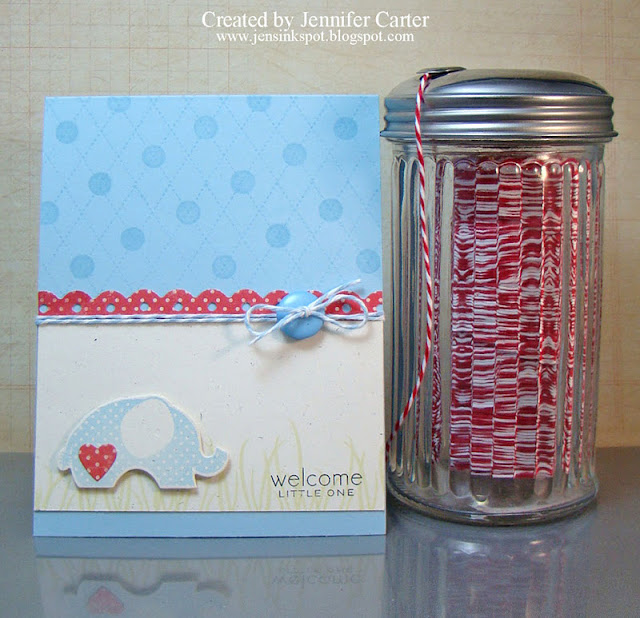
My last card is a sweet little baby card for a boy.  The new "Shore" color is a perfect baby boy color!


I used the twine very simply as an accent to the card.  Doesn't it match this Papertrey Ink Spring Rain cardstock PERFECTLY!?  LOVE it!!


Ahhh, yes, you may have several different colors of twine already, but isn't it great to have colors to match all of your cardstock?  I love products that coordinate!


Here are all of my new spools!  Sigh.  Aren't they pretty?  The light blue is called "Shore" and is the PERFECT color for skies and for baby boy themes, etc as I mentioned above.  The light purple is gorgeous and is called "Orchid".  I love, love the shade of this one!  And I also already mentioned the kraft colored one is called "Flax" and the light orange is called "Cantaloupe".  They are in the store now!! Go shop!! :)

Thank you for stopping by today!  Let me know what you think of the new colors!! I'd love to hear your feedback!! Are you going to order? :)

Supplies
Twine:  The Twinery
Dies:  Of the Heart by Lil' Inker Designs
Stamps: Verve Making a Statement
Paper: Crate Paper Restoration, PTI Kraft & White
Ink: Wisteria Chalk Ink by Colorbox, Snow White by PTI
Other:  Summer Sunrise Button PTI, Pop Dots, Take 3 Die by PTI

Baby Boy Card
Twine: Shore by The Twinery
Paper:  Spring Rain & Rustic White Papertrey Ink, Stella & Rose Hazel by My Mind's Eye
Stamps: PTI Sweet Baby, Daydreamer (grass), Bitty Baby Blessings, Argyle, Polka Dot Basics
Ink: PTI Spring Rain, True Black; Amuse Lichen; VersaMark Champagne
Other: Tiny heart die by PTI, Sweet Baby Die, Fiskars Apron Lace Border Punch, Spring Rain Button PTI

Thursday, January 19, 2012

Lil' Inker Designs Release: Head Over Heels (Bonus Day!)


Welcome back to the last day of the January new releases for Lil' Inker Designs!  Today Laura is reviewing what has been introduced this week and we are also sharing a few more projects using BONUS goods that are being released today as well...just in time for Valentines!  These are all mini sets.  You should have come from Teresa's beautiful blog if you are following the hop!


Hamster Cupid is a mini set. With the focal image at approximately 2" x 2.5", not only is he cute but he's quick and easy to color.


Did you notice that these hearts have the trademark LID perforated detail around the edges!?  YES!! So cute!! I LOVE the arrow!! I think that those 2 details make this set not only a must have but it also makes it stand out from other heart dies on the market!  And that font in the stamp set...so cute!

I used all of these products on my first card.


When I saw this image I thought it looked like this sweet little Hamster cupid could be hanging upside down which made me think of "Head over Heels in Love!"...how perfect for Valentines or a love card!


Please don't judge me too much on my coloring...I need so much practice! :)  Especially need to learn how to stay in the lines, lol!  Anyway, I made a window for the little guy and then colored him.  That little sentiment is from the Of the Heart stamp set.  It has the cutest little sayings in it in the cutest font!


I think you'll be seeing these hearts and that arrow a lot! Can you image how many ways you will be able to use that arrow!  It goes way beyond Valentine's day for sure!  Also, if you look closely you will see one of the newest colors of twine by The Twinery called Flax.  It is a kraft color and matches perfectly with all of my kraft supplies.  Love it!  It will be available soon!!

I had time this evening to sneak one more card in to share with you.


For this card I used one of the heart dies and the arrow to make an embossed image on my card front. 


This is what I used to make it.  I just cut the heart and arrow out of thin chipboard and then adhered it how I wanted it on an A2 sized piece of cardstock (this way I could emboss it directly onto a card front if I wanted and it would be easy to line up).  I cut my arrow so it would fit around the heart and then ran it through my Big Shot machine using embossing mats and added a couple extra pieces of cardstock on top for a shim.


Then, I cut it down to size and gently sanded the impression to get the heart to pop out (you must use cardstock with a white core to get this look).  I took a note from my fellow designer and friend Emily and cut the tag from the new Flags & Tags set down to add a fun border on the bottom of the heart piece.   One more way to add versatility to these cool Lil' Inker dies!!  I framed the heart piece with buttons and the new flax twine from The Twinery.

Thank you so much for joining us all week long!! Don't forget to leave comments on the blogs along the hop so that you can be eligible for the prizes up for grabs this week!  You can find out all the details about the giveaway on the Lil' Inker Designs blog!  Your next stop on this hop is over to one of my favorite designers ever Amy Kolling!  I can't wait to see what she has put together!

All the products that you've seen featured here this week are available for purchase now in the Lil' Inker Designs store, so be sure to stop by and pick up yours!

Thanks for stopping by!

Wednesday, January 18, 2012

Lil' Inker Designs Release: Cutie Cat


Welcome to Day 4 of the Lil' Inker Designs release!  If you are following the blog hop, you should have come from my friend Amy Kolling's blog!

Today I am featuring the 2nd of two sets being released from the 2 Cute Ink line called "Cutie Cat".   


Here is my card.


Awwww! I'm not a "cat" person, have to say I've never owned a cat but THIS cat is super cute!! :)  This is the best way for me and my-allergic-to-cats family to "have" a cat!! :)


I did very minimal coloring on this card.  In fact the only coloring was to outline the cat, add some pink highlights and color the flowers.  So easy.  I pulled out my much-addicted-to large Flag die that Lil' Inker Designs also released this week to mat my image on. I cut a small piece of Plum Pudding cardstock with it and layered that under the pink striped flag.  I love how this looks!  I added some stone twine by The Twinery to accent the flag as well.

Thanks for joining me today! Your next stop on the hop is to Jen del Muro's blog!  These items are available for purchase now, so head on over to the Lil' Inkder Designs store to check them out! 

Also, be sure to leave a comment on my post for a chance to win one of 2 prizes up for grabs this week...a $10 gift certificate to the Lil' Inker store or both of the new 2 Cute Ink stamp sets!  Tomorrow there will be bonus good released and I'll have a card to share featuring those cute products as well! All the details will be revealed on the Lil' Inker Designs blog tomorrow!

Tuesday, January 17, 2012

Lil' Inker Release: Sweet Bee


Welcome to Day 3 of the Lil' Inker Designs January Release!  I hope you've been enjoying what you've seen so far! Wasn't the Flags & Tags set great!?  If you are following along on the hop you should have come from Amy Kolling's fabulous blog!

Today the design team is showing projects using two new sets from the 2 Cute Ink line!  I am working with the Sweet Bee stamp set which is available for purchase at the Lil' Inker store today!


Isn't she cute?


I went with a "traditional" yellow bee but put a spin on her stripes.  Of course this sweet little bee is perfect for Valentine's Day but she is also so cute for cards in general to those you care about and the "Just Bee-cuzzz" sentiment is perfect for those "everyday" occasions. 


I paper pieced her stripes and the heart and also added rhinestones on her antennas and hair bow.


I used the double ended flag that was showcased earlier this week from the Flags & Tags set and scored several lines, folded them and made sort of a ruffly banner for the sentiment.  It is one more way to make those dies even more versatile and give them a new look!  I also used the full sized flag from that same die set to layer everything on top of.

I also created a mini card using the flower grouping that is included in this set.


If you like to create quick and simple cards then this 3 x 3 card fits in that category!  I stamped the flowers and then colored them with my glitter pens.  Love those pens and I just don't get them out enough!

Can you see how cool they look all glittered up?


I also did another little trick with the banner on this card similar to the one on the bee card.  This time I only scored the double ended flag twice and folded and then put a little dimension behind the flag to make it slightly curved.  One more way to change up the look of the double ended flag.

Thank you so much for stopping by today!  There are prizes up for grabs so be sure to leave a comment on this post and the other blogs along the way to be eligible to win one of 2 prizes...a $10 gift certificate to the Lil' Inker store or the two new 2 Cute Ink sets being released this week!  I'll be back with another post tomorrow showcasing the other set being released!  Also on Friday there will be some bonus goodies released that are so cute and fun!

Your next stop on the hop is to Jen del Muro's fun and fabulous blog!


Supplies
Stamp Set & Dies:  Sweet Bee, Flags & Tags Stamp set & dies
Paper:  Love Me by My Mind's Eye; PTI Lavender Moon, Rustic White & Scarlet Jewel
Other:  Rhinestones, Copics & Pop Dots, Square Nestabilities, Linen/Canvas Impression Plate PTI

Sunday, January 15, 2012

Lil' Inker Designs Release: Flags & Tags

Welcome to the January Release for Lil' Inker Designs!!  We have a full week of reveals for you! And as a bonus, we will also be releasing a set of adorable items with a Valentine's Day theme at the end of our hop this week that you won't want to miss!  If you are hoping along, you should have come from Emily's blog!


I am so excited to share today's products with you!  I am in love with this new stamp set and the set of dies that match!!  LOVE!!

So, without further ado, meet Flags & Tags!


The large flag die in this set is very unique!  It has an open center but the back side of the die is covered with a piece of plastic.  This gives the die extra stability but also makes it super easy to pop out the cardstock pieces that you die cut with it!  Very smart design!

I can't wait to show you these sets in action! I had such a great time making projects with these sets that I had a hard time deciding which ones to share today!  This set is so versatile and can be used for so many things! 

First up is a birthday set!


I decorated a large glassine bag with the large flag that is in the die set.  I LOVE this flag die...LOVE!!  As the graphic above shows, it measures 2 1/2" wide by 5 1/2" long. 


I attached the tag & double ended banner dies that are included with the die set to the top of the large flag and stamped the "Birthday Wishes" sentiment that is included in the stamp set.  The sentiments in this set are awesome!! I really adore the font!  The tag on this bag was cut with patterned paper.  It is so fun to use this die with or without the coordinating stamp set.


I love how you can layer with this flag die too!  It really changes up the look!  I cut just the pointed tip of the flag with two pieces of patterned paper.  If I tried to do this without a die, it would have been much more difficult to match up the sides and points evenly...have I mentioned how much I LOVE this die?  How easy it makes it to create this look? Heehee!!


Here is what you'll find inside the glassine bag...a set of altered mini-clothespins.


I created a "card" for the clothespins to attach to and then decorated the top of the card with the tag & double ended flag dies.


These are mini sized clothespins.  I cut strips of patterned paper, attached them to the clothespin with my ATG Gun adhesive and then sanded the edges.  I think that they make a super cute gift!

Now, how about the same idea but with a more girly Valentine's Day theme?


This is the basic layout as the birthday bag but using a much different color scheme.


For the tag on this bag, I die cut it with pink cardstock and then stamped one of the coordinating images from the stamp set on to it.  I LOVE, LOVE how this turned out!  I often forget to stamp images on colored cardstock, but what a fun look it gives!  I also love the options included in this stamp set for the tag!  The gorgeous sentiment is also included in the Flags & Tags set. The little hearts on the double ended banner are from a set that will be released later this week.


Inside you will find another set of clothespins.  These were found in the dollar section of Michaels and are perfect for a Valentine's gift!  


For this flag I wanted to show how you could use these dies with other Lil' Inker sentiments that you may already have. The "my friend" is from the Rainbows & Clouds stamp set. It is a perfect fit!

I also wanted to share a card I made using this set.


This is a mini sized card.  It measures 4 1/4" x 4 1/2".   For this card I impressed the die cut into the card front (much like embossing, but the opposite). 


Then after I had the tag impressed on the card I stamped the image inside the tag shape with another one of the stamp tag options.  This image would be great for masculine cards too!  I created a banner to layer on top and then tied it all together with Twinery twine and a shiny heart button.


Thank you so much for visiting today! I hope you are as excited about these new products as I am!  Hurry on over to the Lil' Inker Design store to place your order!  These products are available today!

Also, be sure to leave a comment on my blog and the blogs along the way to be eligible to win a prize!  Your next stop on the hop is  Jen del Muro!  You're going to love what she has created for you today!

Supplies:
Birthday & Valentines Day Bags
Stamps & Dies:  Flags & Tags Lil' Inker Designs
Patterned Paper: Happy Day by Simple Stories & Love by Fancy Pants Designs
Cardstock: PTI Ocean Tides & Sweet Blush
 
Love Card
Stamps & Dies: Flags & Tags Lil' Inker Designs
Paper:  Sweet Blush Cardstock PTI
Ink: Charcoal Palette
Twine:  The Twinery

Saturday, January 14, 2012

Last Wee Memories Challenge: Sketch

Welcome to this week's Wee Memories Challenge!  There was a last minute change and this will be the last week for the Wee Memories Challenge.  It'll be so sad to see this challenge go! Jenny and the design team has done a wonderful job with it! 

For this last week we have a fun sketch to work with!


There are also prizes up for grabs from our sponsors There She Goes Clear Stamps, The Twinery & May Arts!


And here is my card based on this sketch.


This card features the Make a Wish set by There She Goes.  This is a fun set with lots of presents, cupcakes, cakes and sentiments.  I used some Caribbean & Maraschino Twinery twine on top of the ribbon for accent.

Thanks for visiting today! I hope that you'll play along!  You can find all of the information and the prizes up for grabs by visiting the Wee Memories blog!  I'd also like to thank the Wee Memories Design Team for allowing me the opportunity to be a guest designer during these last challenges! It was a lot of fun and I appreciate the chance to play along!


Supplies
Stamps:  Make a Wish by There She Goes
Twine:  Caribbean & Maraschino Twinery Twine
Paper:  Happy Days by Echo Park Paper, Hawaiian Shores & White by PTI
Other:  Nestabilities Die, Aqua Mist Ribbon PTI, Fiskars Border Punch, Pop Dots, copics
Related Posts Plugin for WordPress, Blogger...