

Welcome to the Catherine Pooler Designs & Pear Blossom Press Collab Hop! Today we are sharing fun, interactive cards that will really brighten your day! They feature fun new stamps and dies from Catherine Pooler Designs, and with help from Pear Blossom Press, they all literally light up! Be sure to hop along with us for loads of inspiration!
And there is of course a giveaway, so be sure to scroll all the way to the bottom to find out how you can win!
I have two card to share today! Each features a different kind of light up kit!
I have to say...these lights are SO COOL! I know the concept has been around for a while but the simplicity of these are, well simple! Ingenuity over time has made these lights to be a no-brainer. I was intimidated with the lights on the market previously...the tape...the way you had to line everything up, but this takes much of the work out and makes it super easy to create a card that lights up!
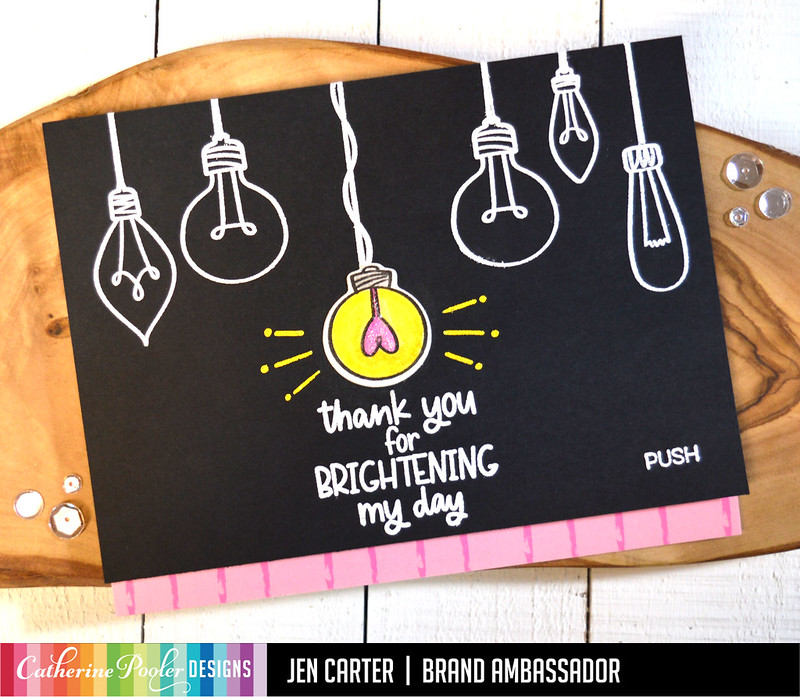
For this card I used the Bright Days Stamp Set from Catherine Pooler Designs. I embossed the bulbs on top and the sentiments with white embossing powder and the middle bulb was die cut with the coordinating Bright Days Dies. To allow the bulb to really light up, I used a Circle Die to cut out a piece of the black cardstock under where the bulb was attached to the card front. I used the My Favorite Things Interactive Labels Stamp for the "push". I also added a strip of Sketchbook Patterned Paper to the bottom of the card. The bulb was colored with Limoncello, Catching Rays, Pucker Up & Twilight Ink. I took a glue pen and colored in the heart in the bulb after I had colored it with the ink & then embossed Halo Embossing Glitter on top for the glitter.
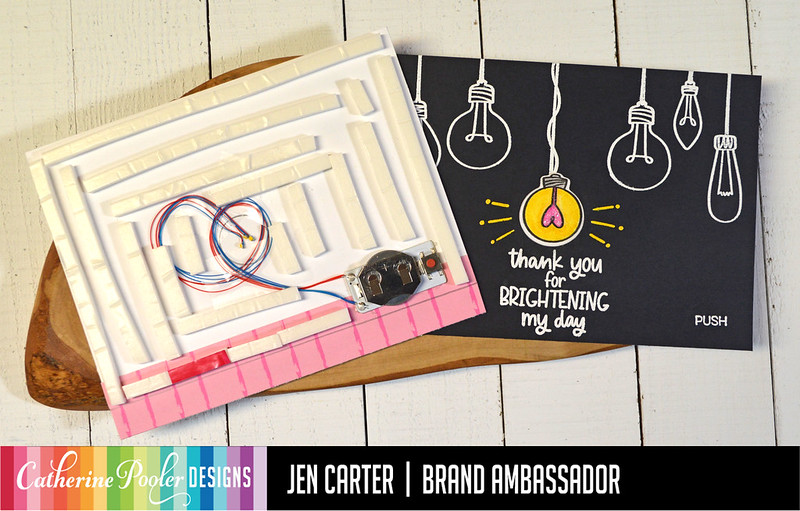
Here's a look at how I wired up the card. This set up uses the Ez-Light Kit. Basically it is all one piece and I put the button where I had embossed "push" on the front and then taped down the wires (with three lights) where I wanted them. I added 3mm Deep Foam Tape around the rest of the card so that it was the same height as the button.
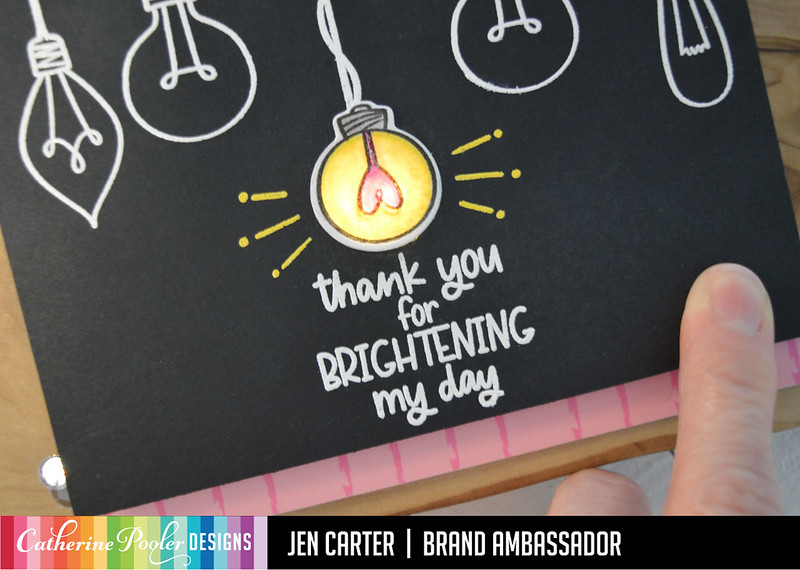
Here are a couple of pictures of the card all lit up after I attached the top panel to the foam tape card front:

My second card features another light kit called Halo Lights which I'll explain a bit more after I show you the card.

I die cut the shape of this card using two awesome Slimline Dies. The scalloped outside border was cut using the Essentials Slimline Die and the piece inside which cuts three circles is from the Post This Slimline Die. They work very well together and love the versatility of getting to match these slimline dies together! I used patterned paper from the Sketchbook Patterned Paper behind each circle and I used the sentiments and images from the Bright Days Stamp Set. I colored these images with copics and the sentiment is stamped with Something Borrowed Ink. The images were popped up with dimensional tape.
Let me show you how I wired this one up.

This is the Halo Lights that I mentioned earlier. It is a round light, the PERFECT size for the circles in the slimline die and it has four lights around the inside of the circle (they are the little yellowish things you see on the metal part). You can see how I turned the Halo piece so that the button was in the middle of the top circle. I used a pencil to mark where that would need to be based on my card front. The foam tape that Pear Blossom sells is the perfect height for making each part of the card the correct height so the button works properly.
When it is turned on it looks like this in the daytime:

I know it's hard to see but if you look hard you can see where each light around the perimeter of the circle is.
In the dark it looks like this:

Isn't that so cool? My family loved these! :)
It's the other part you love...giveaway time! Catherine Pooler Designs and Pear Blossom Press are each giving away a $25 store credit! Comment on this post by June 25th to be entered to win. Winners will be announced on June 28th on the store blogs.
I hope that you'll visit all of the great stops on this hop! Your next stop is over to Rachel Winn's blog!
And in case you didn't start at the beginning, here is the complete list of stops on this hop:
Cassie Trask
Ashlee McGregor
Laura Volpes
Chrissie Tobas
Marcia Caradinta
Allison Cope
Jen Carter (you are here)
Rachel Winn (next stop here)
Ilina Crouse
Ali Farmer
Karen Baker
Pear Blossom Press (Mona Toth)
Thank you so much for visiting today! I'd love if you follow me on social media. The links are at the very end of this post.
 Bright Idea Bundle Shop at: CP |
 Bright Days Stamps Shop at: CP |
 Bright Days Dies Shop at: CP |
 Interactive Labels Shop at: PB |
 Post This Slimline Die Shop at: CP |
 Essentials Slimline Die Shop at: CP |
 Circle Dies Shop at: CP |
 Sketchbook Patterned Paper Shop at: CP |
 3 Pack EZ-Light Shop at: CP | |
 2 Pack Halo Lights Shop at: CP |
 Pucker Up Shop at: CP |
 Something Borrowed Shop at: CP |
 Limoncello Shop at: CP | |
 Catching Rays Shop at: CP |
 Twilight Ink Shop at: CP |
 CP Ink Collection Shop at: CP |
 Mini Inks ALL Shop at: CP | |
 Spreading Rainbows Download Shop at: CP |
 Copic Markers Shop at: ACOT | SBP |
 Halo Embossing Glitter Shop at: CP |
 Premium White Cardstock Shop at: CP | |
 Small Square Acrylic Grid Block Shop at: CP |
 Round Grid Block 2.75" Shop at: CP |
 Small Rectangle Acrylic Grid Block Shop at: CP |
 Acrylic Block 1 1/4 x 6 1/8 Shop at: CP | |
 All Acrylic Grid Blocks Shop at: CP |
 Tweezers Shop at: CP | ACOT | SC | SBP |
 Cutter Bee Scissors Shop at: CP | ACOT | SC | SBP |
 Big Shot Die Cutting Machine Shop at: SC | |
 Cutting Plates Big Shot Shop at: SC |
 Fiskars 12" Trimmer Shop at: ACOT | SC |
 Titanium Blades Shop at: ACOT | SC | SBP |
 Double Thick Foam Tape Narrow Shop at: PB | |
 Foam Tape Large Roll Shop at: CP | ACOT |
 Foam Tape 75" Shop at: ACOT |
 Micro Glue Dots Shop at: ACOT | SC | SBP |
 Glue Dots Dispenser Shop at: ACOT | SC | SBP | |
 ATG Gun Shop at: ACOT | SC |
 ATG Refill Shop at: ACOT | SC | SBP |
Great stuff Jennifer. Next thing you will have will be singing cards!
ReplyDeleteDennis Ureche
Nice new bright set!
ReplyDeleteI always love experiencing your creativity! These are AWESOME!
ReplyDeleteYour cards are so cute! I love how they light up!
ReplyDeleteWow, great cards. The white embossing on black is such an eye catcher. But add lights. Definitely a WOW card. Your slimline is really cute. Again, these lights are perfect with CP stamps.
ReplyDeleteYour use of the Halo lights is stunning! Great cards!
ReplyDeleteThese are so awesome!!!!!
ReplyDeleteThese lights paired with the new CP set are so very COOL! I have never tried any of the lights and find them to be very intriguing... love that slimline card to much. Thanks for the wonderful explanations and for sharing these!
ReplyDeleteYour cards are super cute! Love the white embossing on the black card and the pop of color for the light, sooo cool!
ReplyDeleteSuch cute cards...this blog hop is AMAZINGLY fun!
ReplyDeleteI like how only one of the lights is colored in on that first card!
ReplyDeleteLove your idea of stamping the other lights in white on the black background. Thank you for a chance to win a gift cert. Susie Draper
ReplyDeleteI love using a black background to light up the light bulbs. Cute!!!!
ReplyDeleteI’ve used the original lites a few times, but definitely need to try this halo lite out!!
ReplyDeleteGreat ideas! Thanks for sharing.
ReplyDeleteso cute - and love the slim line look
ReplyDeleteI LOVE the way the bulbs look on black! Both are fabulous!
ReplyDeleteVery creative! Great job!
ReplyDeleteVery cute cards!
ReplyDeleteGreat Cards! I love the Halo lights the best.
ReplyDeleteAwesome cards! I love the addition of the lights to these fun designs! The cards are so special!
ReplyDeleteBeautiful and very creative cards, Jen!
ReplyDeleteCute cards! I remember a while ago when I first started seeing cards that you could light up, but the process looked very confusing. This products looks so much eaiser!
ReplyDeleteCool cards!! I definitely need to try a set of these lights...they look so easy to use!
ReplyDeletecute cards.
ReplyDeleteSuper cute! Thanks for the inspiration!
ReplyDeleteLove the lights on the black.
ReplyDeleteThe slimline card is fun.
thanks for sharing
txmlhl(at)yahoo(dot)com
wonderful cards - the light up features are so FUN - I envy the recipients :)
ReplyDeleteThe halo light was a perfect choice for this adorable card! Thanks for sharing!
ReplyDeleteWow, great cards!
ReplyDeleteGreat cards! I like the lights on the black background with the focal bulb lighting up - so cute...
ReplyDeleteLoved the way you used the halo light. The slimline dies help make this card unique and adorable!
ReplyDeleteWow, awesome cards! Love the new halo lights!
ReplyDeleteLove the design of the first card!
ReplyDeleteCute cards. I especially like the halo lights.
ReplyDeleteGreat cards. I love how the black cardfront doubles the contrast of the bright white embossed lights and the lit-up bulb.
ReplyDeleteBoy I dont know what it's called, but those color combinations are awwwwesome! I like white on a card with beautiful color accents. Then light it up!!! Gorgeous! (Every time I see that little light switch, I giggle,love it )
ReplyDeleteI love your slimline card! I am always drawn to slimline (yet still haven't the courage to try making one my own).
ReplyDeleteThe use of black is fabulous here… I can’t decide if I think it’s the chalkboard type look I like so much or what but it is fresh and fun! Thank you for the inspiration
ReplyDeleteSimply Smashing Cards! Love the various ways to use the Bright Days set! God Bless & the Love of Christ to you & yours!!
ReplyDeleteCards are adorable. Like the black background for a change of pace.
ReplyDeleteNice idea for the slim card. Great look at the lights.
ReplyDeleteBeautiful projects!
ReplyDeleteCool and clever light up cards.
ReplyDelete