

Welcome to the
2nd Annual Handmade Holidays Blog Hop!!!

We’ve gathered designers from some of our favorite manufacturers to show you ways to create something from the heart this holiday season. This 3 day Hop includes over 60 stops with inspiration brimming from every corner. Explore all of the thoughtful and beautiful handmade gifts you could create for the holidays, all in one place, during our second annual Handmade Holidays Blog Hop! You should have come from Natasha Naranjo Aguirre's blog!
If you would like to start at the beginning, visit The Twinery's blog for a full list of participants!
This was such a fun project! I had the privilege of working with products from The Twinery, Fiskars & Tombow! Let me tell you that was a great combination!
For my handmade holiday gift idea, I created a set of four Christmas tree ornaments that also double as gift tags. I'll share how I did this in a tutorial below, but first off here is what they look like.
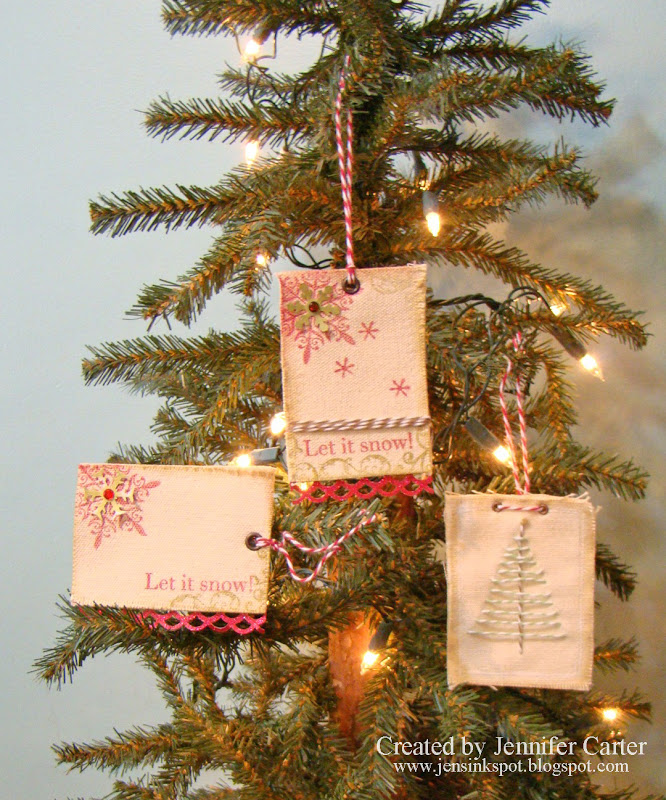
Here's three of the four tags hanging on the tree.

For this tag, I used the beautiful Seaweed Twine for the branches, Cappuccino Twine for the tree stump & Buttercream Twine for the little star on top of the tree (which I made by tying a French Knot). I used Maraschino Twine to hang the ornament tag. I'll show you an easy way to create a similar tag below.

I took a little different approach for the next two tags. I stamped on the canvas, attached the snowflakes, that were punched with fabulous Fiskars punches, with Tombow adhesive. (For the two tags that I stamped on, I purchased pre-cut & pre-sewn canvas tags at Hobby Lobby.

On both tags I added a glittered border that was punched with Fiskars Lacy Doubles border punch. It is such a pretty punch design!
Now I want to show you an easy way to stitch designs for your tags/ornaments!

For this design, I took a piece of canvas that I cut to approximately 2 3/4 x 3 1/2. I put a die that I wanted to use as a template in my sandwich like I was going to emboss with it and then ran it through my die cutting machine. So for the Big Shot my sandwich was:
Multipurpose Platform
Tab 1
cutting plate
embossing mat
canvas material
die
cutting plate

After it went through the machine, it left an impression of the star on my canvas. I like doing this as opposed to using a pencil to draw lines because you won't be able to see these lines when I'm done, but it is hard to erase pencil lines on canvas.

I then threaded my twine through a large eyed needle and began to sew the star following the pattern I had created.

Then, I stamped a sentiment on the bottom.

Next, I took another piece of canvas that I had cut to the same size and sewed the pieces together. This is to hide the stitches on the backside of the tag.

I then punched a few of the Fiskars snowflakes out of yellow glitter paper to add to the tag with the Tombow adhesive.

The next step was to distress the edges of the tag using ink.

I then added an eyelet with my Crop-a-dile and tied the Maraschino Twine through the hole.

This is what the finished tag looks like on the tree.

And, since you've sewn the two pieces of canvas together, this is what the back side looks like...nice and clean!
I hope you enjoyed this project & tutorial! It truly is an easy gift to make & give!
Now, to sweeten the Hop, we’re offering a prize! For every comment you leave on the blogs in the hop, you’ll be entered to win a prize pack from one of the participating manufacturer sponsors! And, you can use the Rafflecopter widget on the Clearsnap blog to gain extra entries each day: http://clearsnap.blogspot.com/

The Twinery is offering 3 spools of the winners choice $48 value!
Visit The Twinery for a complete list of blogs and leave a comment on each by Nov 27, 2012 at 11:59 PM PST. Each day we will be sharing a brand new list of blogs with brand new projects for you to explore, be inspired by and create from!
Cheers to creating gifts from the heart this holiday season!
Happy Hopping!
fab tutorial thanks - love the tip for embossing the image to sew. Your little treat bags look great on the treee.
ReplyDeleteYour little canvas ornaments are really cute and the twine really adds to the design. It was also very clever of you to emboss the design on the canvas to make it easier to stitch. Brilliant!
ReplyDeleteWhat a fun set of canvas tags - they look fabulous!!!
ReplyDeleteThank you for sharing your tutorial :)
I like how you used the twine to sew Christmas images. Thanks for sharing.
ReplyDeleteThanks for sharing. I lov the idea of embossing your stitching pattern
ReplyDeleteI love these!! Fantastic use of the twine!!!
ReplyDeleteWhat beautiful ornaments!
ReplyDeleteHow adorable is this! Love it! I especially love the star and think this would carry over great on a scrapbook page!
ReplyDeleteStitching with twine!! How clever are you!!! I love the tree and the star!! I have been waiting to see this since I saw the sneak! Great idea!!
ReplyDeleteI never would have thought to sew with twine, these tags are so cute.
ReplyDeleteNovel idea to sew with twine. Love it.
ReplyDeleteVery cute! thank you for sharing!
ReplyDeletevery cool!
ReplyDeleteFantastic ideas! Great projects and very inspiring...thanks for sharing...
ReplyDeleteLove these ornaments!
ReplyDeleteOh cool! Great tree ornaments. Clever use of dies to make a pattern for the stitching. :)
ReplyDeleteOh my gosh...your idea of embossing the image to sew is genius. I have it written down in my idea book so I won't forget it. Now I have to look at my dies and figure out which ones I want to sew. Thanks for the inspiration, I love this idea.
ReplyDeleteThe twine gives the perfect pop of color. Cute bags.
ReplyDeletei would have never thought to emboss on canvas, thanks for the idea.
ReplyDeleteGorgeous and a great idea for tags too!
ReplyDeletethese are so cute!
ReplyDeleteYour use of the twine and all those Fiskars goodies is amazing! Love these homespun canvas ornaments!! A finished back makes a complete project!!
ReplyDeleteWhat a great tip on using the die to emboss the design for sewing. Thanks for sharing!
ReplyDeletegreat tip with the image embossing first. :) thanks for the sharing
ReplyDeleteI love your ornaments, they are adorable and still simple enough that I think I could do it. Thanks for sharing!
ReplyDeleteGreat techniques! Very sweet ornaments.
ReplyDeleteLove these! Thanks for sharing!
ReplyDeleteThe canvas ornaments are beautiful! They look so pretty hanging on the tree.
ReplyDeleteThese are so cute. Love the tree!
ReplyDeleteThese are so adorable! I love all of them. The impression left by the dies are a brilliant tip! Thanks ever so much!
ReplyDeleteVery creative project. I like that they are bags and ornaments.
ReplyDeleteWould NEVER EVER have thought of using my dies with canvas - and I love that you emboss the canvas and then stitch it to accent the embossing. Thanks so much for sharing!
ReplyDeleteWow what a cute idea. Thanks for sharing.
ReplyDeleteWow, these are so creative and fabulous!! I love the look of the twine on canvas!! Thanks so much for the inspiration :)
ReplyDeleteLisa
A Mermaid's Crafts
The tree is my fave! Great ideas! Thanks for sharing!
ReplyDeleteThese are so pretty!!! I love this idea and how pretty they are!
ReplyDeleteSo cute. Love the embossing to do your stitching! Great Idea.
ReplyDeleteSuch a classic ornament. You really did make it simple. Thanks.
ReplyDeleteLove all of the little ornaments/gift bags. They are so pretty and cute. Thanks for the tut and for sharing them.
ReplyDeleteVery cute. I love the country look of these.
ReplyDelete... a ** tree-mendous ** trio.. thanks for all the help in making them.. wtg
ReplyDeleteThese are great!
ReplyDeleteTime to take out my sewing machine!
ReplyDeleteJen,
ReplyDeleteI love your canvas tags you used as ornaments on your tree. The stiching with the twine was so unique, and the texture it gave was really special.Thanks for sharing your ideas with us.
love this idea, and great tutorial. love the canvas as a the base. these are wonderful double duty projects, gift tag and ornament. thank you for the inspiration.
ReplyDeleteWow...this is an awesome idea. I really love the Christmas tree one. Great job
ReplyDeleteThanks for the tutorial! I love the idea of combining ornaments with gift tags!
ReplyDeleteVery cute idea! Thanks for sharing :)
ReplyDeleteGreat tutorial! Will attempt these for xmas! :)
ReplyDeletepostalcorey(at)yahoo(dot)com
Gorgeous ornaments! I love the little tree.
ReplyDeleteJen
Very clever! Love your work. Love the fabric you used!
ReplyDeleteVery cute ornaments!
ReplyDeleteGreat use of the twine. very pretty
ReplyDeleteVery cute ornaments/giftbags. I love canvas.
ReplyDeleteWhat beautiful tags! Love the homespun quality and love the tip about embossing a shape before sewing!!
ReplyDeletethanks for the tip for sewing designs. I'm definitely going to use it next time.
ReplyDeleteYour canvas tags/ornaments are adorable! Thanks for the tip to emboss the design and then stitch it with the twine. I know I never would have thought of that. TFS!
ReplyDeleteLove, love, love these little tags/ornaments. Thanks for the inspiration!
ReplyDeleteSweet, sweet tags! Thanks for the tip to emboss before adding twine. These are really pretty.
ReplyDeleteCute idea - gift tag and bag all in one!
ReplyDeleteFiskateer Jean#8889 AKA giveawayjean
Thank you for sharing this great tutorial. I can't wait to make these fun ornaments!
ReplyDeleteso cute. love them!!
ReplyDeleteLove the tags. I really want to get into making these and small flags. Thank you for sharing how "easy" it is to make little canvas's of art!!
ReplyDeleteHappy crafting.
S
very stylish ornament... <3
ReplyDeletethose make very cute ornaments! thanks for sharing.
ReplyDeleteThese are adorable! Love how you created the tree with the twine!
ReplyDeleteLove the special touch the twine adds to your cute projects!
ReplyDeleteToo lovely for words!!! Thanks for sharing!!!
ReplyDeleteI love to make tags! Hadn't considered making them from canvas! TY for the great idea!
ReplyDeleteoh Canvas tags so Vintage looking
ReplyDeleteCute idea and nice work making a tag and ornament.
ReplyDeleteI like the die-impression idea on canvas - I want to try that. I really like your ideas and want to start thinking about how to use these techniques! Thanks!
ReplyDeleteThis hop has been so inspiring!!
ReplyDeleteWow - great idea, love these! Especially thankful for the tip of using the die cut to mark out the outline!!!
ReplyDeleteI just love these ornaments! So sweet and rustic!
ReplyDeleteI LOVE these tags/ornaments Jen! I have some blank canvas and I am dying to try this. Thanks for the tutorial!
ReplyDeletewhat great projects!
ReplyDeleteVery cute and cool idea! Thanks for the tute and inspiration!
ReplyDeleteO M Gee, would have never thought to use the embossed outline to sew around. CUTE. TFS
ReplyDeleteLove the tip for embossing before you sew! Brilliant!
ReplyDeleteBakers twine is a must for my holiday tags! Hugs, Susie.
ReplyDeleteJen I love how this turned out! You did an amazing job!
ReplyDeleteHa, that's something new for me! Great idea!
ReplyDeletei love these canvas ornaments and the way that you used the twine thanks
ReplyDeleteupnurse at aol dot com
Great ideas for using canvas. Love it!
ReplyDeleteLove all the ideas for using canvas. Thanks for the inspiration!
ReplyDeleteI love, love, love, the tree. So cute.
ReplyDelete