Home

Saturday, November 17, 2012

{Twinery} Handmade Holidays Blog Hop


Welcome to the 2nd Annual Handmade Holidays Blog Hop!!!


We’ve gathered designers from some of our favorite manufacturers to show you ways to create something from the heart this holiday season. This 3 day Hop includes over 60 stops with inspiration brimming from every corner. Explore all of the thoughtful and beautiful handmade gifts you could create for the holidays, all in one place, during our second annual Handmade Holidays Blog Hop!  You should have come from Natasha Naranjo Aguirre's blog!   If you would like to start at the beginning, visit The Twinery's blog for a full list of participants!
This was such a fun project!  I had the privilege of working with products from The Twinery, Fiskars & Tombow!  Let me tell you that was a great combination!

For my handmade holiday gift idea, I created a set of four Christmas tree ornaments that also double as gift tags.  I'll share how I did this in a tutorial below, but first off here is what they look like.


Here's three of the four tags hanging on the tree.


For this tag, I used the beautiful Seaweed Twine for the branches, Cappuccino Twine for the tree stump & Buttercream Twine for the little star on top of the tree (which I made by tying a French Knot). I used Maraschino Twine to hang the ornament tag.  I'll show you an easy way to create a similar tag below.


I took a little different approach for the next two tags.  I stamped on the canvas, attached the snowflakes, that were punched with fabulous Fiskars punches, with Tombow adhesive. (For the two tags that I stamped on, I purchased pre-cut & pre-sewn canvas tags at Hobby Lobby.


On both tags I added a glittered border that was punched with Fiskars Lacy Doubles border punch.  It is such a pretty punch design! 

Now I want to show you an easy way to stitch designs for your tags/ornaments!


For this design, I took a piece of canvas that I cut to approximately 2 3/4 x 3 1/2.  I put a die that I wanted to use as a template in my sandwich like I was going to emboss with it and then ran it through my die cutting machine.  So for the Big Shot my sandwich was: 

Multipurpose Platform 
Tab 1 
cutting plate 
embossing mat
canvas material
die
cutting plate


After it went through the machine, it left an impression of the star on my canvas.  I like doing this as opposed to using a pencil to draw lines because you won't be able to see these lines when I'm done, but it is hard to erase pencil lines on canvas.


I then threaded my twine through a large eyed needle and began to sew the star following the pattern I had created.


Then, I stamped a sentiment on the bottom.


Next, I took another piece of canvas that I had cut to the same size and sewed the pieces together.  This is to hide the stitches on the backside of the tag.


I then punched a few of the Fiskars snowflakes out of yellow glitter paper to add to the tag with the Tombow adhesive.


The next step was to distress the edges of the tag using ink.


I then added an eyelet with my Crop-a-dile and tied the Maraschino Twine through the hole.


This is what the finished tag looks like on the tree.


And, since you've sewn the two pieces of canvas together, this is what the back side looks like...nice and clean!

I hope you enjoyed this project & tutorial!  It truly is an easy gift to make & give!

Now, to sweeten the Hop, we’re offering a prize! For every comment you leave on the blogs in the hop, you’ll be entered to win a prize pack from one of the participating manufacturer sponsors! And, you can use the Rafflecopter widget on the Clearsnap blog to gain extra entries each day: http://clearsnap.blogspot.com/


The Twinery is offering 3 spools of the winners choice $48 value!
 
Visit The Twinery for a complete list of blogs and leave a comment on each by Nov 27, 2012  at 11:59 PM PST. Each day we will be sharing a brand new list of blogs with brand new projects for you to explore, be inspired by and create from!
 
Your next stop on the hop is to  Laura Denison's blog!

Cheers to creating gifts from the heart this holiday season!
 
Happy Hopping!

Thursday, November 15, 2012

Wrapping it Up!

Hi!! Welcome to the wrap-up post for Lil' Inker Designs November release!  Hasn't this been a fun-filled week?  If you are following the blog hop, you should have come from the Lil' Inker Designs blog!

Be sure to comment on the blogs along the hop, because there are FOUR gift certificates to the Lil' Inker store to be given away and to be eligible to win all you have to do is comment!

I have one more project to share with you today using the new products released this week! As always, it also has a twist!

 
This card uses the new Instant Camera Christmas die & sentiment.  I cut the frame out of white glittery paper.  I love how that turned out!  Then, the picture is from a piece of patterned paper that I picked up at Hobby Lobby.  It was so simple to create this!  I stamped the sentiment that uses such a beautiful font, on the paper.

 
And what about that tiny little glittery bow?  I love how this bow looks made out of glittery paper.  What a super cute and easy way to decorate up a card front!
 
 
Now here is where the twist comes in.  I attached the little Polaroid to the card with a tiny paperclip so it was easily removable.  On the back of the instant camera frame, I attached a magnetic strip, so....

 
...it can easily attach to a refrigerator or a metal pail, file cabinet, etc to make a cute little accent!  This would be a GREAT way to send a family photo!  I always enjoy hanging pictures of friends and their family on my fridge when I get them in the mail and if you send it with a magnet already attached, you've made it that much easier to do!  And you almost ensure that it won't get thrown away!
 
Here's another look at all the Lil' Inker products released this week (not including those from the coloring line):


Now, I get to send you on to one very special gal's blog, Amy Kolling!
 
Thanks for stopping by! Don't forget to leave a comment for a chance to win!

Tuesday, November 13, 2012

Blessings Countdown Calendar with Lil' Inker Designs


Welcome to release day 3 of the Lil' Inker Designs release!  If you are following along in the hop, you should have come from Lil' Inker Designs blog, it is the first stop on the hop today!

Today I am featuring the Instant Camera Christmas trio of products and I am so excited to share my projects with you today!  I wanted to create a special countdown to Christmas type of project that I could use with my family this holiday season.  What I ended up with is a Blessings Countdown Calendar!   These dies were perfect for making this, and there are a couple of surprise twists to this calendar as well!  (This is a long post, so please bear with me! I hope it'll be worth it for you to make it clear to the end!)

 
First off, I die cut 25 of the instant photos using various types of pattern paper which I mixed and matched.  Then, I applied the numbers (you could use dies or stickers, etc) for each day in December leading up to Christmas.  After decorating each instant die, I clipped them onto a cord that I had stapled onto the back of the wood frame (from Hobby Lobby).   The clips I used are hair clips that I found in the jewelry section. They worked perfectly!


I used various LID dies to decorate the instant photos, including the new mini bow die (day #8)!   I also used the Of the Heart die (day #3) previously released.


 For this section I used the Of the Heart die (#12), the Jingle Joy bell die (#17), the Holly Jolly holly dies (#21) & the new mini bow die (#24).

Ready for twist #1?

 
Here it is...this is what the back of each day looks like (I just turned the calendar around so you could see all of the pictures).  I've attached a favorite photo from the year onto the back of each card.  Each day that the kids take a number off of the calendar, we will talk about the blessing on the back and reminisce about the special times we had throughout our year.  I tried to pick a variety of activities and special photos to highlight and also things that would get the kids thinking about how those times were blessings and gifts from God during the year.
 

 Some of the photos I chose were...being a ball boy for a high school football game, time with extended family, getting to take tumbling lessons, playing football, fun on vacation, etc...

Ready for twist #2?

I didn't want these little instant photos to go to waste.  It did take some work to put this all together and it is quite special to me.  I want to be able to have a way to look back on this in the years to come.  Leaving it in the frame isn't really an option so...

 
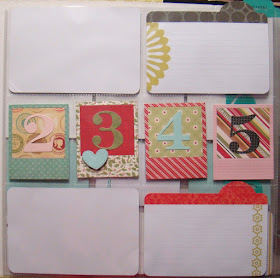
I got out my much neglected Project Life scrapbook and found that the Instant Photo dies fit perfectly in the smallest pockets.  Now, please don't judge my page too much.  This is just a sample, I didn't have time to pretty this part up yet, so I will redo this soon.  But, this gives you a good idea of what the front of the page would look like.  And the back...


...the back looks like this.  You can still see the fun countdown that was created.  And on this page, you could write fun facts about the year, or things you love about your kids.  You could create different categories and list your families "favorites".  There are so many possibilities for what you could do back here and then your hard work is not used and enjoyed only once, but for years to come!

I have one more way to use this idea.

 
Laura designed the dies so that they can be ornaments and hung with twine/ribbon.  I made a few examples similar to the calendar above, only this time I put the photos on the front of the frames and attached the Gift Bow Topper die to it so it can easily hang from the Christmas tree.

 
Here is one of the pictures.  You might recognize this from the calendar above.  I LOVE this picture.  It is a picture of my son's shoes (from May 2012, the date is stamped on the bottom right-hand corner with the Instant Camera: Christmas stamp set) and my daughter's shoes INSIDE his!  I loved how it showed their size difference!  I also stamped a "1" in the left hand corner to continue on with the countdown theme.

 
One more example.  Date on the right-hand side and the countdown number stamped on the left-hand side. 
 
Here are the new products that I used for these projects:


I hope you enjoyed this project! Thank you for staying with me through the end of the post!  If you decide to make a blessings calendar, I'd LOVE to know about it (and see pictures too if you take them!). 
 
Be sure to leave a comment!  Just by leaving  your comment, you'll be eligible to win one of two $10 store credits! The more blogs in the hop you comment on, the better your chances are of winning!

To continue on in the hop, please go say hi to Alyssa! She will be feauturing some other new Lil' Inker products today!  Don't forget, these products are available now, so hop on over to the Lil' Inker Designs store to check them all out!

Thanks for stopping by! Come back tomorrow for another release post...pssst...I can't wait to share this one with you!


Monday, November 12, 2012

Mini Bow!

 Hi! Welcome to day 2 of the Lil' Inker Designs release!  There are some fabulous products available this release that I am excited to share with you!  If you are following along in the hop, you should have come from Lil' Inker Designs blog, it is the first stop on the hop today!

Today I am showcasing the new Mini Bow Dow!  Oh my, this is the cutest little bow ever!  It matches the Small & Large Bow Dies that are HITS!!  So, if you are wondering if you need this bow, ummm, yes, you do!

My project today is a chocolate gift set and it uses all three sizes of bows. 
 
 
Here's the trio together.   The mini bow is on the push pop that is filled with chocolate chips (it is standing in the chocolate chips), the small bow is on the Santa Claus chocolate fudge jar and the large bow is on the mini jar that contains peppermint hot chocolate and  mint & dark chocolate chocolate chips.

 
Here is the small bow.  I took a jar of Hershey's Chocolate Fudge and made it look like a little Santa Claus, complete with a Santa hat.  The bow is such a fun addition to the gift and works as an accent on the belt buckle. 

 
And here is the cutest little mini bow! Isn't that just so adorable?  I put mint, green & red colored chocolate chips in the push pop tube and also decorated it up like a Santa Claus.  The bow is adorable!  Can't you imagine decorating all your little gift boxes with these bows?  Oh. My. Cuteness.


Here is a comparison of the three sizes of bows together.  I know, right?  ADORABLE!
 
You better run to the Lil' Inker Designs store! They are available right now and they aren't going to last long I have a feeling!  Snag them while you can!
 
Be sure to leave a comment!  We'd love to know what you think about these new products!  And, just by leaving us your thoughts, you'll be eligible to win one of  two $10 store credits!  The more you comment, the better your chances are of winning!
 
Now, I am excited to get to send you over to one special gal's blog, Amy Kolling!  I can't wait to see what she has for us today!
 
Thanks for stopping by!  Come back tomorrow for another release post...pssst...I can't wait to share this one with you!