I have a fun post to share with you today! It is fairly picture heavy, but I hope you enjoy it! I love the dies from Lil' Inker Designs and was playing around with one of the pinwheel dies. Let me tell you that that die is so much fun! I love looking for other ways to use my dies and I came across a fun discovery as I was bending and folding it. Wanna see?
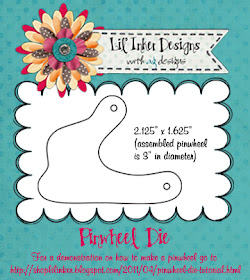
Do you see the pinwheel? Here is what the die looks like:
This die makes the perfect 3D leaves! I am always saying that I wish I had a leaf die and now I do! I love the way it looks too!
To do this, I just took one of the pinwheel die cuts and "folded" it as if I were putting the pinwheel together and then attached a brad. I realized it was hard to explain so I took a few pictures of the process.
This is what you'll need. A die cut of the pinwheel and a brad.
Insert the brad through the hole on the largest end.
Bring the other side up and insert the brad through the 2nd hole.
This is what it will look like finished. You can also use glue or a glue dot to keep the ends together instead of a brad if you'd like.
While I'm at it, I thought I'd share one more tip that I discovered. If your cutting plate is like mine, it has a lot of little cuts in it that show up as "scratches" on your die cut. In order to avoid getting those on your die cut, since with this technique you'll use both sides, cut through 2 pieces of paper at the same time. Put a scrap piece of paper down first on the plate with the scratches/cuts and then put your good piece of cardstock that you want to cut and use on top of that. Then, put your die cut on top of that. This will allow the bottom piece of scrap paper to get all the cuts in it and keep your good cardstock looking clean. (Hope that makes sense, if not, I can take pictures of the process.) In the photo above, the 1st die cut was cut directly on the cutting plate and the 2nd photo shows how it turned out with a scrap piece underneath it.
I have one more card to share using a similar technique but with a slightly different leaf look. I told you this was a very heavy photo post! :)
Isn't that a cute set of leaves? For this one, I started at the long end of the pinwheel die and just started rolling, much like you would if you were creating a rolled flower. When I got to the end I used a little bit of hot glue to adhere the felt leaf in place.
I couldn't decide if I liked it rolled tighter or more loosely so I used both types on this flower to make them unique. From these shots you can see the side and inside of the leaves. Isn't that fun?
To create the flower, I took a strip of fabric, cut it about 1" in diameter and twisted it. Then, I started rolling it from the center to create the flower shape and tucked the end of the fabric at the back of the flower. I've used these flowers to make pins and hair pieces. This could easily be used as a gift.
Well, I hope you enjoyed this LONG, very heavy photo post! I appreciate each of you that take the time to stop by! Have a wonderful day!
Supplies
Thank You Flower Card
Stamps: Lil' Inker Designs Sentiment Flags, PTI Polka Dot Basics
Ink: VersaMark, Turquoise Gem VersaMagic, Dark Chocolate PTI
Paper: White, Spring, Moss, Hawaiian Shores, Martha Stewart & My Mind's Eye
Other: Lil' Inker Designs Pinwheel Die & Sentiment Flags Die, PTI Mat Stack Die, Twinery Caribbean & Honeydew Twine, Ribbon, Pearls, PTI Impression Plate, White Pearls
Get Well Soon Card
Stamps: Lil' Inker Designs Sentiment Flags
Ink: Dark Chocolate PTI
Paper: White, Spring, Moss, Hawaiian Shores
Other: Lil' Inker Designs Pinwheel Die, Sizzix Embossing Folder, Fabric, Felt, Pearls, Fiskars border punch


Very cute cards! I love the color combos!
ReplyDeleteYou are so darn clever, Jen! What a great way to get more out of your dies, and so cute, too.
ReplyDeleteGORGEOUS jen! I looove that flower and your leaves are so fun. Great card!
ReplyDeleteThis is so creative and I love all the step by step pics Jen! You probably just sold a whole bunch of those dies. They should pay you commission. I love that rolled flower on the second card too. Great post today.
ReplyDeleteOk.....you said a new way. Well, LOVE it! That rolled fabric flower is just beautiful Jen! Love those soft muted colors!
ReplyDeleteSo cute! I love the way it looks with the fabric rosette! Awesome job thinking out of the box!
ReplyDeleteWow, those are great. don't you love when you come up with another way of using something like this.
ReplyDeleteTFS
Ang
GASP! I love it! Brilliant idea!
ReplyDeleteJen, I hope you're sending the cool weather to Cincinnati! I love your card...and the tips are fabulous! I needed that tip for the cutting plates! They get creased so quickly!
ReplyDeleteLOVE this idea Jen and of course you brought it to life beautifully!!! Love the colors Jen~~ totally fabby!!!
ReplyDeleteOh my gosh, Jen! Fantastic cards and so creative. Now you have me looking at that die.....
ReplyDeleteSo cute, what a clever use of that die! I also love the varied polka dot strip background.
ReplyDeleteGorgeous! What a cool idea with the 3D leaves.
ReplyDelete