Home

Friday, April 27, 2012

The Twinery & SRM Stickers!

Welcome to a special day!  Today designers of The Twinery and SRM Stickers are teaming up to showcase projects using products from both companies!  Be sure to visit The Twinery's blog for a full list of participating blogs (be sure to check out the post from Thursday as well for the other half of the designers blogs)!

I received some wonderful stickers and clear tubes from SRM to play with!  They were great to play with and it was my first time using them!  I made two separate projects for today's post.  This post is fairly picture heavy, so I'm going to keep my descriptions to a minimum.


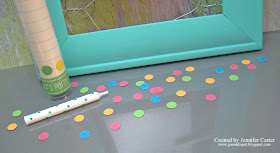
The first theme I went with was a party invitation.   The idea of this is that the invite, the candle and the confetti is all included in the tube and is given as an invite to a party!


The tube is decorated with the "We've Got Your Border - Birthday" stickers from SRM on the bottom.  I love how the stickers are clear and such cute colors too!  They easily wrapped around the tube. 


I made a party hat and used four colors of The Twinery's twine to make a pom pom.  The colors I used are Peapod, Lemondrop, Caribbean and Pink Sorbet.


I created this invitation on the back side of lined patterned paper (that you can see through the tube).  Once the party information is written on the invite, you roll it up and place it inside the tube.


The candle and confetti is also inside the tube so when the recipient opens it it is a little surprise.  What a fun way to get a birthday party invite!  I know my kids would LOVE it!

For my last project I went in a totally different direction and created a "flower bunch" thank you.


The tube is decorated with tulle and twine to resemble a flower.


The card is made out of clear cardstock (which made it a chore to try to get a good photo of, so I apologize for the glare!)  I used the SRM stickers from the "We've Got Your Border - Thanks", which work perfectly for a clear card base since they are also clear, to put together the inside of the frame and add some strips of coordinating twine as highlights.


I made a flower using a piece of circle felt and blanket stitches sewn with Peapod twine and then added a button as the flower center.  I really like how this turned out!


The inside of the card is very simple, also made with stickers from the the thanks border pack.

As always, there are prizes and this is a great one!  Now is your chance to win some baker's twine from The Twinery!


the prize will be 3 full spools | winner's choice of colors ($42 value)


To be eligible to win, you MUST leave a comment on each of the participating designers' blogs from The Twinery. A complete list of designers will be on The Twinery blog each day. Deadline to leave comments is 11:59 pm Sunday, April 29th. Don't forget to leave your e-mail address so we can contact you if you're the winner.

Thanks to SRM Stickers for providing the tubes and sticker collections for the designers to create with!  If you visit their blog, they are also giving away a fantastic prize so be sure to check it out!


Thank you so much for joining me today!! Be sure to stop by the rest of the designers blogs to be eligible for this great prize!

Tuesday, April 24, 2012

Hexagon Love + More Button Pendants

Hi everyone!! I am back today with a card that I made using hexagons!! I have no idea what it is about hexagons but I love them!  


The colors for this card were inspired by my Project Life kit.  I loved the box that some of the pieces are in and so I used that as a starting point for inspiration.  


What I really love about this stamp set is that there are 3 strips to make easy backgrounds that all coordinate together!  LOVE that!!  I stamped the largest hexagon in Hawaiian Shores ink, the next size in New Leaf ink and the inside solid hexagon with Berry Sorbet ink.  I have to say that I LOVE these new inks!  After I stamped the rows of hexagons I ran the whole piece through my Big Shot with the Moroccan Motifs Impression Plate.


I die cut the little flag from Lil' Inker Flags & Tags Die and then stamped my sentiment.   

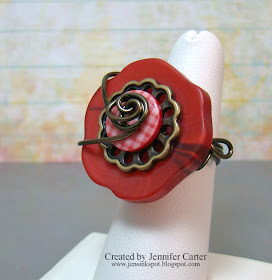
On another note, I updated my Etsy shop today to include FIVE new button pendants!  


I hope you like these!! Thanks for stopping by!


Supplies for Card
Stamps:  Rosie Posie & Pretty Peonies PTI
Paper: White
 Ink: PTI Hawaiian Shores, Berry Sorbet, New Leaf
Other: Moroccan Motifs Impression Plate PTI, Lil' Inker Designs Flag Die, Pop Dots, Corner Chomper

Wednesday, April 18, 2012

Twinery & Imaginisce Showcase

Welcome to The Twinery & Imaginisce blog hop!  I am so glad you stopped by!


If you are following along in the blog hop, you should have come from Tiffany Hood's blog!   If you would like to start at the beginning, visit The Twinery's blog for a full list of those participating each day!


There are some fabulous prizes too! 

SIX lucky winners will receive either...


'I Dream in Twine', The Twinery's full collection of all 18 colors

or


Imaginisce's 'Makin' Waves' Collection!

To be eligible to win visit each participating designer's blog each day of the hop & leave a comment by Sunday, April 22.


The paper kit that I used from Imaginisce was "Sole Sisters" and it is all about friendships and girl time!  I decided to go with a girl's night out party theme.


For the party theme, I created a card to send out as an invitation, some lollipop favors and a colorful little candy cup.


The paper kit, Sole Sisters, included lots of fun premade tags, chipboard shapes and diecuts so it was so fast & simple to create a card!  I used some coordinating trendy tape that I picked up at my local stores and attached the black & white houndstooth tag that was included with the kit.  I added a single strand of Twinery twine as a bow accent down the side.  I love how one tiny piece of the Twinery's twine adds such a pop to a card!

For the candy cup, I purchased a very inexpensive (50 cents on sale!) glass votive candle holder and filled it with colorful candy to match the theme.  I cut some red muslin in a circle and then rubber banded it to the top of the candle holder so it was easy to tie the twine & buttons in place.  I punched a circle with the cutest purse paper from the paper kit and attached it to the top of the muslin.  It made a super quick, super inexpensive party gift!


I also made some lollipops to serve as additional favors and to use as decoration.  I attached another one of the stickers from the kit onto a punched piece of coordinating cardstock and tied two different colors of twine.  Fast and simple!


Here is a side view so you can see how the lollipop looks from the side.


Thank you for visiting us on our hop today!! Be sure to visit The Twinery & Imaginisce's blogs tomorrow to continue on with more product showcasing from both companies!

Don't forget to leave a comment on each participating blog to be eligible to win one of the SIX prizes up for grabs!

Take care and thank you for visiting!

Saturday, April 14, 2012

Button Pendants Part 2

Hey everyone! Yesterday I posted that I had a new section in my Etsy shop, Jen's Ink Spot, with Button Pendants that have been HIGHLY requested for some time now!  I added a few more designs today and wanted to quickly share them with you.


Don't forget, I am currently having a special for 15% off ALL items in my Etsy shop with coupon code CELEBRATE.  I have quite a few button rings for sale as well, some are very new designs!  Be sure to check them all out!

Friday, April 13, 2012

Button Pendants are HERE!!

Hello!! I wanted to give you a quick update on what is brand new in my Etsy store, Jen's Ink Spot!! After many, many requests to have button pendants I have FINALLY taken the plunge and added a few to my Esty store!  You can find a new section of my store called Button Pendants with all the pendants currently available.

I have just began to experiment with these so I am sure that you will see new creations as I get more comfortable with putting these together, but these are the first five I've put together for my store.


I have also added some new rings to the shop as well! 


To celebrate the new section of my shop opening, I have created a coupon code good between now and Monday, April 16, 2012 for 15% off your purchase for my Etsy store

Coupon Code for 15% off all items in store:  CELEBRATE

Thanks for stopping by!  I hope you enjoy your weekend!

Tuesday, April 10, 2012

Hey everyone!  I hope everyone had a wonderful and blessed Easter! We had a great time with family and friends, a wonderful time of worship and now have way too much candy in the house! :) 

I am honored to be hosting the next Paper Dolls Challenge!  It is a 2-in-1 challenge! 


In honor of Spring the challenge I issued was to create a card or project that includes fruit on it somewhere AND is based on a sketch of your choice! I find that if I need a starting place when I am "stuck" on a card, the best thing to help me get going is to start with a sketch.   If you aren't sure where to find sketches, I've included a few of my favorite blog links at the end of this post where you can find sketches to use (of course there are many more to choose from)!

Here is the card I made featuring a strawberry image.


I know that this card has a little more going on in it that most of my cards but I wanted to change things up a bit.  I LOVE this patterned paper! 


That adorable strawberry image is from a Unity Stamps Itty Bitty collection.  I paper pieced the strawberry (YES!! I CUT it out! Astonishing I know!) and then used my white Signo gel pen to add the white dots.  The strawberry's top is popped up on pop dots.  The cute sentiment is one from the Lil' Inker Designs Flag Sentiments set and it is stamped on a flag die also from Lil' Inkers! 

I used a punch to punch a slot on the side of the card and then added some Blossom twine from The Twinery.


The sketch I chose to use (remember you can choose whatever sketch you'd like!) is from an "old" one, Sketch #22, on the Freshly Made Sketches blog.


If you are in need of some ideas for sketches, here are a few of my favorites:


Have fun! Be sure to link up your creation over at the Paper Dolls blog! You have a whole month!  Thanks for visiting!


Supplies:
Stamps:  Sentiment Flags by Lil' Inker Designs, Sweetest Day Itty Bitty by Unity
Paper: This & That Graceful by Echo Park; Sweet Blush, Ocean Tides, Rustic Cream by PTI
Die: Tag Sale Die PTI
Ink:  Aqua Mist & Dark Chocolate PTI
Twine:  Blossom from The Twinery
Other: Ribbon Hobby Lobby, Pop Dots, Slot Punch, White Signo Gel Pen

Friday, April 6, 2012

More Coffee Cozies!

Hello! I am back today with another card using the Lil' Inker Designs Coffee Cozy set!  I just love this set and find it to be so versatile!


For this card I kept the theme a little bit earthy.  I wanted a clean & simple design that highlighted the fun coffee image!   To incorporate an earthy feel, I used a piece of muslin to create the bow on the tag, a scrap piece of fabric and a piece of denim.
 

Have you tried cutting denim with your dies?  It works very well!  I used the coffee cozy die and my son's old pair of jeans to cut the cozy for this card.  It creates an unexpected element. I also took a piece of scrap fabric, twisted it and then rolled it to create the little flower accent that I glued on to it.   The steam was stamped in VersaMark.

If you haven't picked up your Coffee Cozy set yet, head on over to the Lil' Inker Designs store! There are so many fabulous dies and stamp sets there!