Home

Thursday, August 30, 2007

Christmas Stamp-a-Stack

You asked...I answered! Many of you have asked for it and we're finally going to do it! I will be hosting my first-ever Christmas Stamp-a-Stack.

It's never too early to start thinking about your Christmas cards!

If you would like to get a jump on the holidays, join me for a Christmas Stamp-a-Stack on Saturday, October 13th at 9:30 am. We'll make 16 Christmas-themed cards in 4 different designs.

Cost will be $19 (cost includes 16 cards plus stamped envelopes). Please bring your own adhesive. This event will be in Inman at Tammie Miller’s home.

You must RSVP and pre-pay by Wednesday, October 3rd.

Envelopes are included with your stamped cards!

Please join me for the fun!

In case you saw this event advertised in my August newsletter, there has been a change in the date. It was brought to my attention that the original date that this was scheduled for will not work so we are going to try for Saturday, October 13th. As I mentioned above, Tammie Miller has graciously offered us the use of her home for this event! Thanks Tammie!!


**Cards pictured may not be the cards that we make that day**

Wednesday, August 15, 2007

Wax Paper Resist Tutorial

I tried a new technique last week that was so cool and so much fun and I thought that all of you might enjoy trying it too! Here is a slideshow tutorial that includes pictures of each step. If you would like to slow the tutorial down or view each slide individually, click on it and it will take you to my gallery where you can control the slideshow easier. (The first time you click on it, it should give you the controls to speed up or slow down the tutorial, the second click will take you to the gallery.) I have included the written instructions for each step below.


What you need:
Wax Paper (from your kitchen)
Glossy Cardstock
Brayer
Palette Inks or Kaleidacolor Ink
Hot Iron (with steam turned off)

1. Take two pieces of glossy cardstock (available through TAC you get 25 sheets for $4.95) cut to the size that you want them. I cut mine to card mat size which is 4 x 5 1/4 inches.

2. Take a piece of wax paper that is cut to the same size as your glossy cardstock and wrinkle it into a ball. Then, flatten it out again.

3. Heat your iron to a medium-high setting with the steam turned off. Sandwich your wax paper between the 2 pieces of glossy cardstock so that the glossy side of each piece of cardstock FACES the wax paper.

4. Take your iron and gently press it onto the sandwiched layers of cardstock and wax paper for a few seconds. Be sure that you iron over the entire piece of cardstock so that the wax transfers to the entire piece.

5. Take your brayer (also available through TAC for $12.95) and load it with ink. For this first card I used TAC Bordeaux Palette Ink. Make sure that the entire brayer is full of ink and you do this just by continuing to roll the brayer on your ink pad until you've covered the entire thing.

6. Now roll your brayer over the glossy side of your cardstock. You will see the wax resisting the color.

7. This is what your paper will look like when it has been completely covered in ink.

8. Take a paper towel and wipe off the excess ink which will reveal more of the white wax pieces.

9. Embellish your card as desired!


It's really simple isn't it!! Here are some more cards that I came up with using this technique.

These next two use one piece of the cardstock that I had cut into a card mat size and I just cut that piece into two seperate pieces to make accent strips for these cards. The stripes on these cards were made by using the Kaleidecolor Ink pads which are a rainbow of colors. Doesn't that make a cool effect?
(Other Supplies Used: TAC Happy Celebration Level B Hostess Set, Souffle & Gelly Pens, Shimmer Chalks (used to highlight the words), Paper Piercer)

(Other Supplies: TAC Kid Praises Stamp, Watercolor Pencils, Dove Blender, Gray Tombow Marker, Winchester Eyelets, Crop-a-dile)

This next card uses a design by Risa that I really loved. The red background paper is the wax resist piece on this card and it is then stamped with the Salsa Flowers in Noir Palette Ink.

(Other Supplies: TAC Seeds of Blessing (Sentiment), TAC Salsa Flowers, Blue, Green & Yellow DCWV Cardstock, Sanding Block, VersaMark Ink, 2" Circle Punch, 2 1/2" Circle Punch, Matte Heritage Brads)
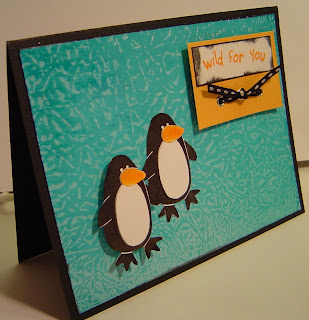
This is the last card that I made today using this technique. I thought that this one looked like water or ice so I put the cute little penguins from the TAC Wild for You stamp set on it. It's really a plain card but it's still cute. The penguins are also stamped on glossy cardstock and cut out. The beaks were stamped in orange and then cut out and glued onto the original black beaks. There are several eyelets on the sentiment piece that the ribbon is tied through also.
If you try this technique, I'd love to see what you come up with! Leave a link to your card in the comments section or send me an email with your card attached!

Happy stamping!!

Wednesday, August 8, 2007

Sets I'm Really Liking

The first set that I'm really liking is The Angel Company's "Everyday Events". There are some CUTE images in this set! This set covers birthday, wedding, friendships, thanks, Christmas, baby, etc... It has some of the most adorable images in it! These two cards (the fish and the chair) were made using that set. I used my Aquacolor crayons (my favorite medium for coloring) with a water brush to color both of the images on the cards. The sentiments are in the stamp set too and those can be mixed or matched!

This chair card layout was taken from a design that Gwen did. She does fabulous work and I loved the simplicity in her card. This is my version of her design. In real life this card has more coral in it than what the scan picked up but you get the idea. There are also lots of sparkly stickles on the flowering plant.

The next set that I am really liking is TAC's "Kid Praises". What a FUN set! I used to collect cows but that fad ran its course years ago but I still couldn't resist the cow in this set! He's so CUTE!! I used the "Circle Sampler" set (LOTS of options with this set!) to make the background using Brilliance Moonlight White ink (the BEST white ink!!) on the black cardstock. It just said cow spots to me! How easy and fun to make my own background! To color the cow I used Prismacolor H20 Pencils with a dove blender and then went around the entire image with a gray Tombow marker to add a shadow. Doing that really helps the image to stand out and it literally only takes seconds!

Both of these sets are fun, fun and can be used for many different occassions! I LOVE them! I'm sure that I'll share more sets that I'm really liking later, but for now, enjoy!

Monday, August 6, 2007

Paper Piercing is so much FUN!

I have really enjoyed using my new paper piercing tool that I purchased from TAC. It is a very inexpensive tool and it can add SO much to your project! If you pair this up with stamp sets in the catalog that have lots of dots, like the "Swirly Seasons" set, you have a match made in heaven!

Take this pumpkin card for example:


See all of those dots on the pumpkin? That is part of the stamp and I took my paper piercer and punched a hole everywhere there was a dot. This added visual interest to the card and even adds a little depth. It is much like the old "connecting the dots" game. Very simple to do too!

Here's another one using the same stamp set and the same technique.


What does the paper piercer look like? Here you go, just a simple tool! (And it's only $2.95!!)

And, just in case you were wondering what the stamp set that I used looked like, here's a picture of that too! It's only $19.95 for 12 stamps!


(Stamp images copyright of The Angel Company)

I love this set because there is an image for almost every holiday you can think of! Need a card for a teacher? Use the apple image! Need a Christmas card? Use the holly or the snowflake. Valentine's Day? No problem! Use the heart! What about a general event? Use the flourishes or the dragonfly! You can get a lot of use out of the images in this set!

I dare you to try it!!!

Thursday, August 2, 2007

Guest Designer...Laurie Willison

I want to welcome Laurie Willison as my very first Guest Designer on Jen's Ink Spot!

Laurie is a very talented artist who is fairly new to stamping--although you can't tell that by her work! I met Laurie several years ago when I was selling children's books and she hosted a catalog party. When she heard that I was now with The Angel Company she contacted me and told me that she was interested in having a party because she loved to scrapbook. Well, her love for scrapbooking has also become a love for rubber stamping. She has been quite successful selling her cards to her friends and coworkers and her enthusiasm for stamping is very contagious!
All of the cards in this post were created by Laurie. Enjoy (and be sure to leave her comments)!!
(Outside of card)(Inside of card)Here is a little that Laurie shared about herself:

"My name is Laurie. I have been scrapbooking all my life but seriously since 1997. In 2004, I had Rylee and that gave me lots of scrapbooking material! Now she won't hold still for the camera so I have more time for cards! I never started actually making cards until the end of 2006, when Jennifer introduced me to The Angel Company and now I am hooked! I make cards more than I scrapbook now! Although I still have alot to learn I love creating new things!

My favorite embellishment is probably ribbon! And brads and eyelets and stickles! I love anything that can make a card look like it is perfectly finished! I also love using my Quickutz and, of course, all my angel stamps! They are so much fun!"


The following card is one that Laurie made for my color combo challenge! Beautiful!!


I want to thank Laurie for agreeing to be my very first guest designer!! It's been fun for me to put this together and showcase her work! Great job Laurie!!